

The Mau-umae Trail (Pu’u Lanipo Trail) is one of my favorite hikes near Waikiki and leads you all the way up to the scenic Koolau Summit Trail. You can actually start this trail from your hotel in Waikiki as it is so close. The route is pretty adventurous with muddy slopes and some minor rope climbs. You won’t find too many others on this slightly overgrown trail. I combined this trail by looping up along the Koolau Summit Trail to Mount Olympus and coming back down via the Wa’ahila Trail.
In this blog post, I will share with you the directions, all of my photos from throughout the hike and some information on what to expect throughout the route.
MAU’UMAE TRAIL (PU’U LANIPO TRAIL) HIKE HIKE DETAILS
- Hike Distance: The total distance of the hike is 10km out and back (return trip) if you return from Pu’u Palikea. I turned the route into a loop visiting Mount Olympus and descending via the Wa’ahila Trail and the total distance was 12km.
- Hike Duration: The hike to Pu’u Palikea and back should take about 4-5 hours due to the muddy, slow-going terrain. If you do my route via Mount Olympus the route should be about 5-6 hours with plenty of drink stops and photo opportunities.
- Hike Difficulty: The Mau-umae Trail (Pu’u Lanipo Trail) is quite technical compared to a normal hiking route. While the path is relatively easy to follow you will encounter very uneven terrain with constant shuffling over tree roots and naturally formed clay stairs. Muddy embankments and slippery slopes require ropes at certain points to navigate. There is some basic rope climbing required but only to help you clamber up the muddy slopes. If you are in average athletic condition, reaching Pu’u Palikea will be an exciting and challenging route but easily achievable for most in decent hiking condition. Continuing on the Koolau Summit Trail to Mount Olympus and descending via the Wa’ahila Trail is another step up with overgrown sections and more exposed ridges.
- Hike Incline: 850 meters incline on the hike to Pu’u Palikea with the return trip or 1200m incline continuing on to Mount Olympus and descending via the Wa’ahila Trail.
- My Strava Map Upload: Mau-umae Sunrise Hike

HOW TO GET TO THE MAU’UMAE TRAIL (PU’U LANIPO TRAIL) TRAILHEAD
The trailhead is just 3.5 miles from the Diamond Head end of Waikiki. I caught an Uber here in the early morning for just $13. The trail starts in a local neighborhood and is a small alleyway next to a house and a fenced-off area. The trailhead is signposted and legal but because it is in a neighborhood, make sure you are very quiet and discreet to respect the local homeowners. I’ve attached an image below showing the trailhead and have also pinned the trailhead location on the map below.

MY EXPERIENCE HIKING THE MAU’UMAE TRAIL (PU’U LANIPO TRAIL)
After looking for a nice hiking option while staying in Waikiki, I came across this trail and decided to hike to the summit and then traverse across the Koolau Summit Trail (KST) to Mount Olympus and then descend back down into the suburbs via the Wa’ahila Trail. It’s a tough one to catch the sunrise on the KST with a couple of hours of ascending to be done so we set off on the trail at 5 am. Early but not early enough to summit for sunrise. We caught the golden glow during our climb up the ridge.
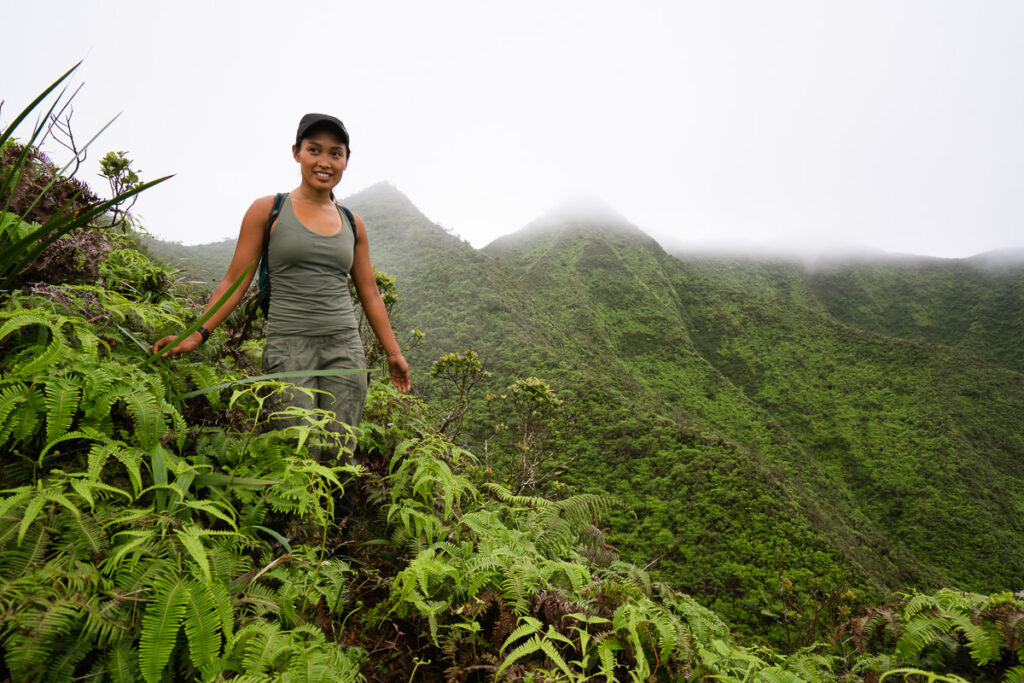
One of the main things to note about this trail is a make-or-break piece of information. You NEED to wear pants and gaiters. The undergrowth will scratch your legs a lot and wearing pants and gaiters made this an enjoyable hike rather than a battle. It’s a non-negotiable on this hike.
The trail begins with some undulations out of the suburbs and into the wild as you begin to get your first looks back towards Diamond Head Crater and Waikiki. The pink tones of the sunrise gave us a beautiful backdrop every time we stopped to turn around and enjoy the views. The rocky terrain and narrow trails mean this route is pretty slow-going so don’t expect a clear run to the top. Even early on, the bushes on either side of the trail are quite thick and we were glad to have our legs covered.


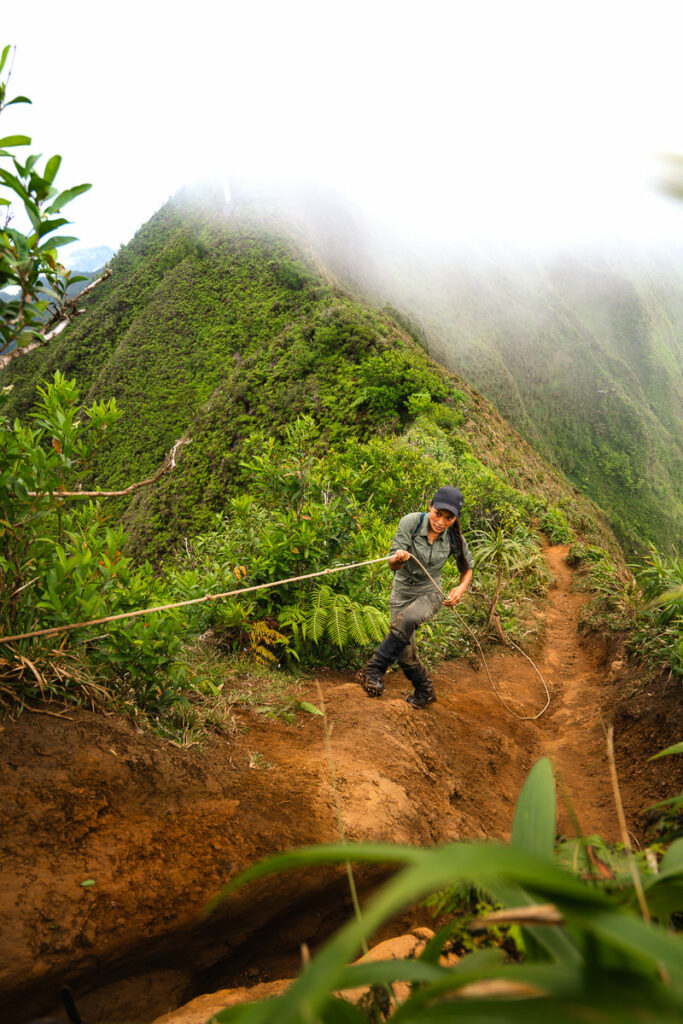
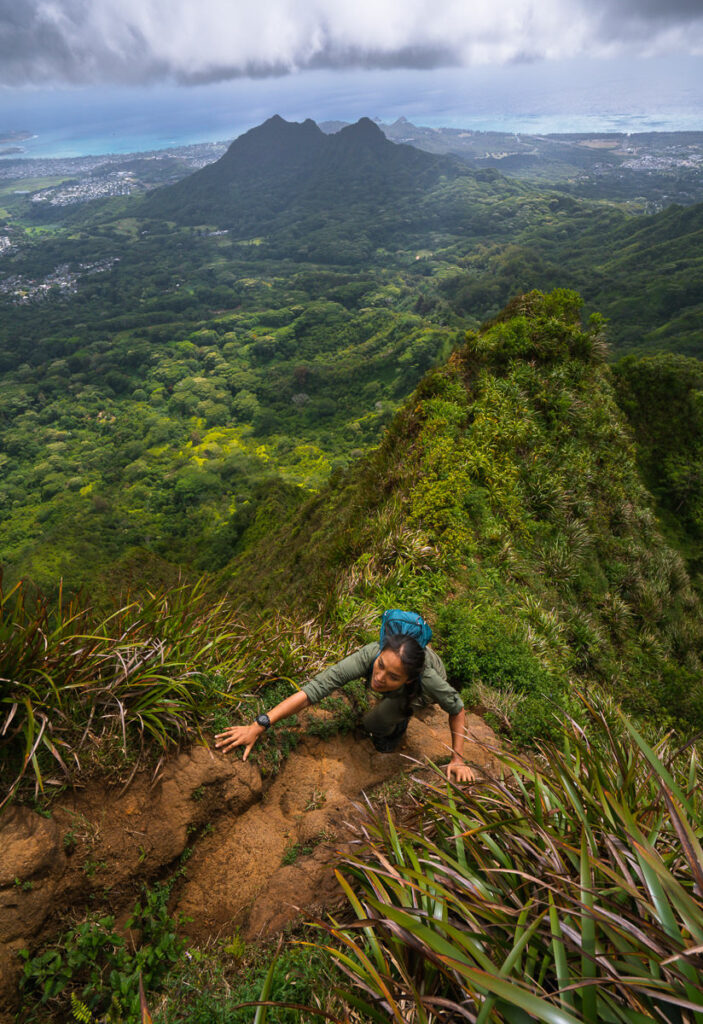
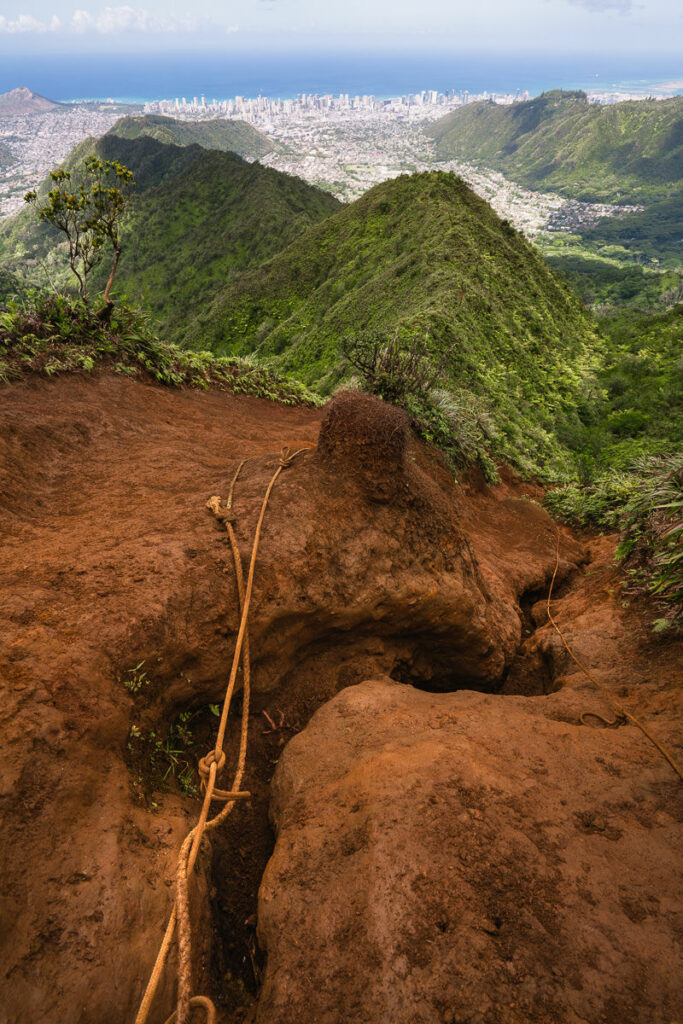
It’s only a 5-kilometer hike to the summit, which is known as Pu’u Palikea. However, due to the 700 meters of elevation, slippery slopes, and rocky terrain, this one will take you a little while. There are a few sections where you can use the assistance of the installed ropes, which are very helpful on a rainy day due to the slippery clay surface found all across the hiking trails of Oahu.


Oahu is a hiking paradise and it can be quite rare to complete an entire route and not see another person enjoying the trails. However, on our journey along the Mau-umae Trail (Pu’u Lanipo Trail), we didn’t see a single other hiker.


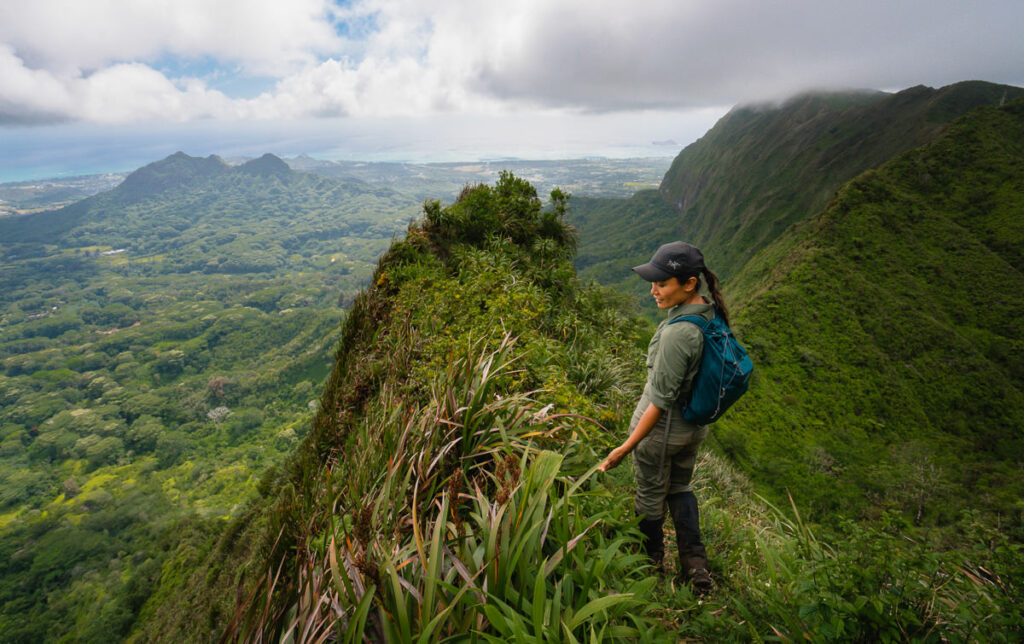
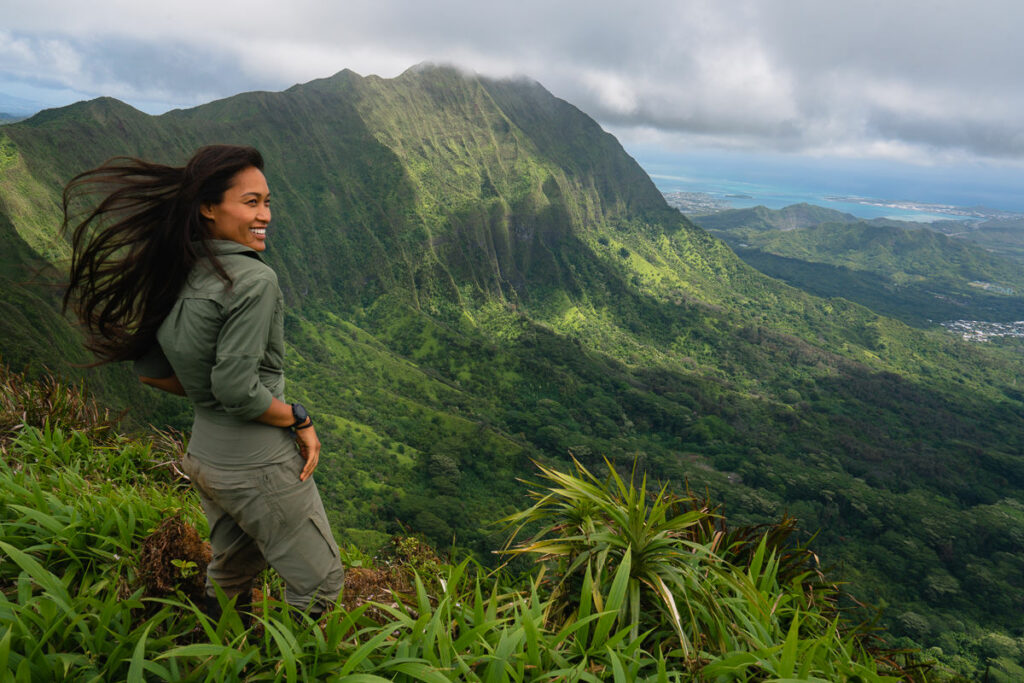
It’s pretty common to be engulfed in clouds when you reach the peaks along the KST on Oahu. This morning was no different. We put on our windbreaker jackets and sat down for breakfast and a rest at the Pu’u Palikea summit after two hours on the trail. Luckily, the clouds cleared for us just enough so that we could take in the views of the east coast of the island. The Olomana Trail ‘Three Peaks’ and Lanikai were clearly visible in the distance and we even had glimpses all the way to Chinaman’s Hat.


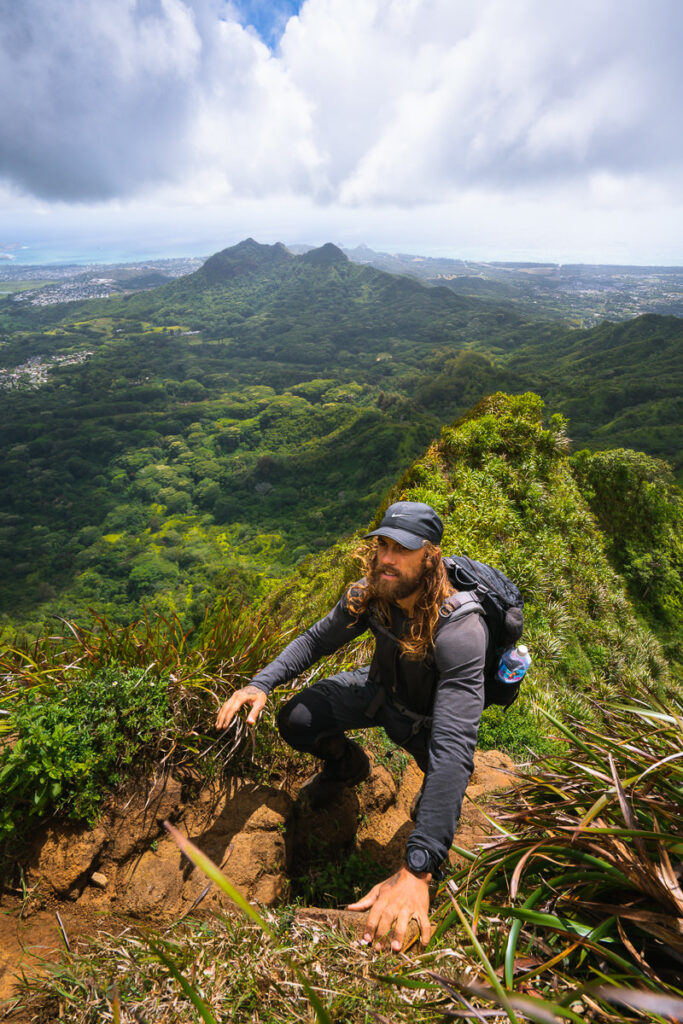
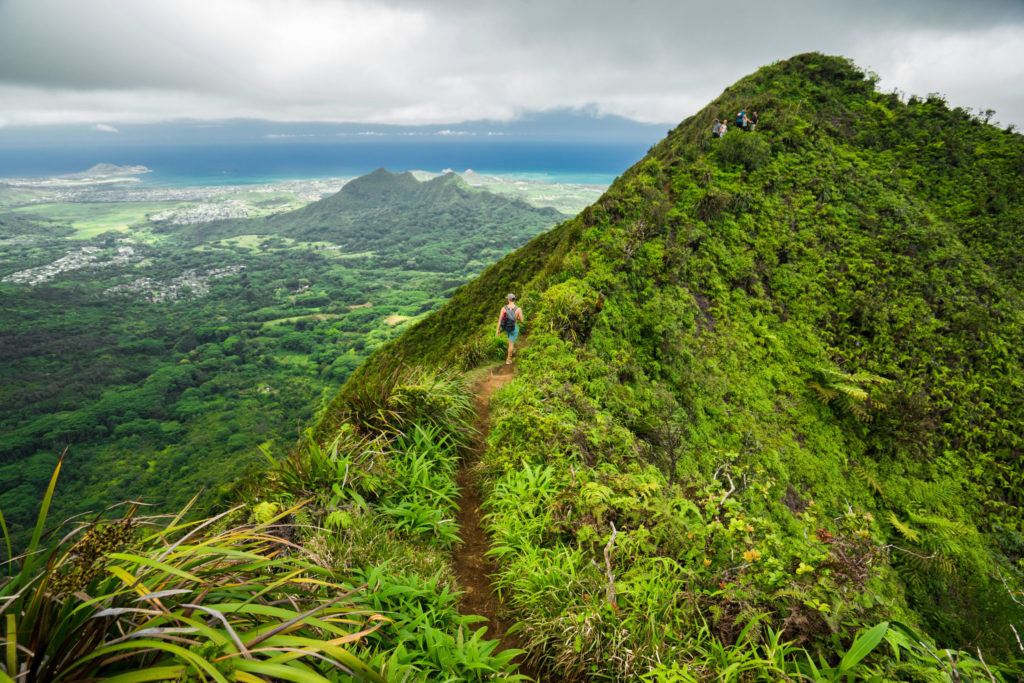
At this point, you have reached the Pu’u Palikea Summit and can simply return down the Mau-umae Trail (Pu’u Lanipo Trail) to complete the ten-kilometer out-and-back route. However, for a more adventurous route, we decided to head left along the KST towards Mount Olympus. This was probably my favorite part of the trek as we were able to traverse the narrow ridge-line with huge drop-offs towards the east. This section is only for experienced hikers but a very enjoyable section of trail. The wind picks up here and things intensify with muddy and overgrown sections of trail.

Even though the distance between Pu’u Palikea and Mount Olympus is just 1.6km, it took us 1.5 hours. We took a lot of photos but the trail is also very thick, as is common along the KST. It’s an incredible part of the trail and I highly recommend it if you are confident with narrow ridges, big drop-offs and have ample experience with such conditions.
We were again lucky enough to have clear views at Mount Olympus summit with views on one side of the eastern coast and the Koolau ridges and in the other direction, we could look down towards the south coast and spot Waikiki.
From Mount Olympus back to the Wa’ahila Recreation Park along the Wa’ahila Trail is just four kilometers. It should take about 1.5 hours due to the slippery terrain and minor rock scrambling along the way. It’s another beautiful section of trail and is a great out-and-back route in itself.

After reaching Wa’ahila Recreation Park we called an Uber for $15 back to Waikiki. Taking Uber allowed us to start and finish at alternate trailheads rather than having to do an out-and-back route, which I always avoid as much as possible to keep the hiking interesting.
I hope you enjoyed this guide to the Mau-umae Trail (Pu’u Lanipo Trail) and have good luck and good weather on your journey!
WHERE TO STAY ON OAHU
- Hilton Hawaiian Village Beach Resort (Overall Favorite): In the heart of Waikiki, this high-end resort is right on the beach with a private lagoon.
- Sheraton Waikiki (Luxury): A luxury resort with the most amazing infinity pool on the island, which overlooks the beach.
- Ewa Hotel Waikiki: (Value): Ewa Hotel is just one block back from the beach and is just over $150 USD.
- Waikiki Beachside Hostel (Budget Choice): A budget alternative, which is still in an amazing location.
- Disney Aulani Resort (Family Choice): This is a resort your kids will never forget. It honestly feels like you are living in a theme park.
MORE OAHU BLOG POSTS
I lived on Oahu for two years and loved adventuring from the beaches to the mountains to the waterfalls! These are my most popular blog post and guides from the beautiful island of Oahu to help you plan your trip!
- What to pack for Hawaii: THE HAWAII PACKING LIST: WHAT TO PACK
- A helpful guide to choosing accommodation: WHERE TO STAY ON OAHU
- Most epic hike on Oahu: THE STAIRWAY TO HEAVEN OAHU, HAWAII
- The best Waterfalls: AMAZING WATERFALLS ON OAHU, HAWAII
- Ultimate Cliff Jumping Guide: 11 BEST CLIFF JUMPING SPOTS ON OAHU
- Guide to Swimming with Sea Turtles: WHERE TO SEE TURTLES ON OAHU
- The best Waterfall Hikes: TOP WATERFALL HIKES ON OAHU
- Best Tours: 20 BEST TOURS ON OAHU
- The Ultimate Guide to Oahu: 80 AWESOME THINGS TO DO ON OAHU

Vivian Pham
Saturday 26th of June 2021
This is how our Hawaii trails get ruined when influencers post detailed directions on how to get these beautiful, sacred spots. These are not your places to promote your adventures to be overrun by visitors who don't know how to treat the land. Please consider taking this down. Your post of this is disrespectful to the native Hawaiians and their land.
Jackson
Sunday 27th of June 2021
Hey there, this is a regular trail found on All Trails with a GPX map and step-by-step guide on how to reach the route with hundreds of reviews.