
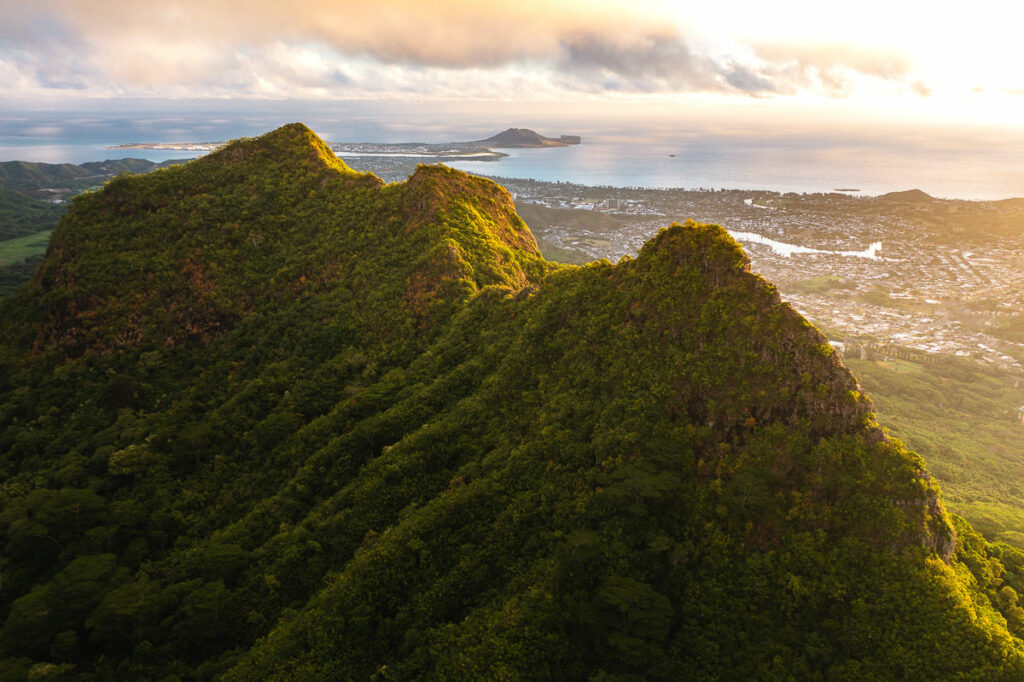
The Olomana Trail, also known as the ‘Three Peaks Hike’, on the east side of Oahu Hawaii is one of my favorite challenging hikes on the island. It’s quite technical with lots of bouldering, rope sections, and tree roots to navigate so your mind and body get quite the workout. Once you reach the first peak, the views along the ridge-line are incredible. I suggest heading up at sunrise or even before sunrise so you can watch the amazing colors in the sky over Lanikai Beach. On the backside, seeing the Koolau Mountain Range light up in the background with the ominous third peak in the foreground is one of the most spectacular hiking views on the island.
OLOMANA TRAIL THREE PEAKS HIKE
This trail can be dangerous and isn’t for everyone but in this blog post, I will give you all of the details about the Olomana Trail and what to expect.
OLOMANA TRAIL ‘THREE PEAKS’ HIKE DETAILS
- Hike Distance: The total distance of the hike is 7.1km (4.4 miles) out and back (return trip).
- Hike Duration: The hike to the third peak and back should take about three hours or just two hours if you decide to turn back at the second peak.
- Hike Difficulty: The Olomana Trail is quite technical compared to a normal hiking route. While the path is relatively easy to follow you will encounter very uneven terrain with constant shuffling over tree roots and naturally formed stairs. Muddy embankments and slippery slopes require ropes at certain points to navigate. There is some basic bouldering to be done on the way up to the first and second peak where ropes can be used and there is some limited exposure. If you are in average athletic condition, reaching the first and second peaks will be an exciting and challenging route but easily achievable.
- The journey from the second peak to the third peak is often left alone by many hikers due to the exposure on either side of the ridge and the small rope-assisted rock climbing sections. This final section to the third of the three peaks should only be attempted by those with experience on rocky scrambles, not afraid of heights, and good technical ability. It isn’t a rock climb or anything incredibly dangerous but those who are not 100% confident should leave the last peak alone as many hikers over the years have come into trouble and had fallen in this area. The good thing is that the views of the third peak from the second peak are the best on the trail, which is why many people call it a day at the second peak.
- Hike Incline: 600 meters incline on the hike to the third peak and back.
- My Strava Map Upload: 3 Peaks Hike
TOP 3 PLACES TO STAY ON OAHU


- Ultimate Luxury: Lotus Honolulu – Diamond Head View, Great Waikiki Location
- My Favorite: Aston Waikiki Beach – Best value in Waikiki & Great location
- Value Hotel Waikiki: Surfjack Hotel is easily the best value (luxury) hotel in Waikiki
HOW TO GET TO THE OLOMANA TRAIL ‘THREE PEAKS’ TRAILHEAD
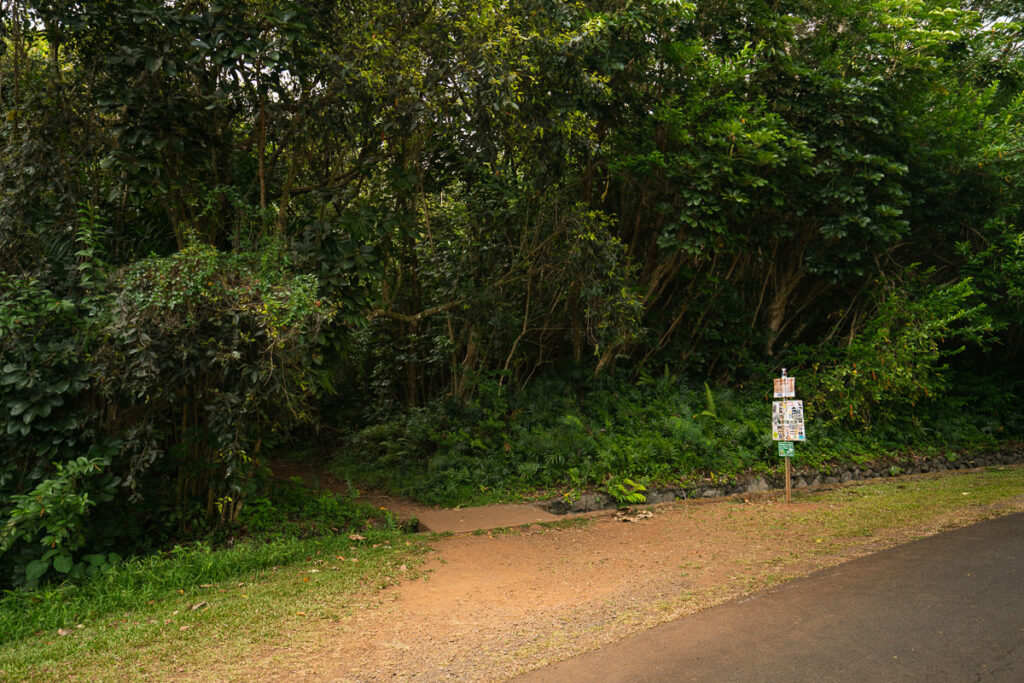
The Olomana Ridge Trailhead is on the east side of Oahu, Hawaii. It’s about a thirty-minute drive from Waikiki. The trailhead is actually within the driveway/property of the Olomana Golf Club and I’ve added the pin location to the map below. Don’t worry this hiking trail isn’t illegal like many on Oahu. You will need to park about half a mile away in any of one of the nearby neighborhoods and then walk to the trailhead. Make sure you park legally as many people unknowingly get ticketed for parking on unsigned sidewalks. Also, don’t leave anything in your car as thieves target tourists with break-ins while they are off enjoying their hike. The images below show the entrance to the golf course and then the small sign that indicates the turn-off for the trail.

BEST RENTAL CAR COMPANY IN HAWAII

When you book your Hawaii Rental Car online, I personally recommend and always use Discover Cars. They search for both local and international companies, so you get the best deal!
MY EXPERIENCE ON THE OLOMANA TRAIL ‘THREE PEAKS HIKE’
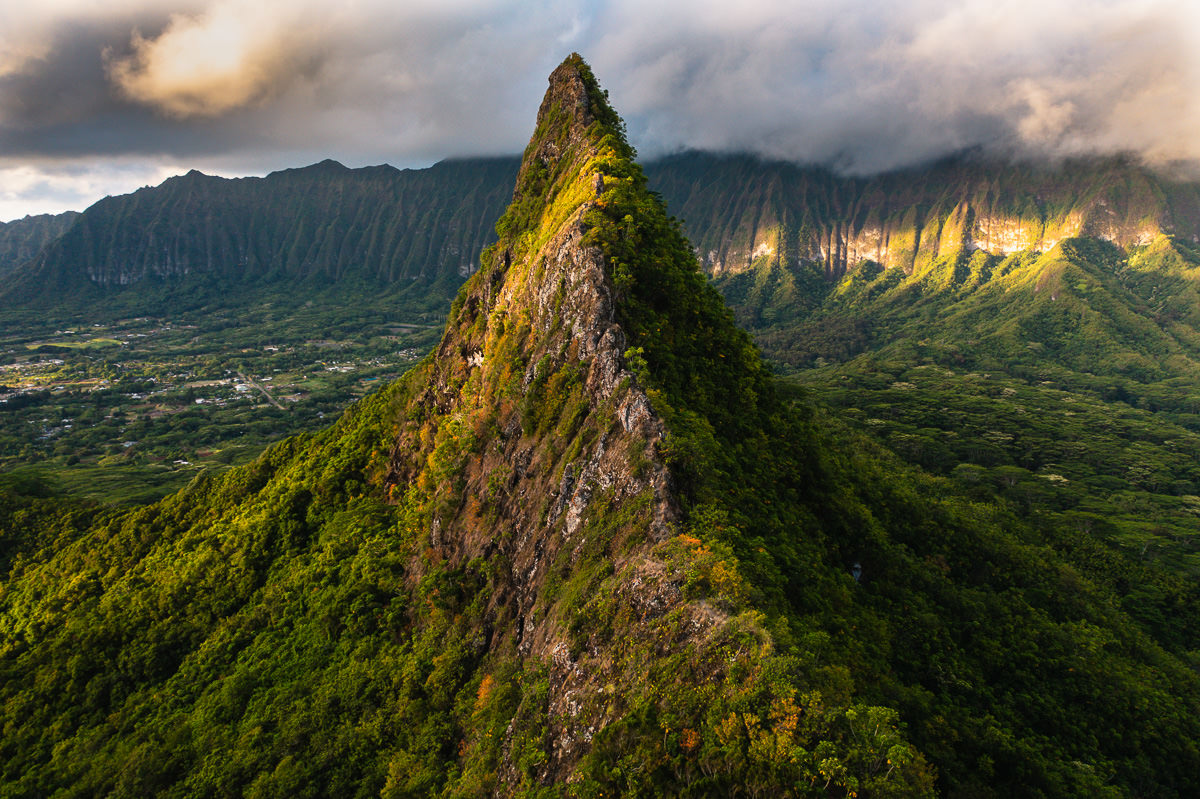
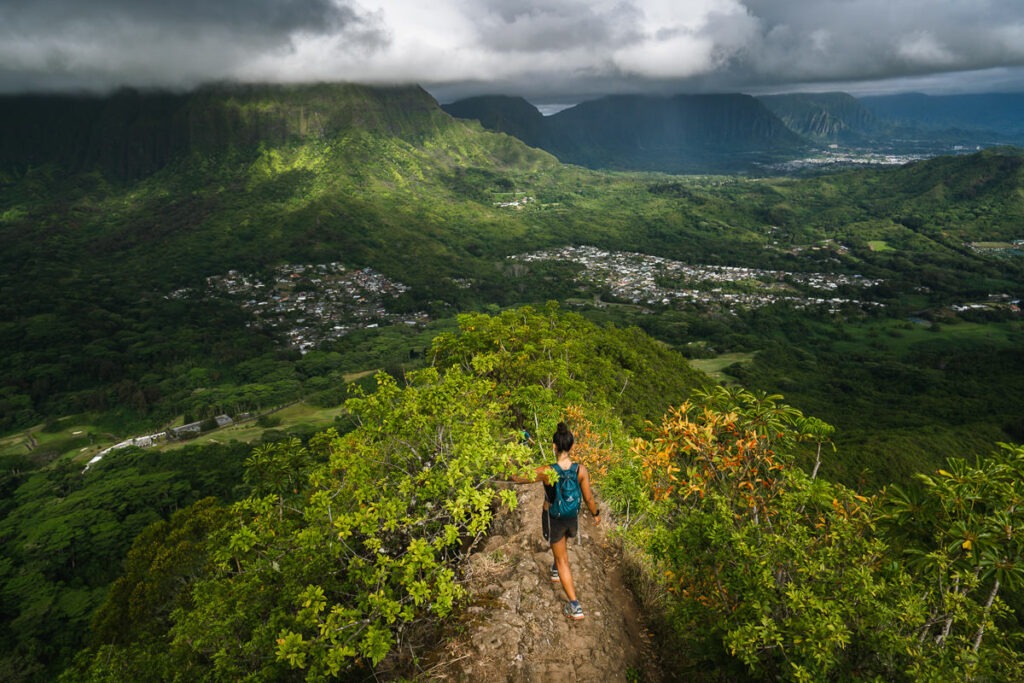
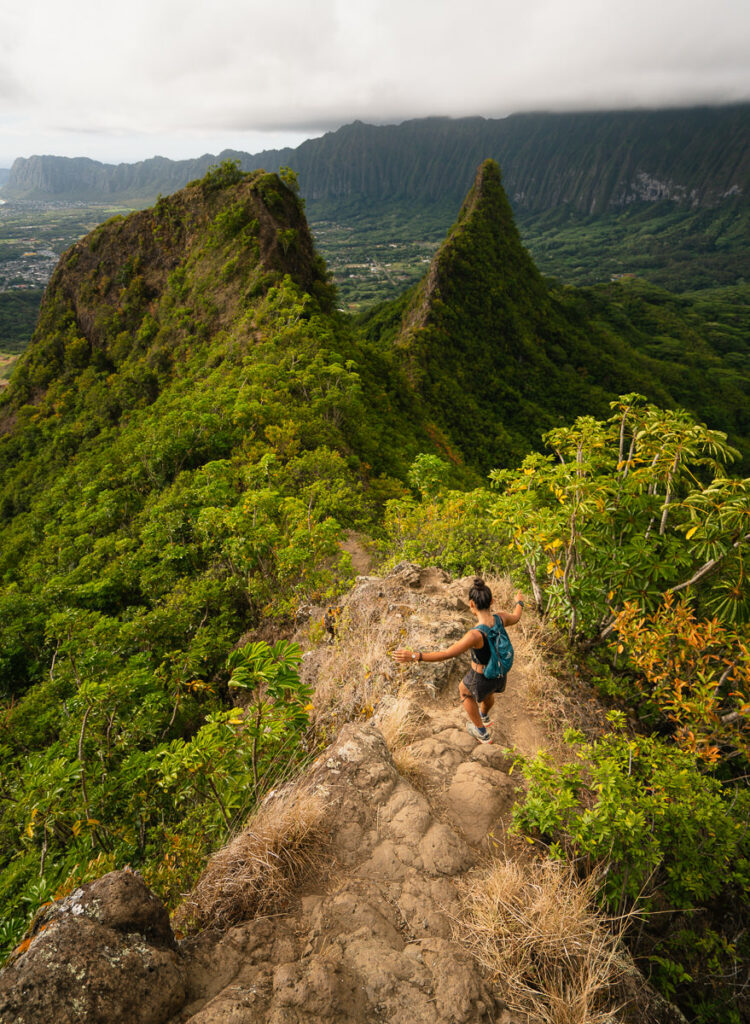
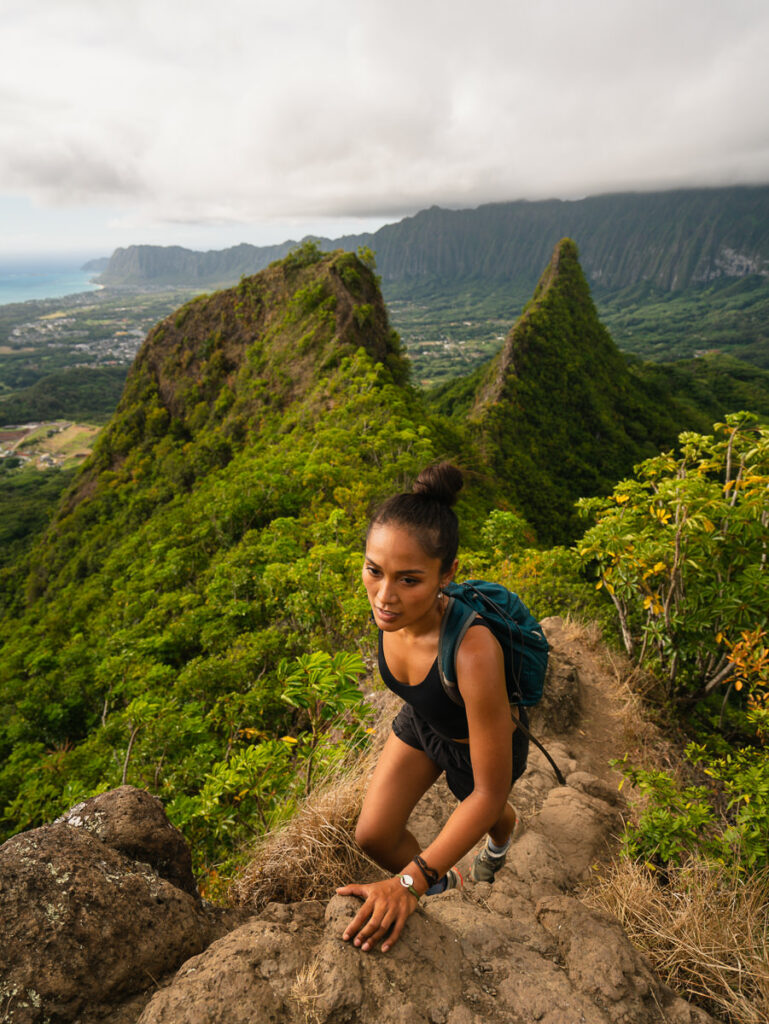
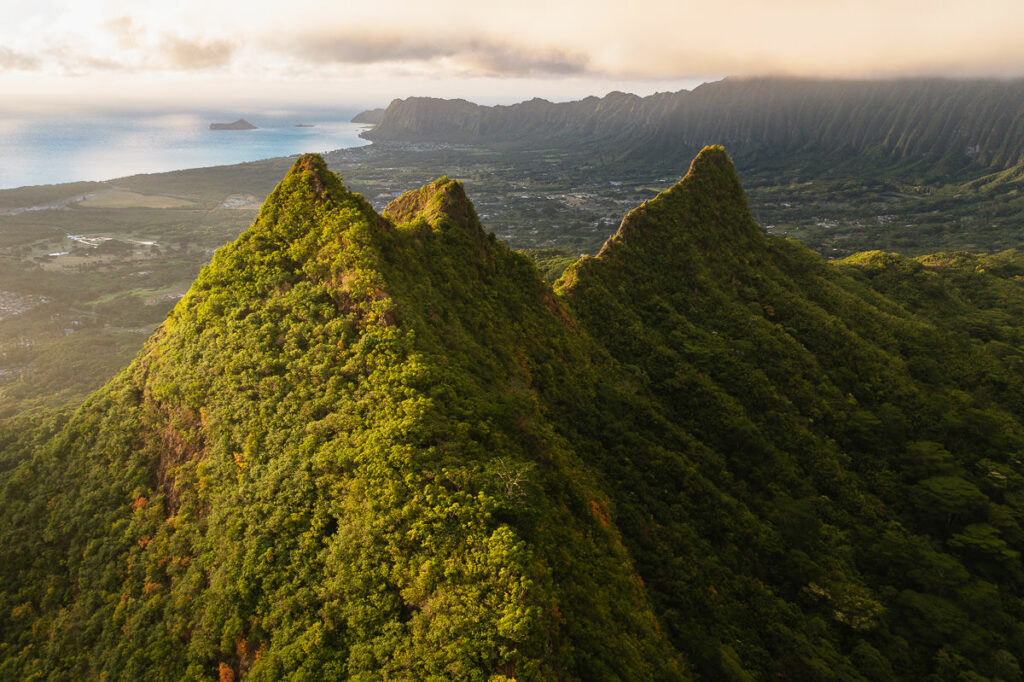
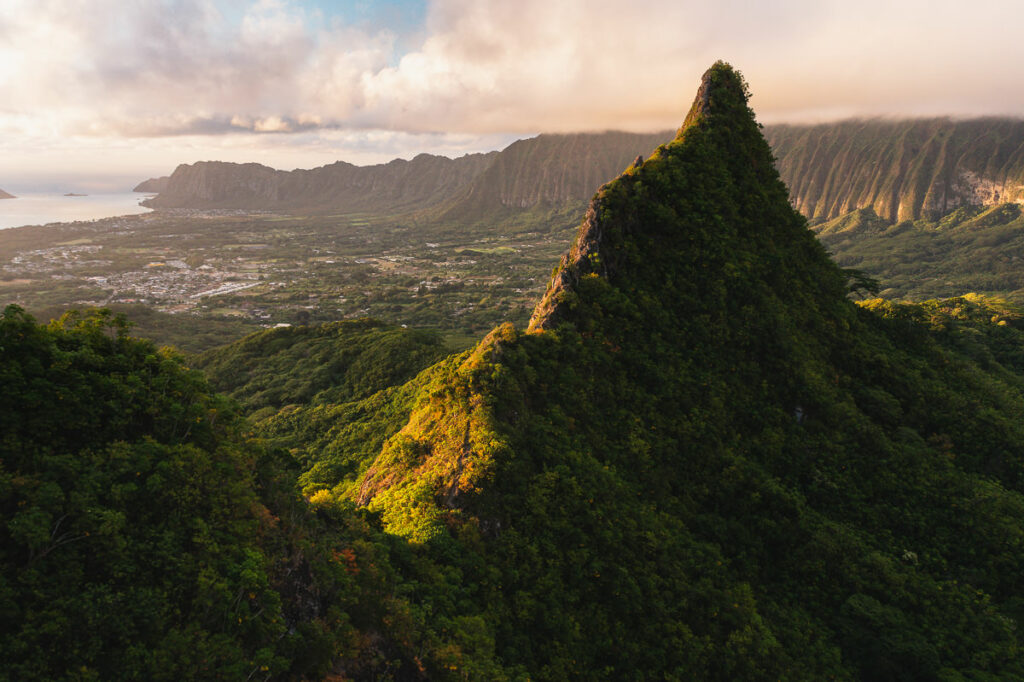
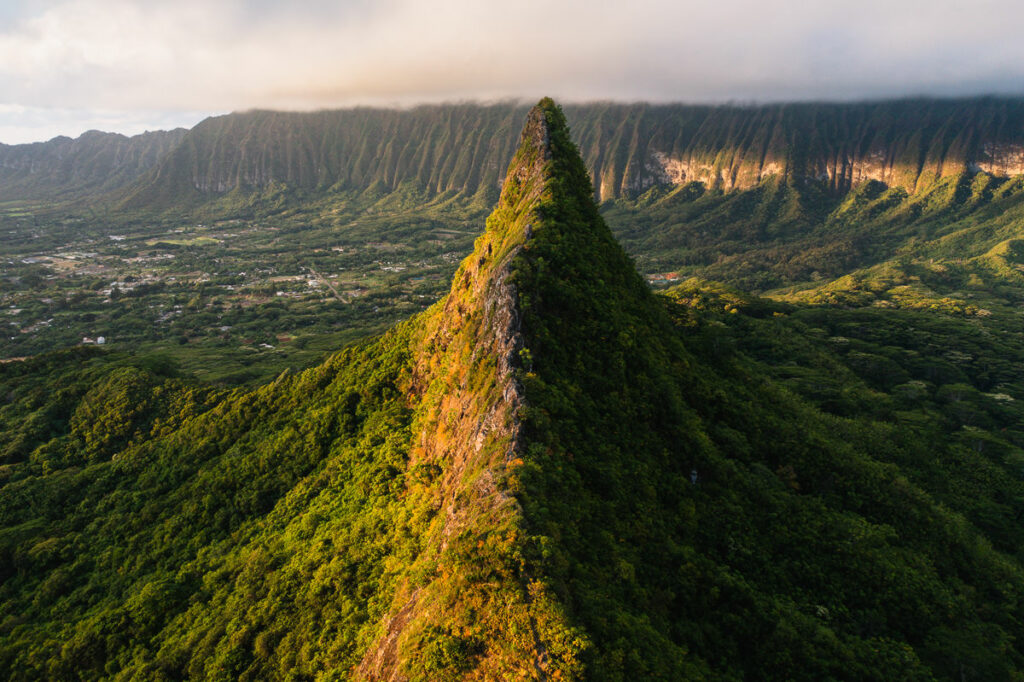
Three Peaks is one of the most distinguishable landmarks on the island. Whenever you are hiking anywhere along the Koolau Ridge, you can always peer down from the cliffs and spot the three sharp peaks in the valley below. The interesting part about the third peak is that from the second peak it looks like a precarious, vertical climb. However, from many other vantage points such as K1 or locations from the center of the island, you can see that it is the least sharp of all three ridges. It’s a comforting thought while you are hanging from the ropes on the third peak, but by no means is this an easy trail.
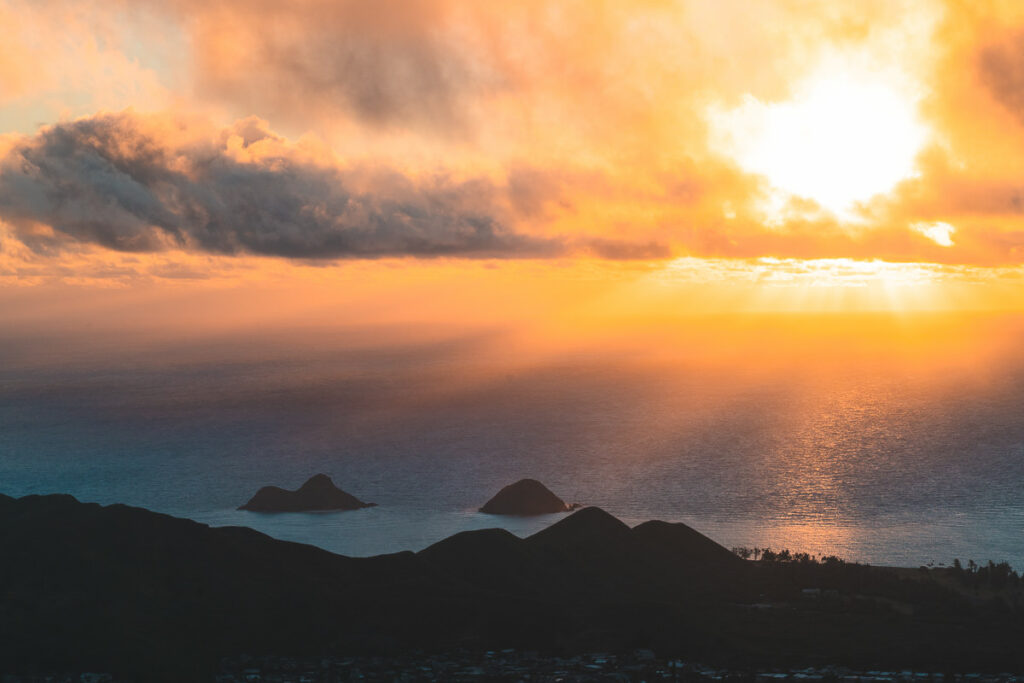
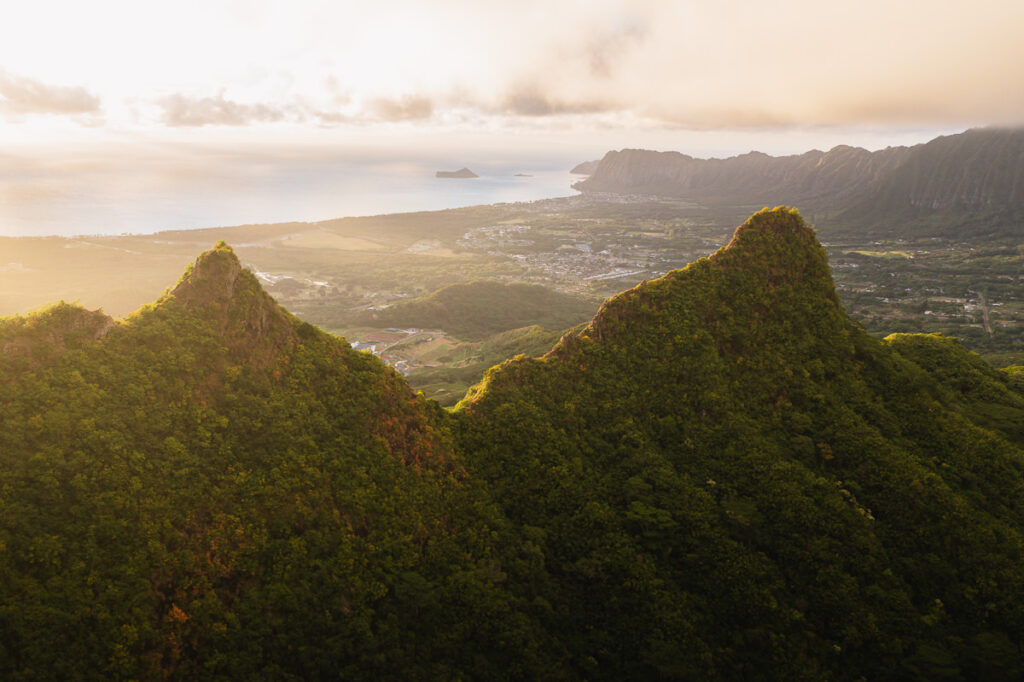
I decided to hike this one for sunrise as you can catch some pretty epic views of the east coast as the sun rises directly over the islets of Lanikai known as Na Mokulua. You will need a headlamp and strong motivation to be atop the peaks for sunrise. We left Waikiki at 3:20 am for a 4 am start up the trail.
We parked about 3/4 of a mile away in the nearby neighborhood and made our way to the start of the trail. It’s important to note the gate will be closed to the driveway if you go before sunrise but no one seems to mind if you slip around the side to begin your hike in the dark.
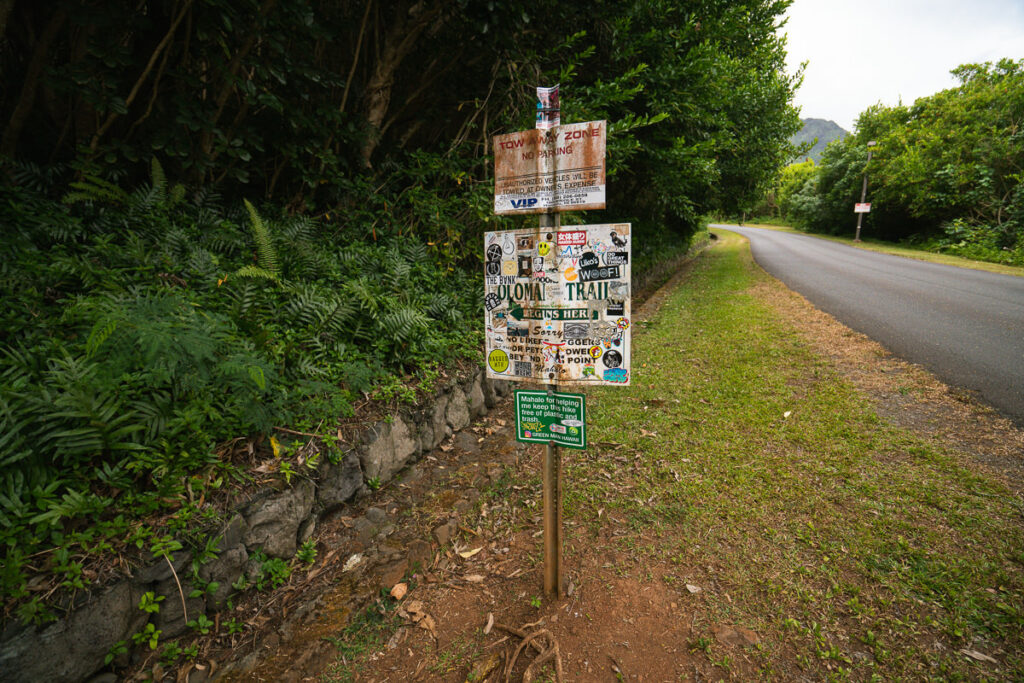
The trail shoots off to the right when you see the white ‘Olomana Trail’ sign covered in stickers. The route is pretty clear for most of the way but it won’t hurt to have the AllTrails map or my GPX I provided above plugged into your phone to double-check if you are ever uncertain.
The journey from the trailhead to the first peak is relatively steep with a few hundred meters of the incline leading you up and over tree roots and slippery, muddy mounds. The tropical heat can be steamy within the canopy of the forest so expect to reach the summit covered in sweat. All of the photos from the ascent were taken on the way down as it was obviously dark on our way up.

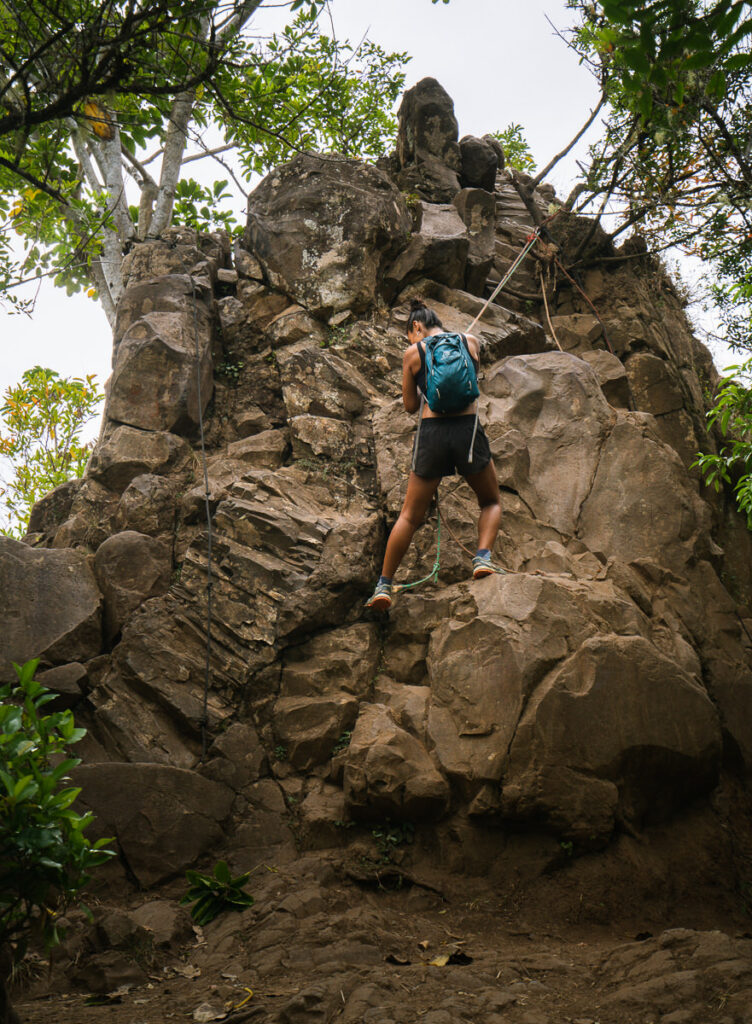
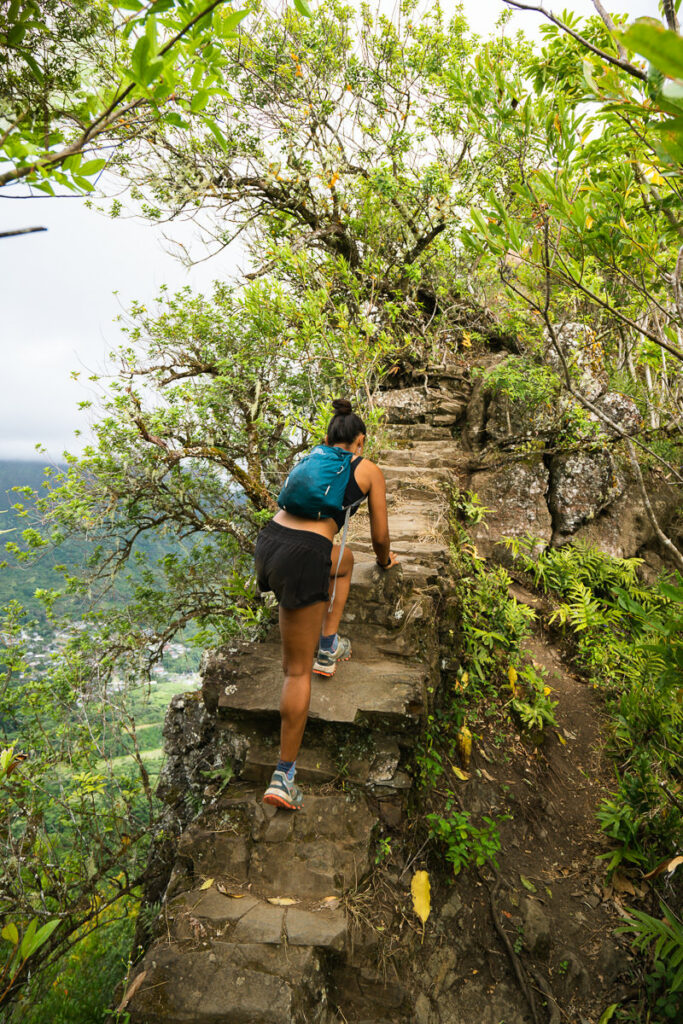
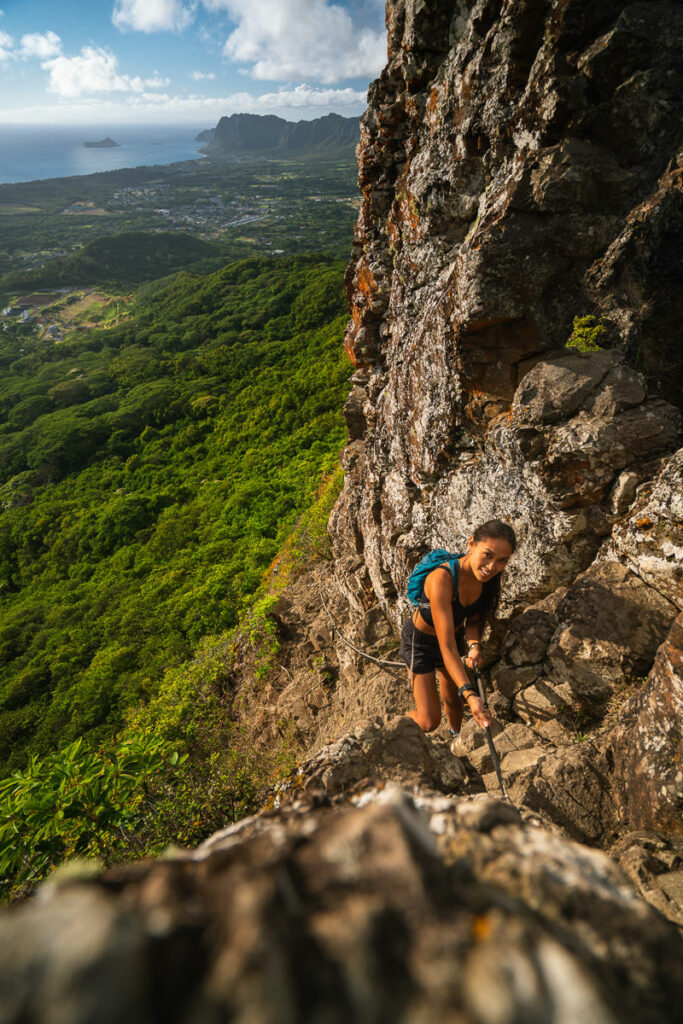
As you get close to the summit of the first peak you will have a small boulder problem to navigate. The ropes will help you climb up the rocky wall, which will be challenging for beginners but a piece of cake for this familiar with a bit of scrambling. Make sure to always check the ropes as these are installed by other hikers and you are climbing at your own risk.
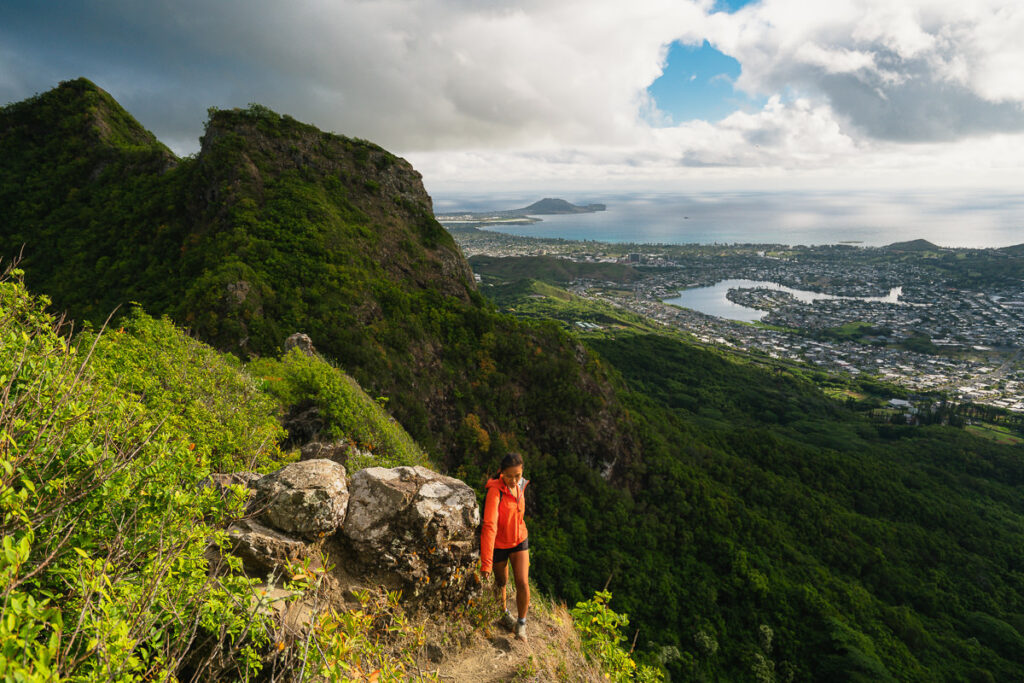
After the big boulder, you will emerge from the undergrowth and begin to catch some amazing views of the northeast coast of the island all the way down to Kualoa and Kaneohe. It’s a spectacularly lush part of the island where the Acacia Trees beneath the Koolau Ridges create the Jurassic Park vibes, which Hawaii is so famous for.
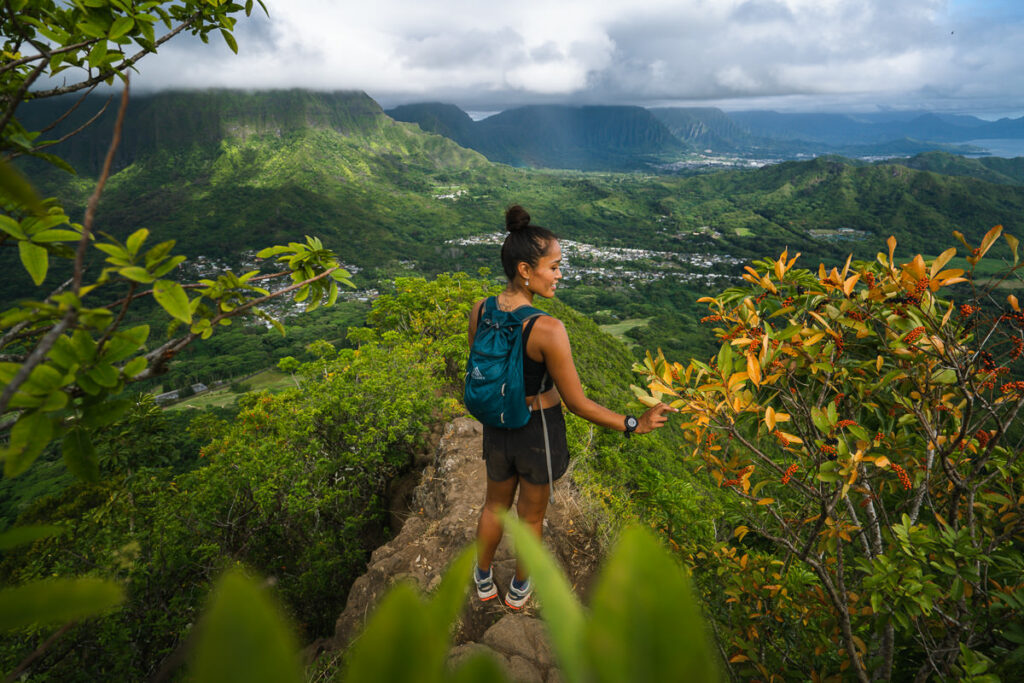
After about an hour or so you should reach the first peak, which is a sweet little platform with views in all directions. We chilled out here for a little bit but decided to carry on to peak two for our sunrise spot. It will only take you about 10-20 minutes to reach the second peak from the first peak with a small descent before a small ascent up the second peak. For those unsure of their climbing ability, you should still be comfortable reaching the second peak but after that, things intensify.
With about 20-minutes to spare, we arrived at the second peak to watch the sunrise unfold over the east coast. There’s often a fair bit of cloud cover over the interior of the island but a beautiful sunrise on the east coast is a pretty common occurrence. On this morning, it started to rain but by the time the sun rose, the rain had drifted off and we caught some beautiful rays pouring through the clouds to light up the sky.

As the sun broke through the clouds, the third peak lit up on one side creating a very dramatic view with the Koolau Ridge in the background. This view is beautiful but also a bit intimidating as the ridge looks very sharp due to this side-on angle. In reality, it isn’t quite as steep as it looks. These are a few drone shots from the golden hour, some of which actually show the true angle of the third peak.

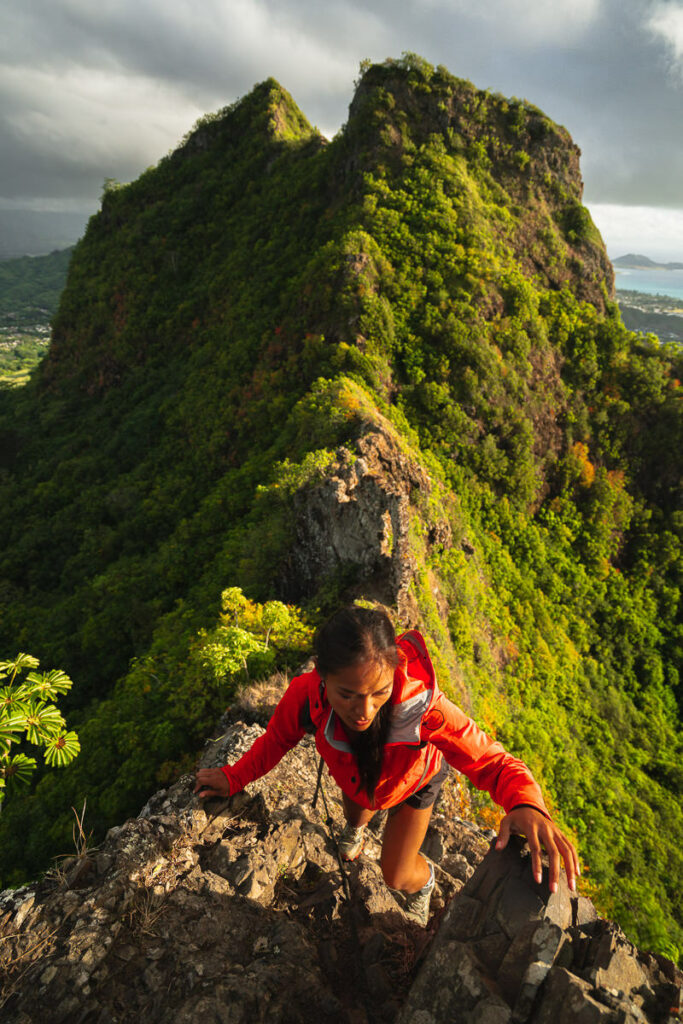
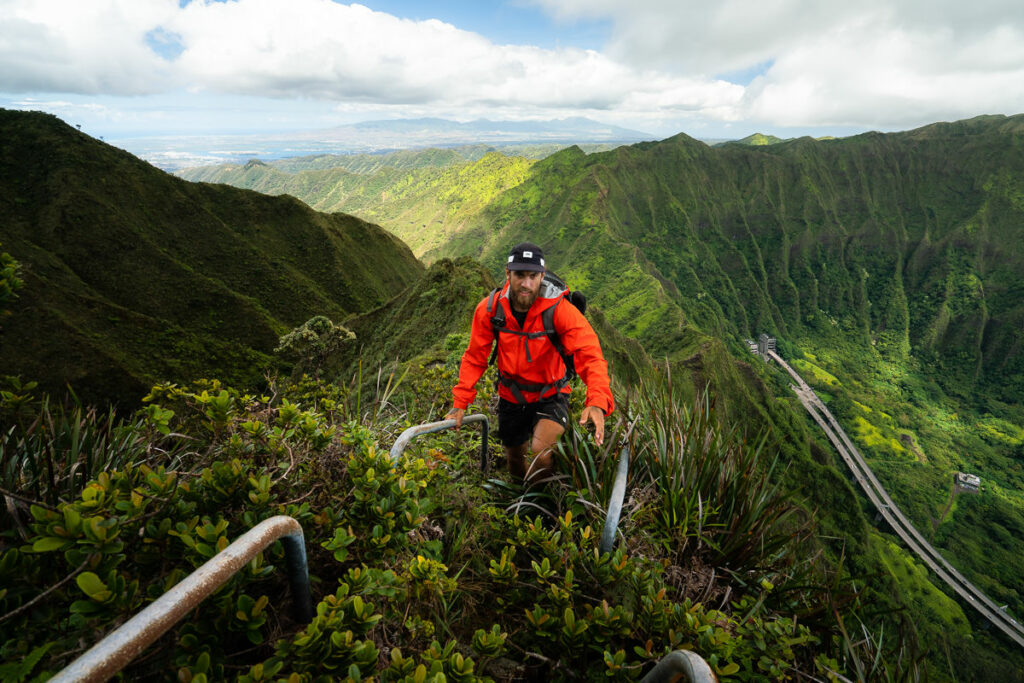
At this point, you are up on the second peak and enjoying the views. You can turn back and finish the hike there or continue on to the third peak. It’s not quite as crazy as it looks but you will have to do some scrambling, minor rope climbing and there is exposure on narrow ridges. I won’t dramatize it any more than it is but many who have limited experience hiking should probably turn back and only those confident on narrow ridge-hikes and steep rope sections should continue.
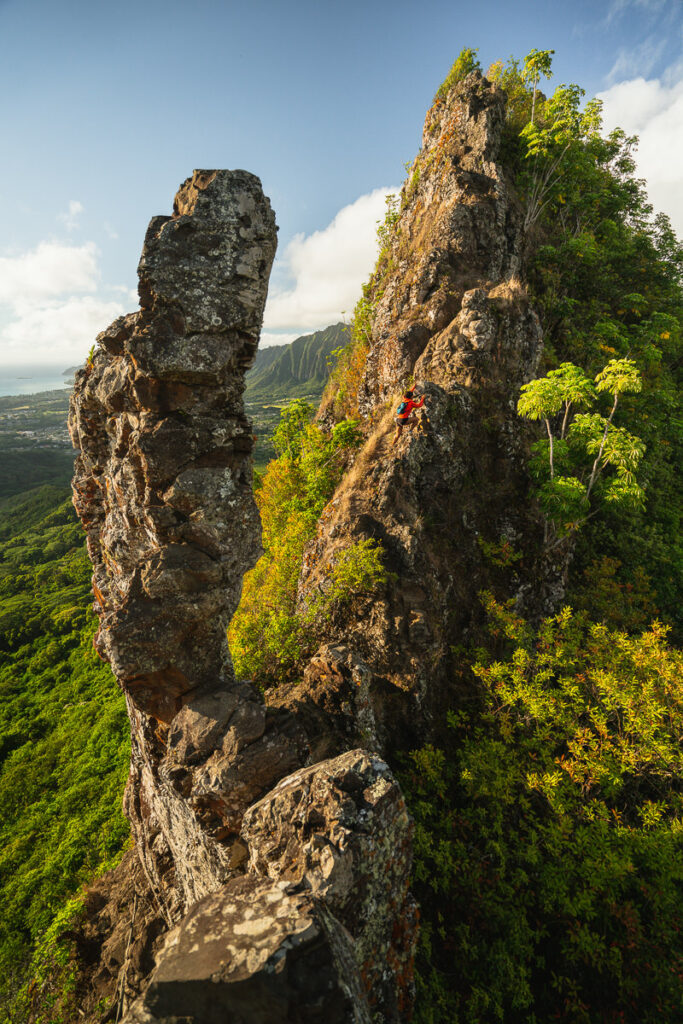
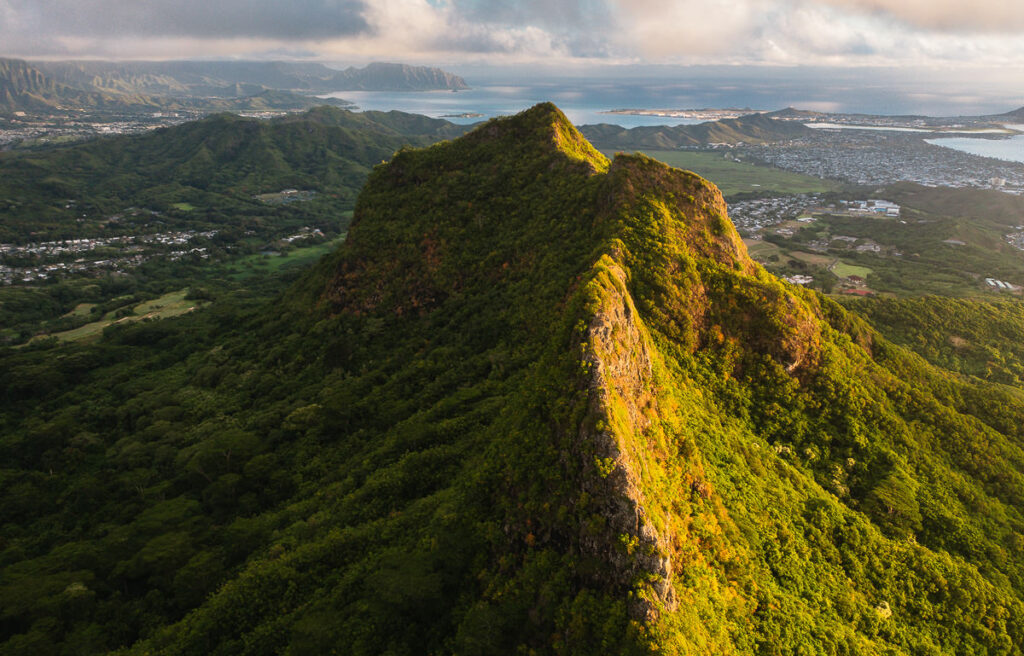
The drop-down from peak two is quite immediate and there’s a fair decline with ropes to begin the journey across to the third peak. This is one of the best spots to snap some photos of the peak as it juts out from the sea of green trees against the backdrop of the ridges.
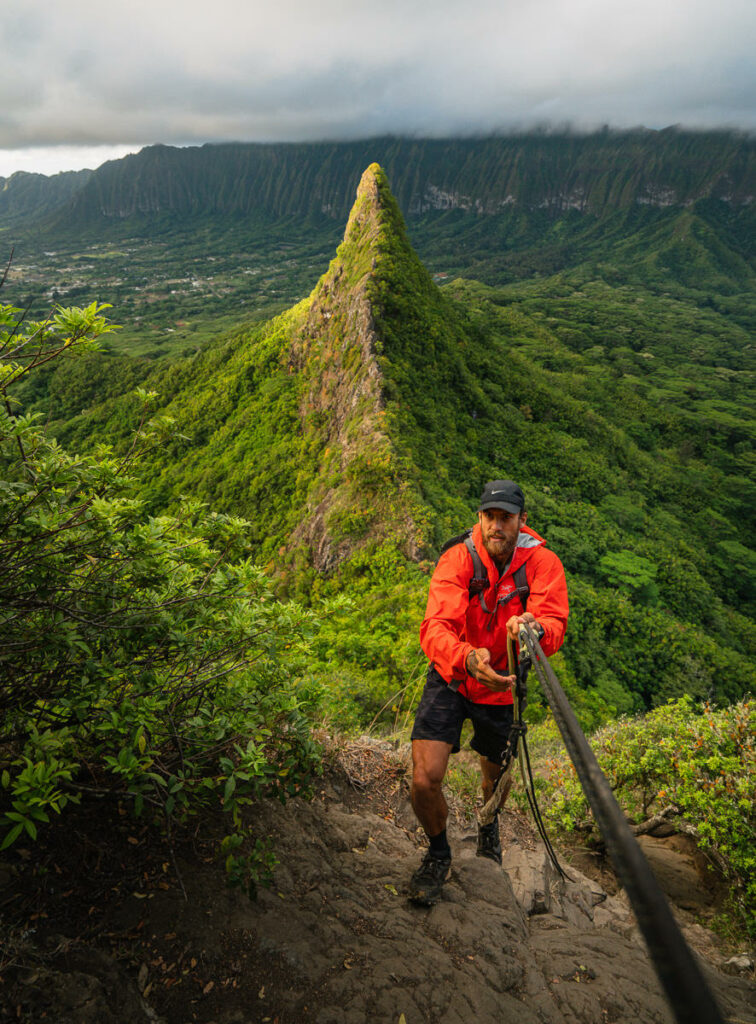

After the descent, you have a short moment to catch your breath before beginning the rocky climb up the third peak. There are two main sections to navigate. One of them is a large rock wall that you will edge around the side of with the help of ropes and the other is a narrow climbing section using a rope. This section requires focus and making sure of each step is important as there are loose rocks and slippery gravel on this climb.

Atop the summit, the views do not get any worse at all, although they don’t change much from peak two to peak three. I do suggest heading down the ‘backside’ of peak three ever so slightly for a nice viewpoint looking out towards the Koolau Range.

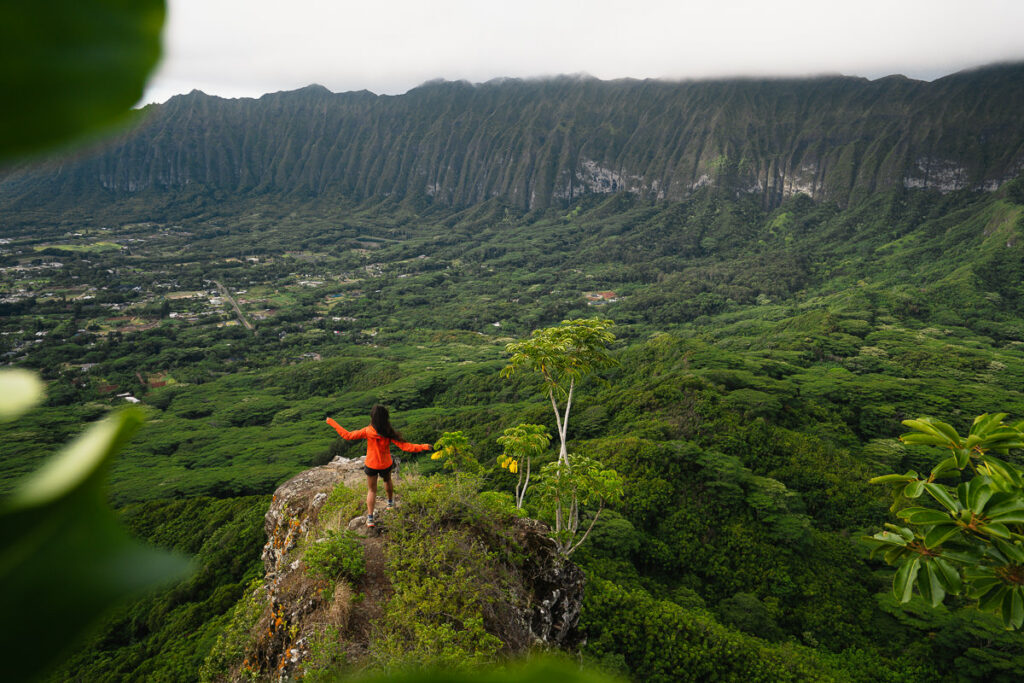
It is possible to continue on down the backside of the third peak known as ‘Reverse Olomana Trail’, but I’ve never done that way and it’s something for only very experienced hikers to attempt. That is the end of the hike and you now carefully retrace your steps all the way back to the second and first peak before descending to the trailhead.
I hope you enjoyed this guide to the Olomana Trail ‘Three Peaks’ and have good luck and good weather on your journey!
THE FOUR MOST POPULAR OAHU TOURS
- Doors-Off Oahu Helicopter Flight Tour: My number one recommendation is to do a heli-flight (doors off) and be blown away when you see Oahu from the air.
- North Shore Shark Cage Tour: The biggest adrenaline rush you can have in Hawaii is beneath the surface with sharks!
- Eco-Friendly Dolphin and Snorkel Tour: One of the best experiences I had on Oahu was swimming with the beautiful spinner dolphins on this exact tour.
- Turtle Canyon Snorkel Cruise by Catamaran: The number 1 MOST POPULAR snorkel tour on Oahu. GUARANTEED Turtles!
HAWAII HIKING PACKING LIST
Many people come unprepared for hiking on Oahu and that’s why there are so many rescues. Make sure you at least have the basics and you will be prepared for bad weather or any mishaps on the trail. A headlamp, rain jacket, and good hiking boots or shoes are the three main pieces of gear you need. Below are my four Hawaii hiking essentials.
- Arcteryx BETA AR Rain Jacket: This is my go-to rain jacket. It’s super light, folds down into a tiny ball, and protects brilliantly in a storm. This one never leaves my backpack.
- Salomon X Ultra 3 Mid GTX Hiking Boots: For the best ankle support, waterproofing, and durable exterior I’m a fan of tough but light hiking boots like these Salomons for my adventures.
- Black Diamond Head Torch: I can’t tell you how many times, I’ve arrived back from a hike unexpectedly late. I always keep this lightweight but strong headtorch in my bag for the unexpected.
- Darn Tough Socks: These are the most comfortable hiking socks I’ve ever worn and last for years. They also have a lifetime warranty and you just send them in with a hole and they replace it no questions asked.
WHERE TO STAY ON OAHU
- Hilton Hawaiian Village Beach Resort (Overall Favorite): In the heart of Waikiki, this high-end resort is right on the beach with a private lagoon.
- Sheraton Waikiki (Luxury): A luxury resort with the most amazing infinity pool on the island, which overlooks the beach.
- Ewa Hotel Waikiki: (Value): Ewa Hotel is just one block back from the beach and is just over $150 USD.
- Waikiki Beachside Hostel (Budget Choice): A budget alternative, which is still in an amazing location.
- Disney Aulani Resort (Family Choice): This is a resort your kids will never forget. It honestly feels like you are living in a theme park.
MORE OAHU BLOG POSTS
I lived on Oahu for two years and loved adventuring from the beaches to the mountains to the waterfalls! These are my most popular blog post and guides from the beautiful island of Oahu to help you plan your trip!
- What to pack for Hawaii: THE HAWAII PACKING LIST: WHAT TO PACK
- A helpful guide to choosing accommodation: WHERE TO STAY ON OAHU
- Most epic hike on Oahu: THE STAIRWAY TO HEAVEN OAHU, HAWAII
- The best Waterfalls: AMAZING WATERFALLS ON OAHU, HAWAII
- Ultimate Cliff Jumping Guide: 11 BEST CLIFF JUMPING SPOTS ON OAHU
- Guide to Swimming with Sea Turtles: WHERE TO SEE TURTLES ON OAHU
- The best Waterfall Hikes: TOP WATERFALL HIKES ON OAHU
- Best Tours: 20 BEST TOURS ON OAHU
- The Ultimate Guide to Oahu: 80 AWESOME THINGS TO DO ON OAHU
József
Friday 22nd of July 2022
Aloha! Thank you for sharing your story and your photos! It's very useful! I hiked on the trail in 2019, with my wife. We reached the second peak, began to slope to conquer the third one, but shortly we turned back. That was too difficult for my wife, but overall we really enjoyed this hike.
Paul M.
Monday 16th of May 2022
Great summary and lots of tips! Thanks so much. I have done the first peak and so glad to get advice for the rest. Mahalo
Martin
Wednesday 3rd of November 2021
The strava link goes to a hike in Tanzania!
Brent
Monday 14th of June 2021
Detailed, useful, and inspirational trail guide. Very informative details about gear and access to the trail. Thanks! Looks like a beautiful and interesting short Oahu hike.