
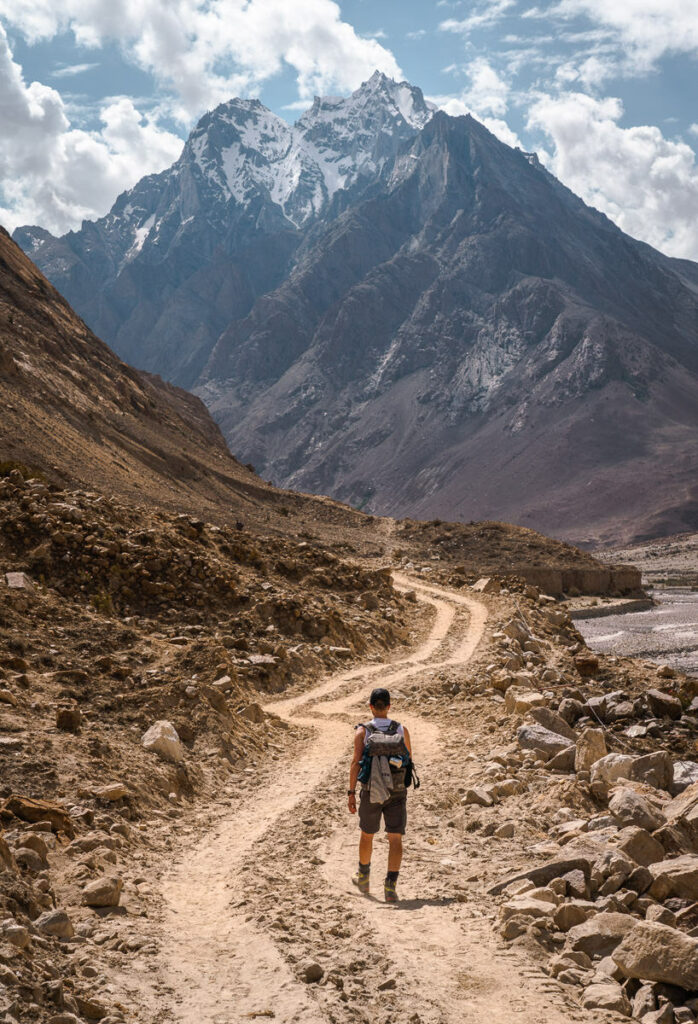
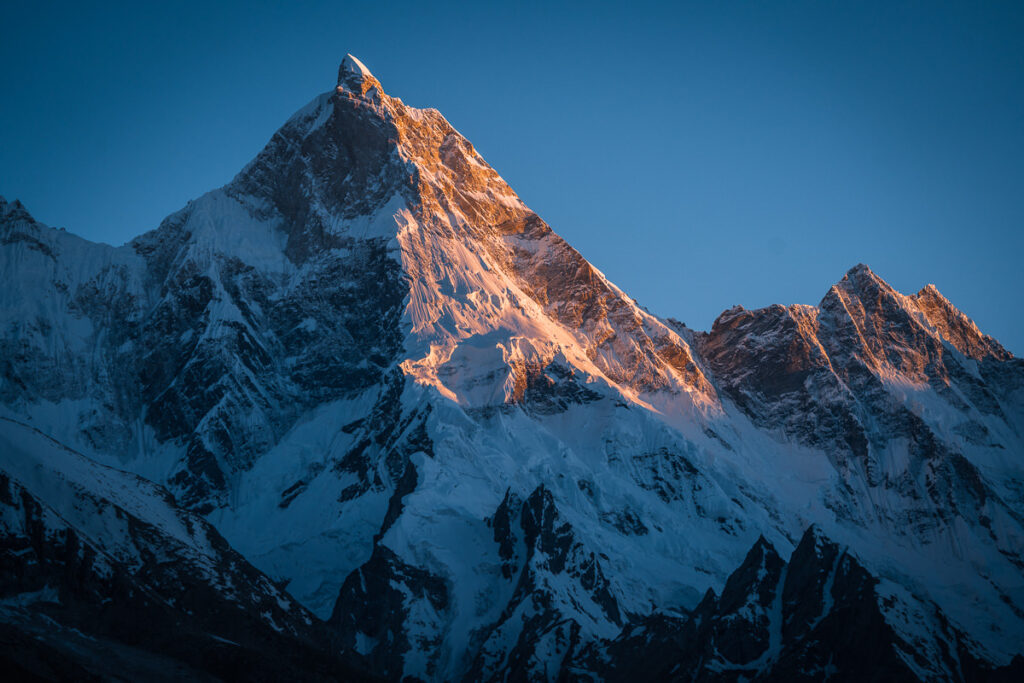
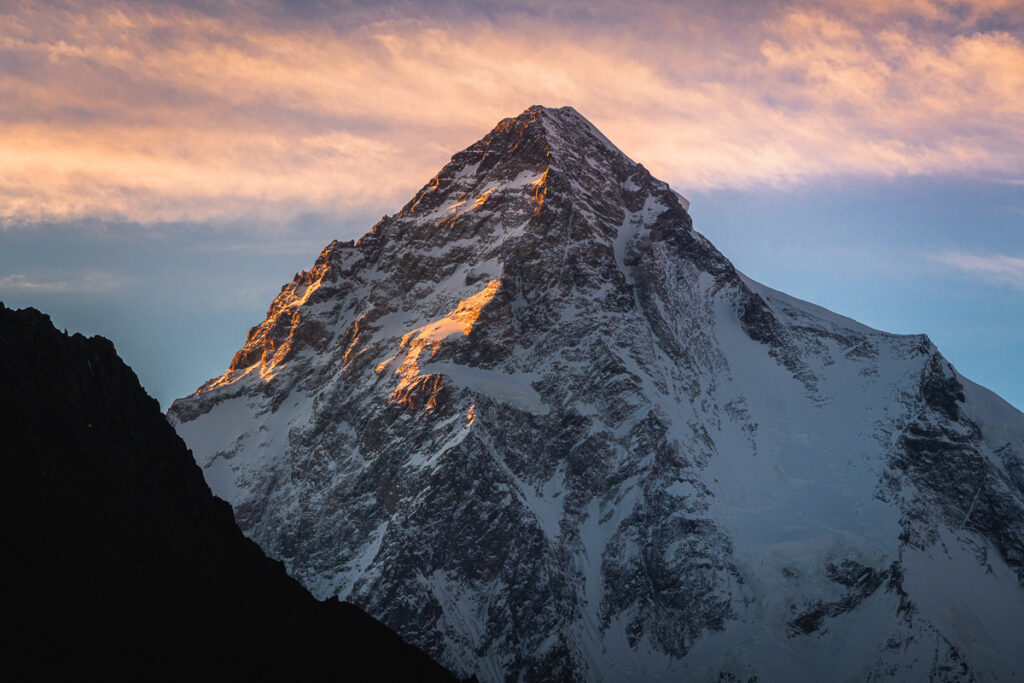
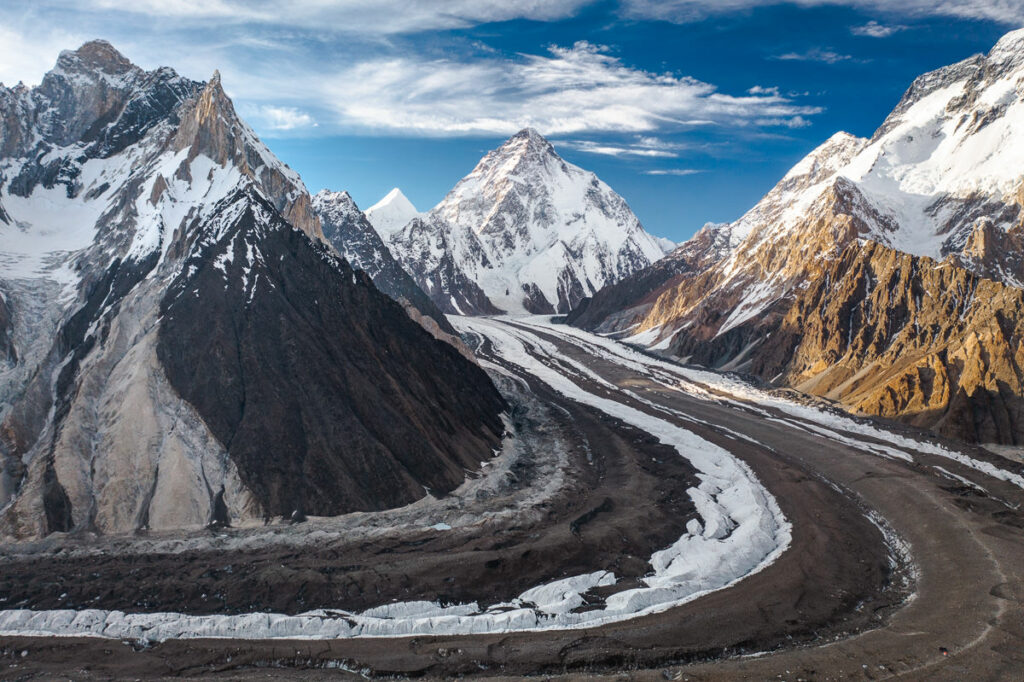
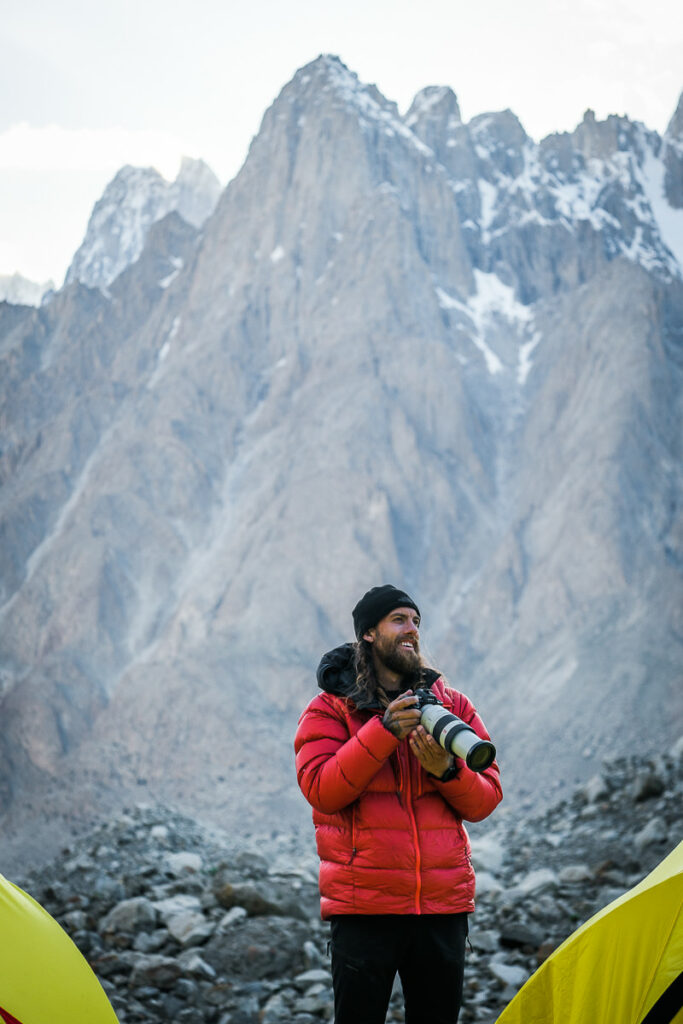
For those willing to pursue adventure, one of the world’s greatest adventures lies deep in the Karakoram Mountain Range of Northern Pakistan. This region is like no other in the world and is home to five peaks that reach above 8000m, including the aptly named ‘Savage Mountain’, otherwise known as K2 (Karakoram 2). For seasoned adventurers, the K2 Basecamp Trek is a challenging and unimaginably scenic, multi-week expedition along the Baltoro Glacier beneath monolithic mountains.
The trekking expedition with Epic Expeditions is a two-week route traveling to K2 Basecamp along the Baltoro Glacier en route to reaching the foot of K2, which is the world’s second-highest mountain after Mount Everest. The height of K2 Base Camp is just over 5000m but this won’t be the highest point of the route. The trail is a loop route (in good weather) that takes you over Gondogoro Pass, which has a high point of 5,585m.
BEST TRAVEL COMPANY FOR PAKISTAN
Interested in traveling to Pakistan or doing the K2 Base Camp Trek?
I recommend joining an Epic Expeditions trip for all things Pakistan adventure travel. Use code ‘JACKSON5’ when booking for a 5% discount.
BOOKING A TOUR FOR K2 BASECAMP TREK
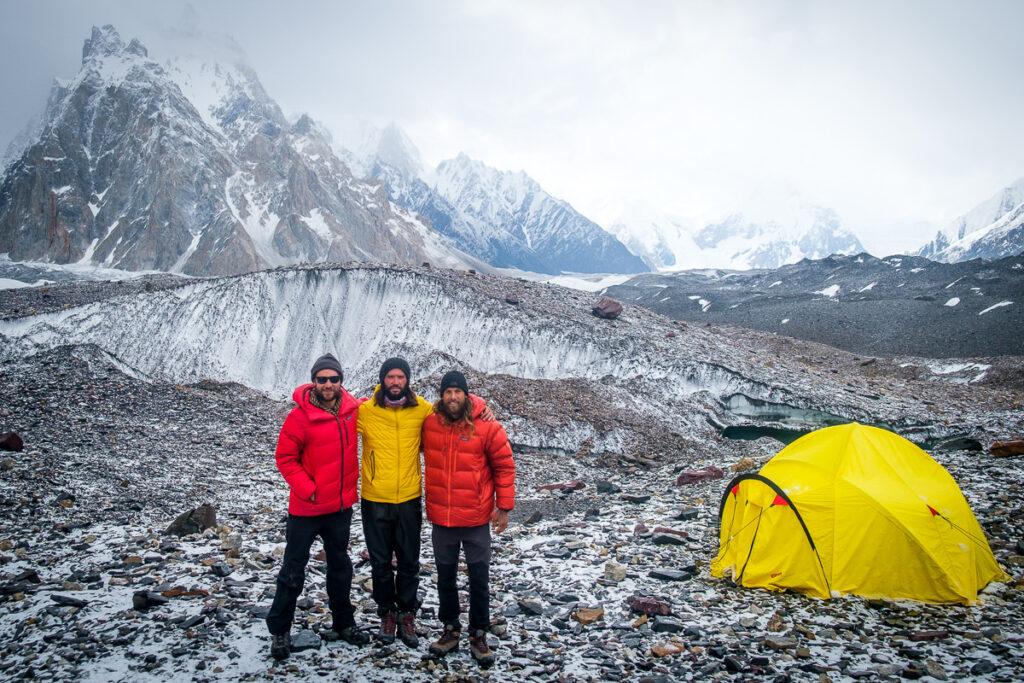
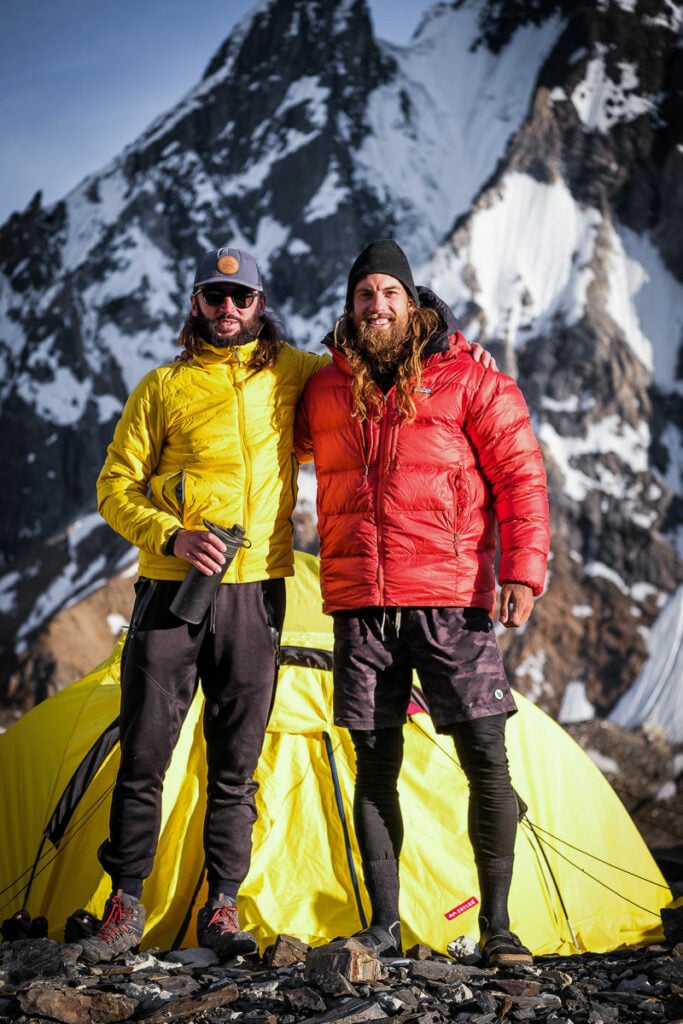
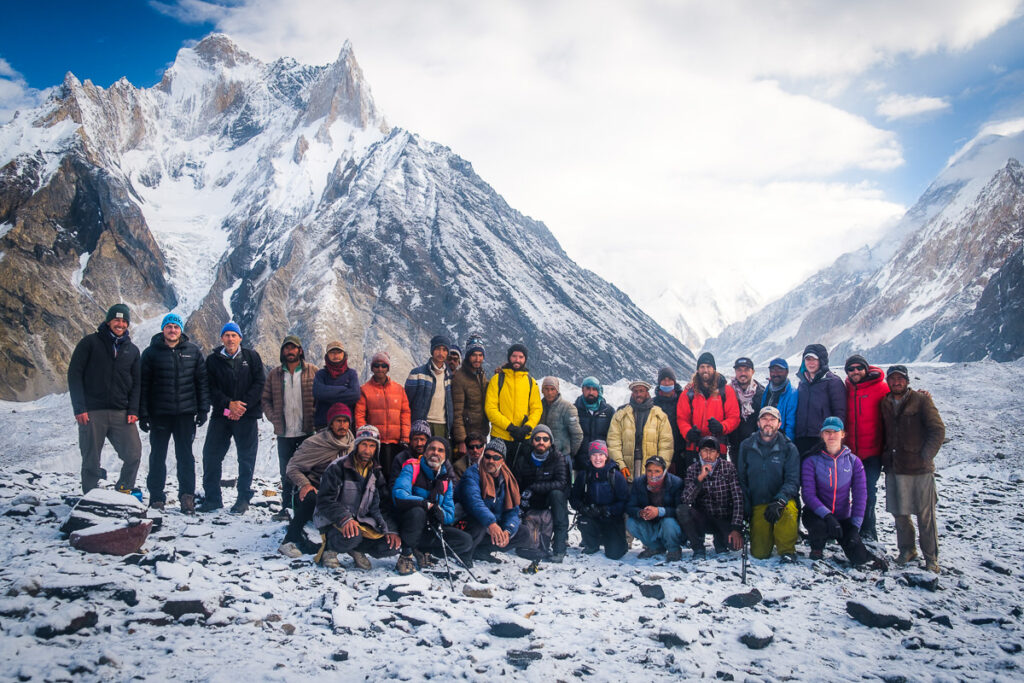
The K2 Basecamp Trek does require a guide. I did the trek with Epic Expeditions, which is one of the top trekking companies when it comes to the K2 Basecamp Trek. The owner, Chris, has explored all over Pakistan and is joined by an experienced Pakistani team of cooks, porters, and guides.
The trek costs approximately $4200 USD with Epic Expeditions as of 2023 and includes all transfers, accommodation, meals, drinks, and permits. The itinerary is 21 days even though the trek is just 14 days, which is to allow for domestic travel on either side of the trek and any potential delays with domestic flights or road conditions/landslides. I honestly had a great time and can wholeheartedly recommend Epic Expeditions.
You can use my discount code ‘JACKSON5‘ for 5% off the total price of your trek with Epic Expeditions, which is a pretty handy saving of almost $250!
TREKKING TO K2 BASECAMP GUIDE
In this blog post, I will cover everything you need to know about the logistics of the K2 Basecamp Trek and also share with you my experience on each day of the trek in the form of a short journal entry and my photos from that day. This will give you an idea of what to expect and a great insight into the scenery you will find on each day of the trek. Before sharing my experience on the trek in the second section of this blog post, I will detail all of the information you need to know in this complete guide about the K2 Basecamp Trek.
K2 BASECAMP TREK DETAILS
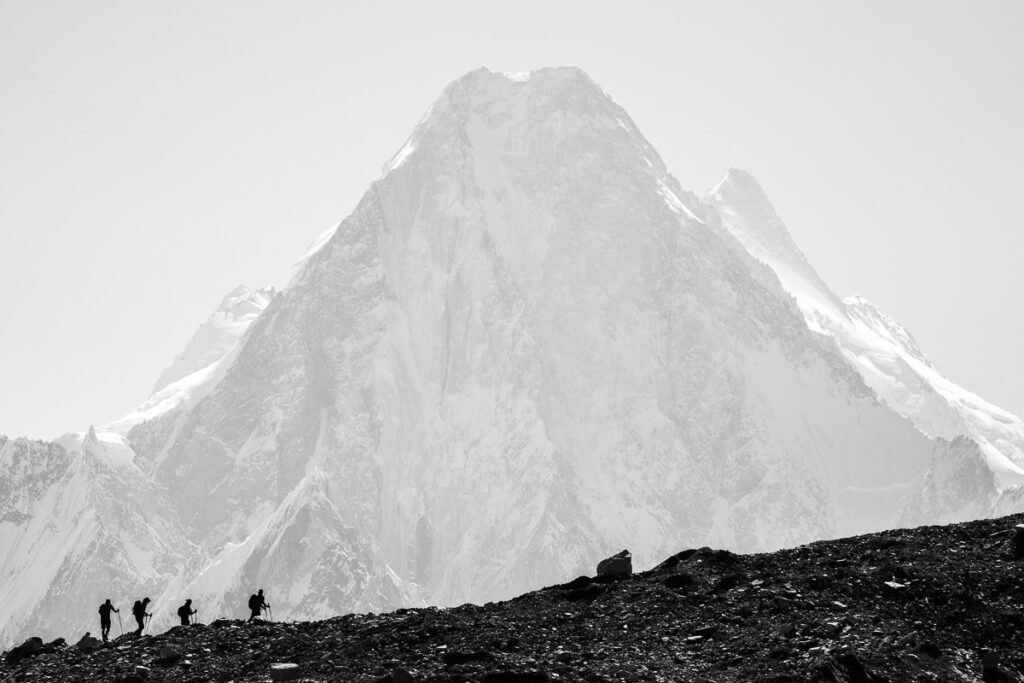
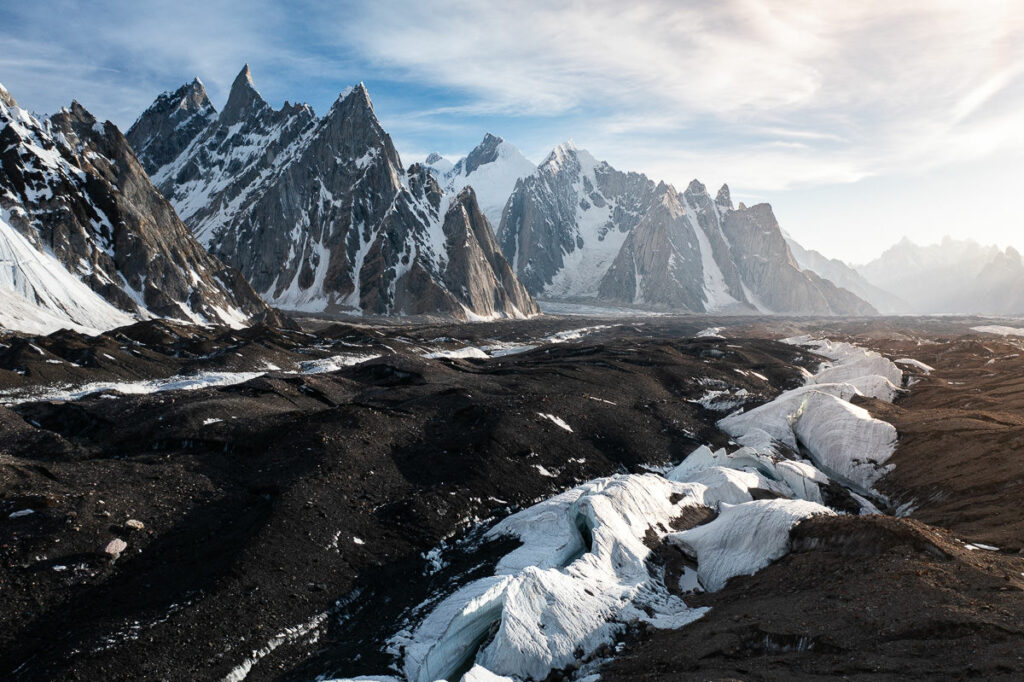
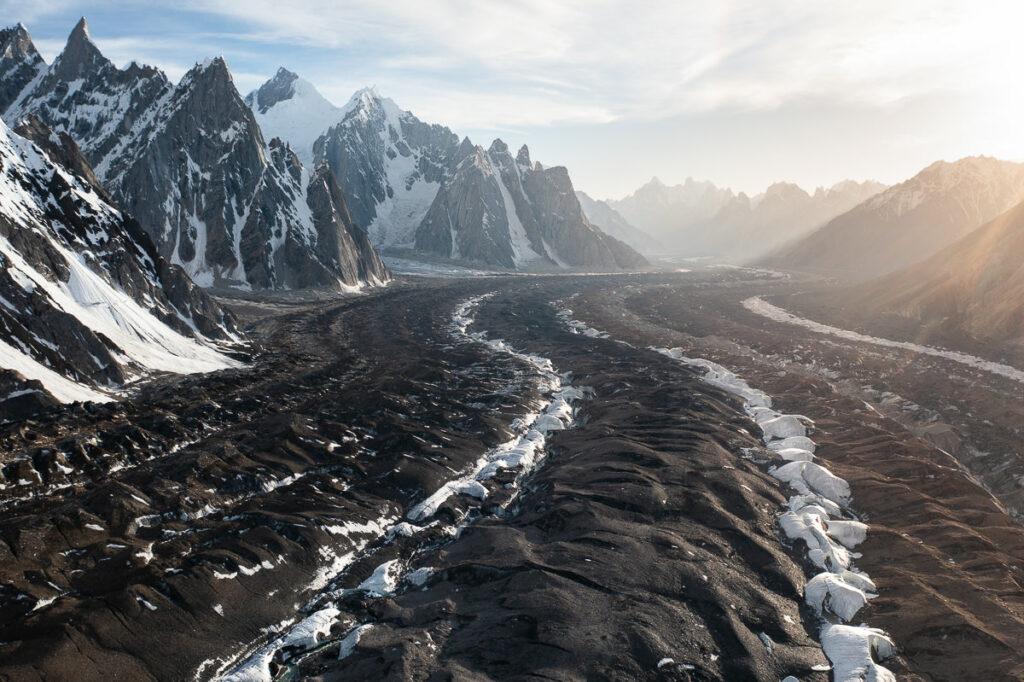
While trekking through the Karakoram Mountain Range towards K2 Basecamp, you can expect harsh camping weather conditions such as snowstorms or days on end of the exposed sun. The rocky, glacial terrain makes this a tough trek but also provides some of the most incredible trekking views in the world. Unlike the popular Everest Base Camp trek, which is visited by more than 100,000 trekkers annually, the K2 Basecamp Trek sees just over 1000 visitors a year making it a brilliant alternative for adventure-seekers.
- Distance: 160 km through-hike
- Days required: 12-14 days
- Total Incline: ( with undulation) – 10,000 m
- The highest point on the trek: 5,585m, which was at the Gondogoro Pass
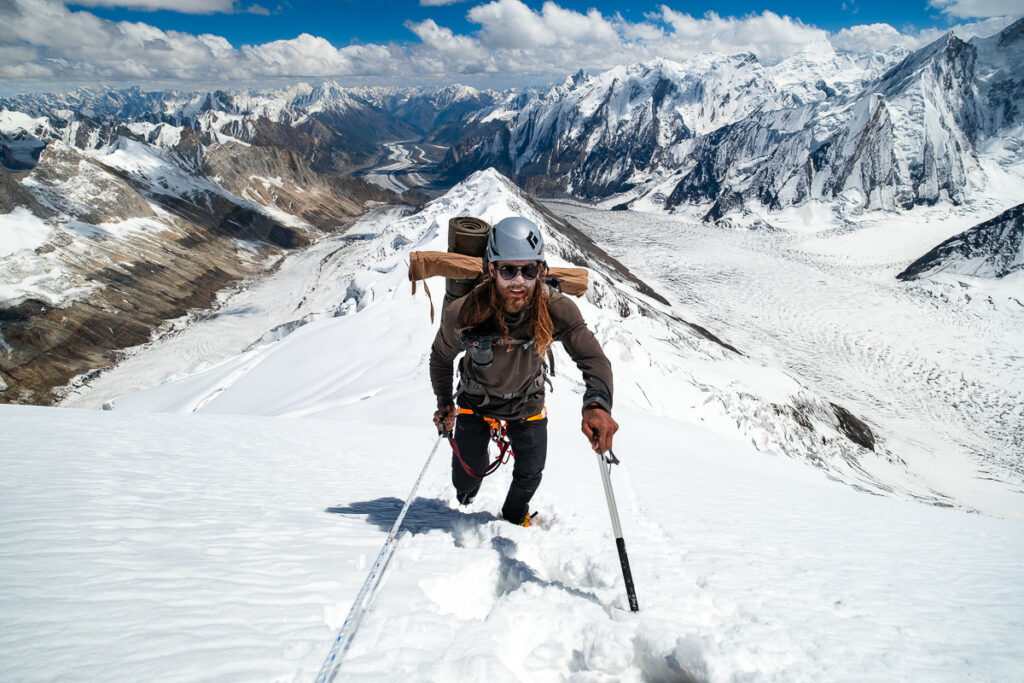
- Difficulty: This trek was much harder than Everest Base Camp Trek as it was 30% longer, much steeper, and less commercialized. One of the major differences are that you will be camping every night rather than in tea houses. Also, the terrain is along a rocky glacier making it much more difficult to cover distances rather than a path that leads you to Everest Base Camp. Having said that, there was nothing technical involved to reach basecamp although a small section of fixed rope action on the Gondogoro Pass was the most diffucilt part of the trek. Our longest day was 25km with 1200m of incline. If you can handle the altitudes of above 5,000m and can walk each day for 6-10 hours, you will be fine on this trek. The acclimatization profile was very good as you have seven days to reach base camp, so it eases you into it.
- Permits: Your tour operator will take care of these. It isn’t possible to hike independently and you must book with a guide and a registered tour operator.
- Guide: A guide is required on this trek and the guide manages all of the logistics, distances, directions, and camping sites. The directions weren’t always very clear like on the Everest Base Camp trek and having the guide manage all of the logistics was great.
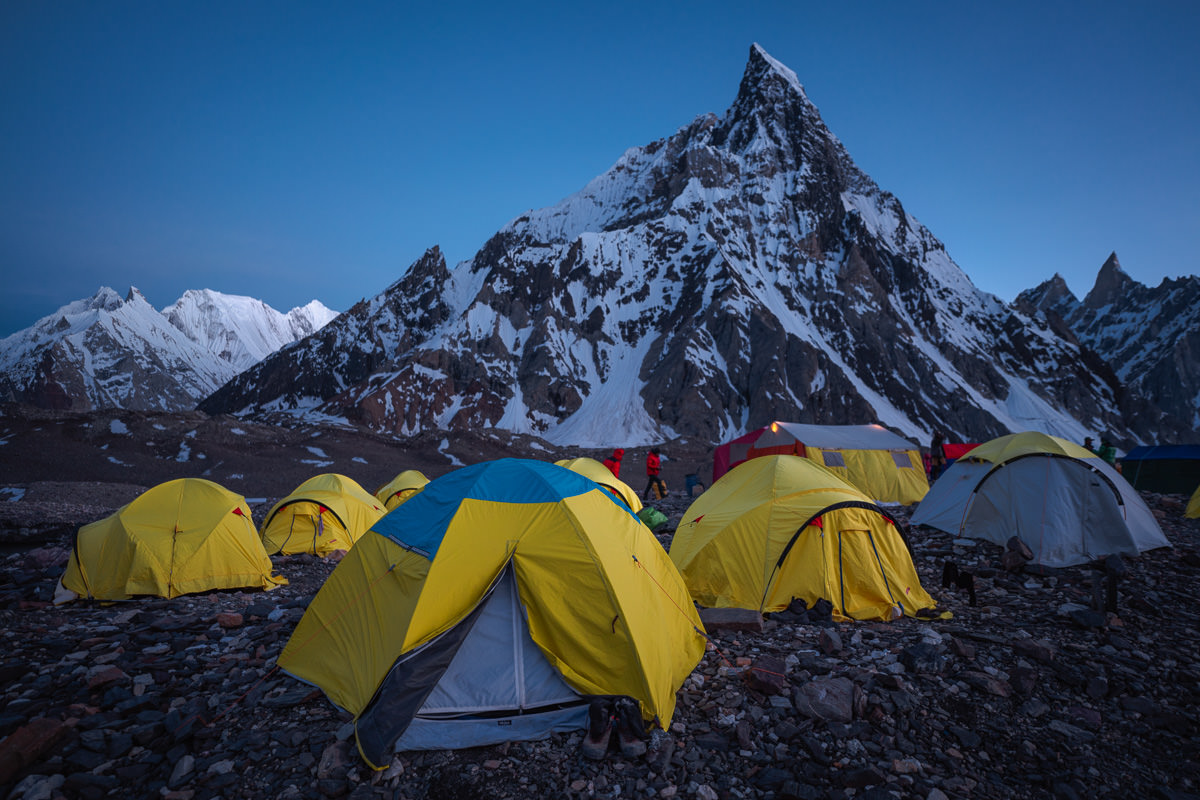
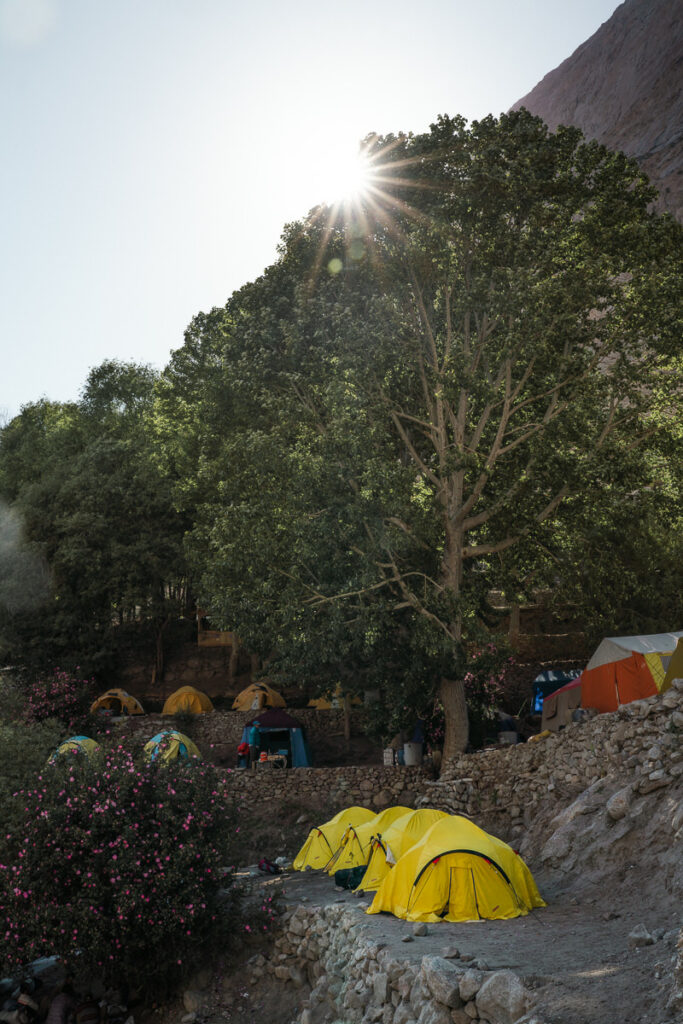
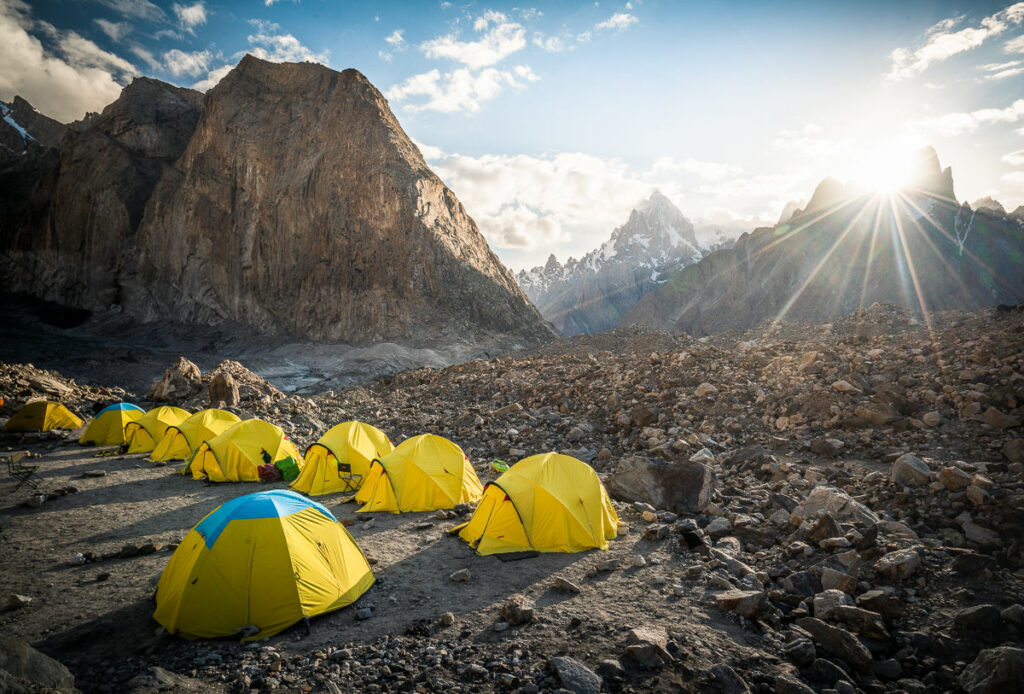
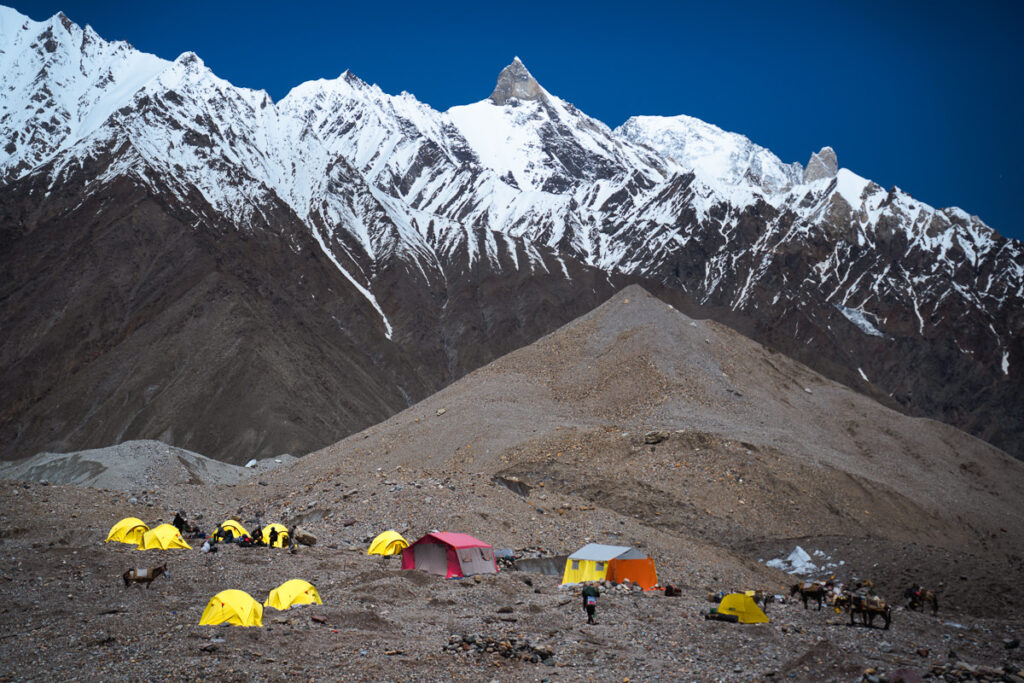
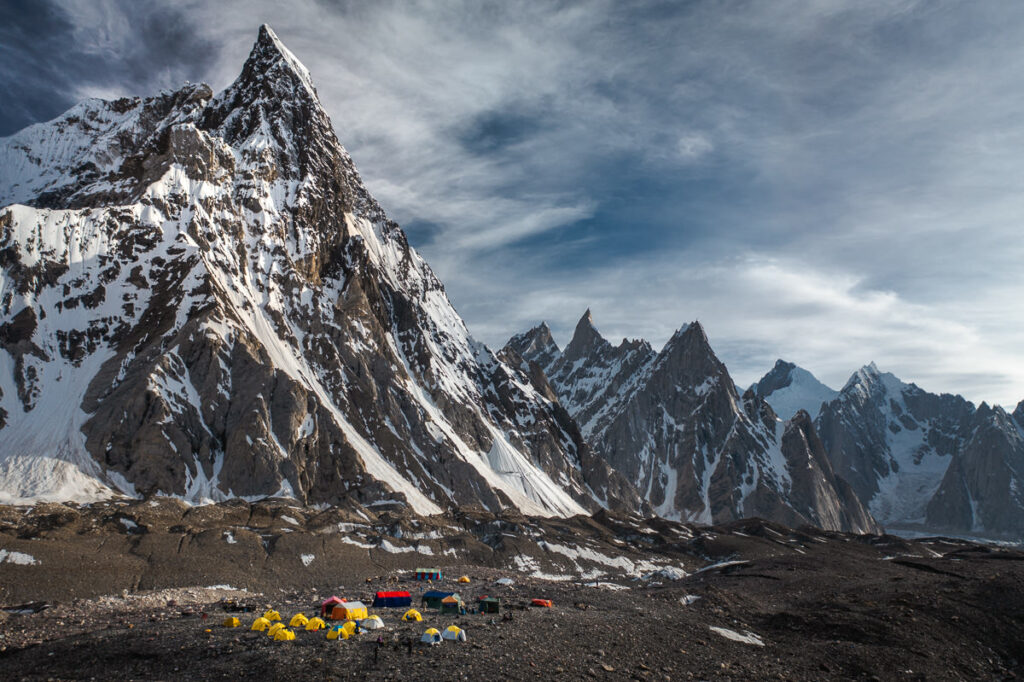
- Accommodation: Each night you will camp at an incredibly scenic campsite with views of 7000m and 8000m peaks visible. Trust me you will be entranced just while looking out of your tent window.

KEY POINTS ABOUT THE K2 BASECAMP TREK
- This trek is way less crowded than Everest Base Camp trek and most well-known routes in the Himalayas. On average, 1000 trekkers visit K2 Basecamp per year compared to 100,000 trekkers to Everest Base Camp. This gives you an idea of the off-beat nature of this route.
- The K2 Basecamp Trek is off-the-beaten-path and remote so you will have no access to electricity or cell signal for more than two weeks. However, your team may bring a generator or solar chargers to keep your batteries, headlamps, phones and cameras charged.
- The trailhead is reached by jeep after flying into Skardu from Islamabad.
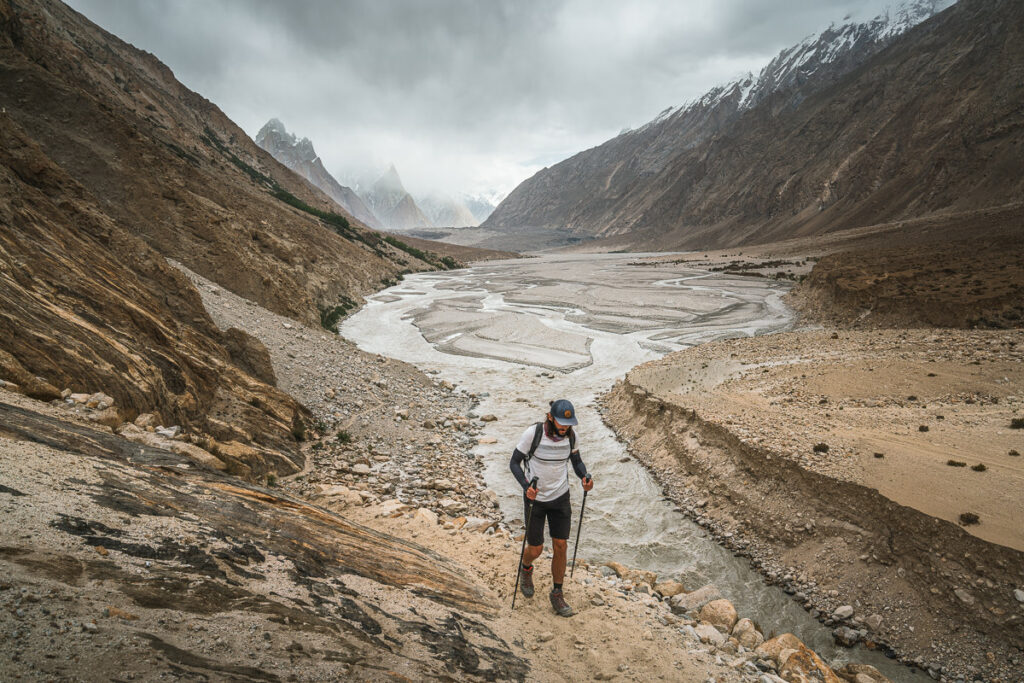
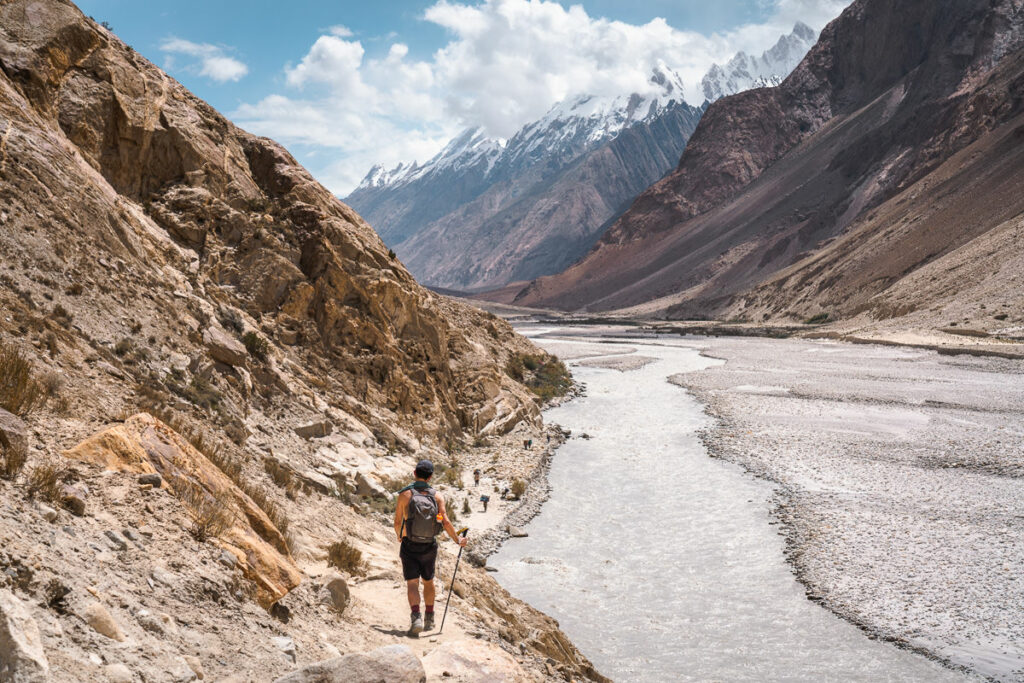
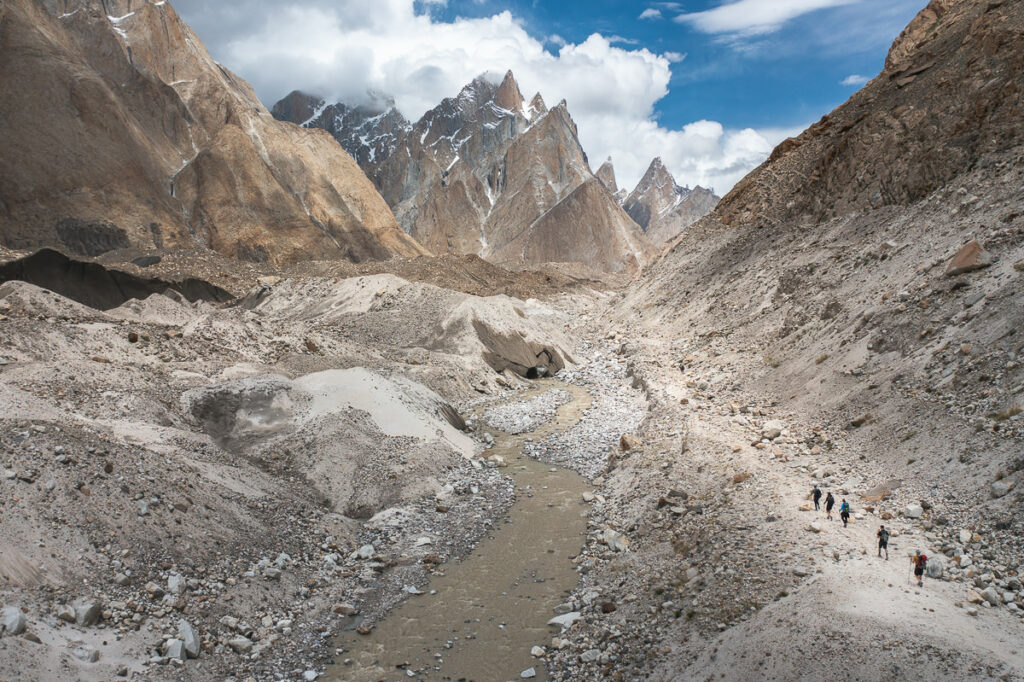
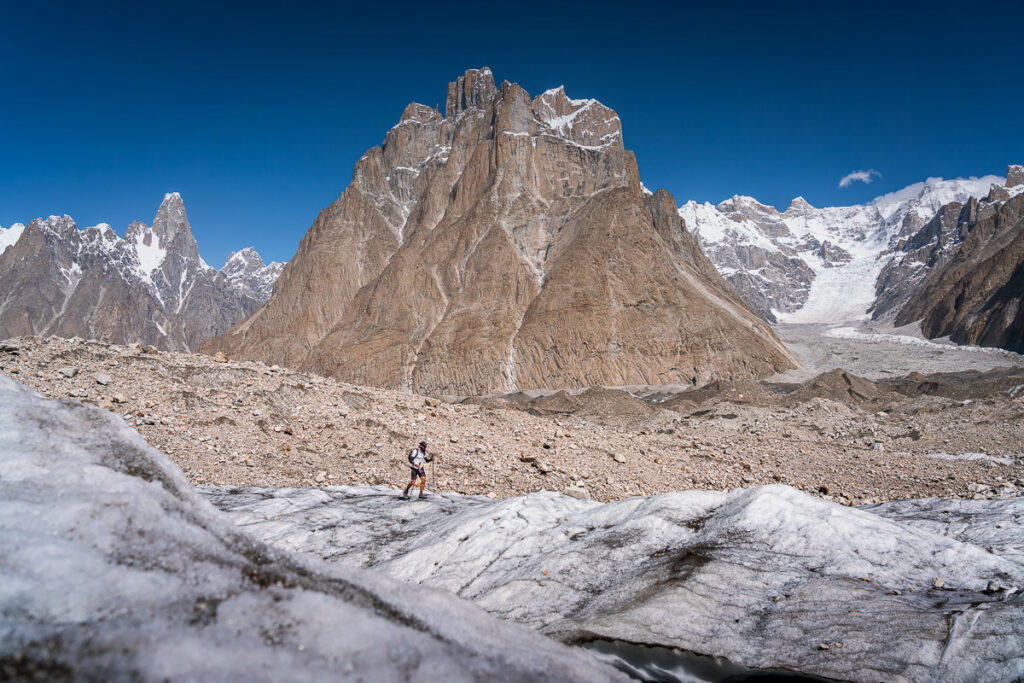
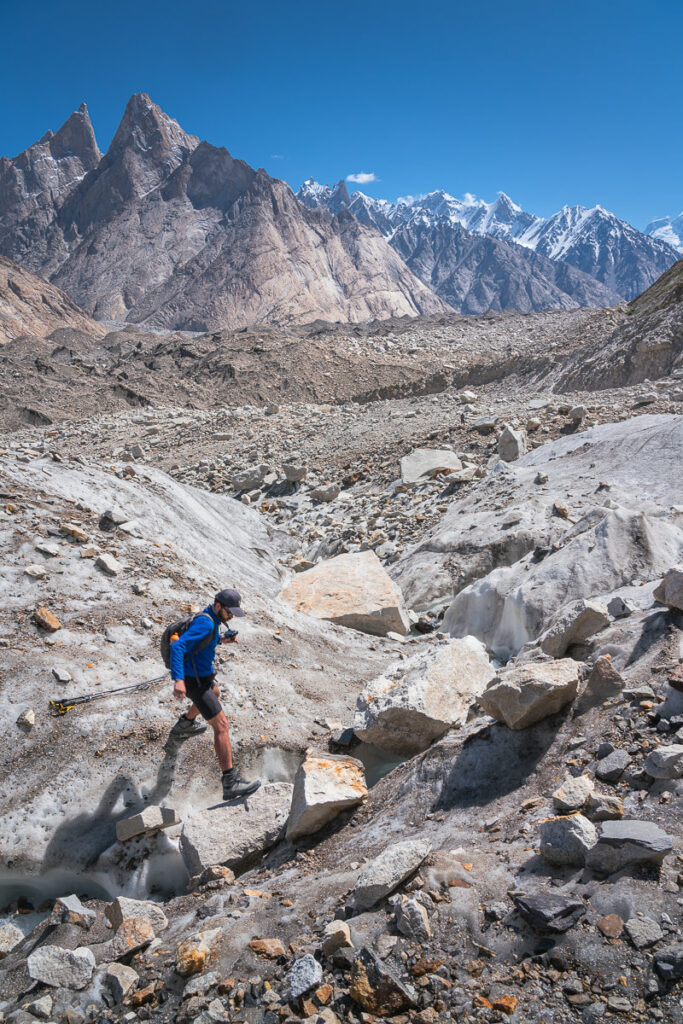
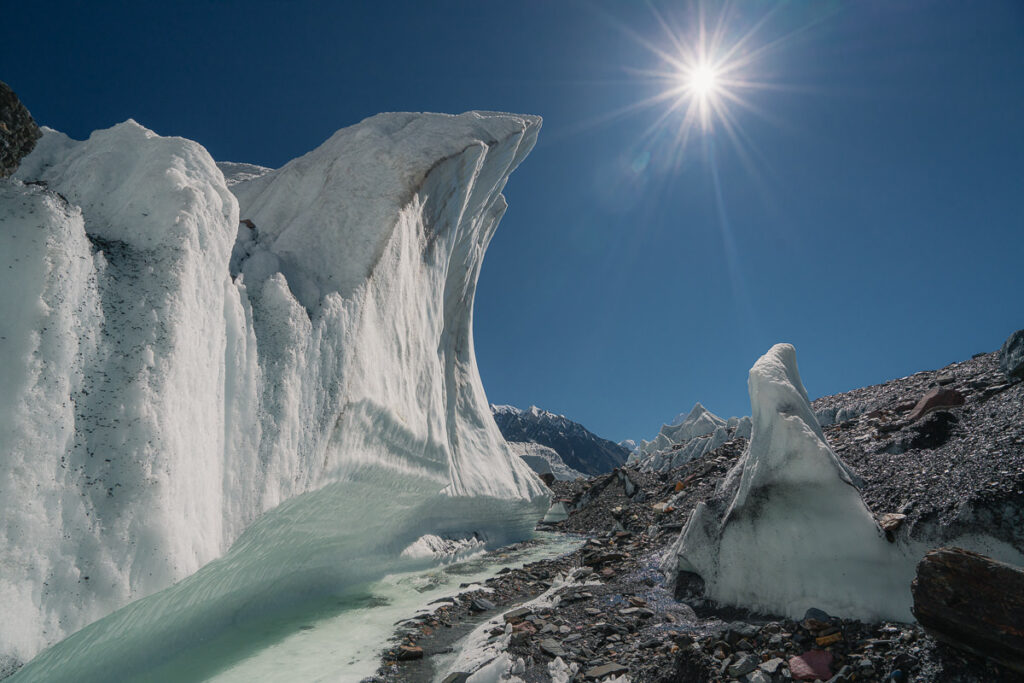
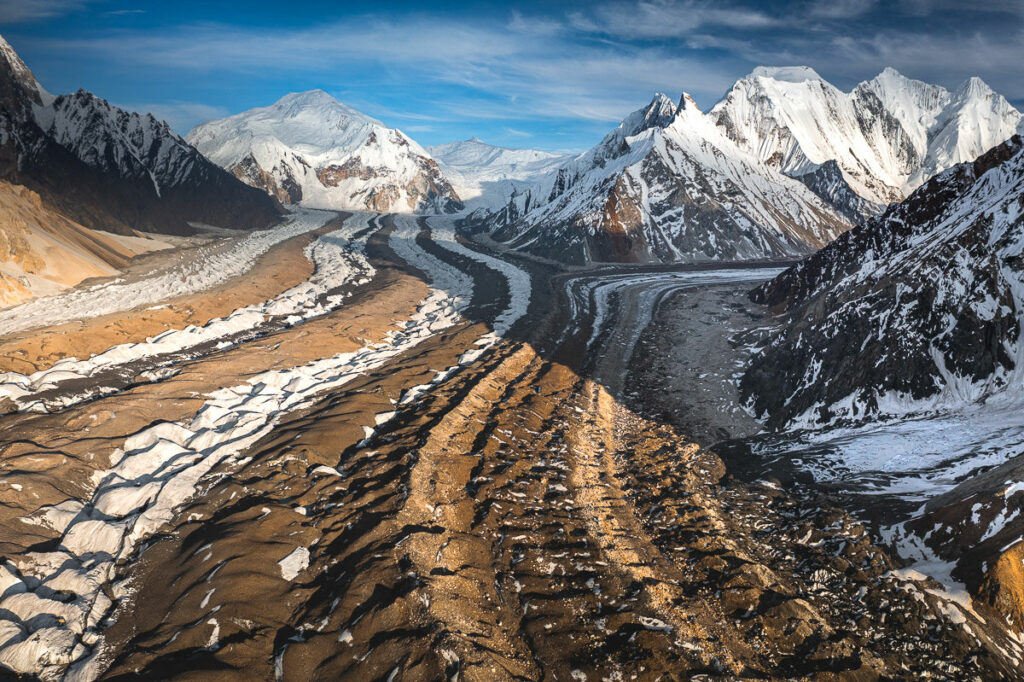
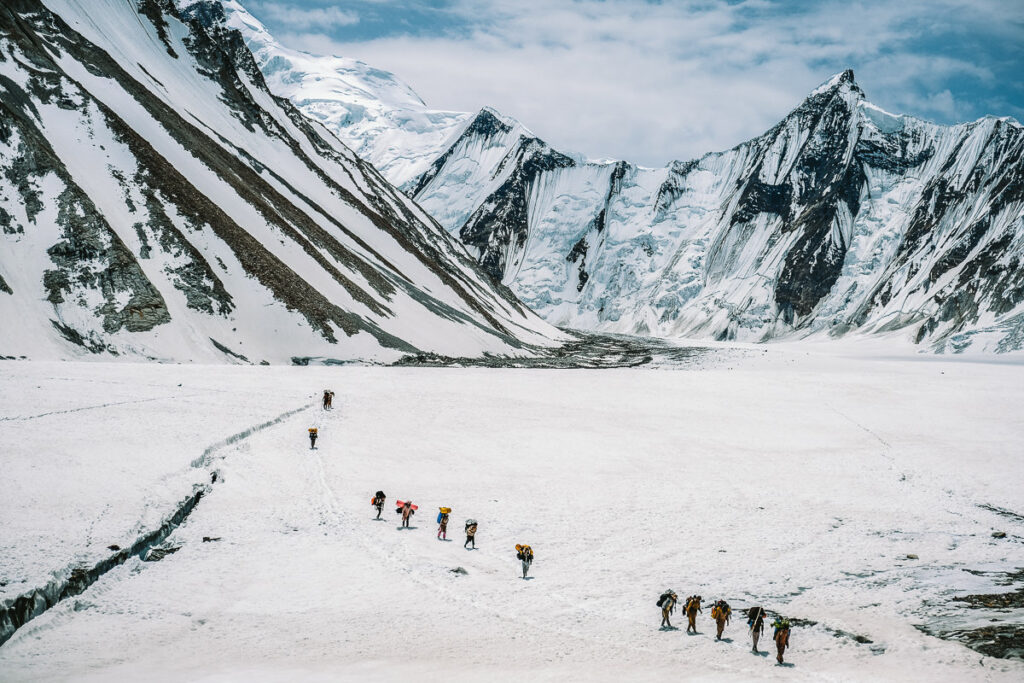
- The first couple of days of the trek are quite dusty and hot while running alongside the river. By day three, you are well and truly on the Baltoro Glacier and will experience the rocky terrain for the remainder of the trek.
- You will visit K2 Basecamp but also pass by Broad Peak basecamp and a few other basecamps of 7000m peaks along the way.
INSURANCE FOR THE K2 BASECAMP TREK
Pakistan is a precarious place for climbing or hiking because the availability of helicopter rescue is almost non-existent. Compared to places like Nepal, helicopter rescue requires prior organization and deposits of $5000+ by your trekking or climbing company. There is a solution though.
Need extra protection?
Regular travel insurance is great but won’t cover you for high altitude hikes or for helicopter evacuation. Each year, I purchase a Global Rescue Subscription.
For less than $500 per year or $100 per expedition, you can purchase a Global Rescue subscription and be covered no matter how extreme the hike or how high the climb is.
TREKKING TO K2 BASECAMP: WIFI/ELECTRICITY AVAILABILITY
Wifi: There is no WiFi on this trek although some operators may provide a satellite connection. Most will not offer WiFi. There is some 4G connection available until Concordia Camp if you are using SCOM. The sim card and data costs about $10-20 and worked intermittently but just for messaging and some Google search. I went without internet for the entire trip and it was nice not to be looking for bars of service but if it is important to you, know that it can be possible in a few spots.
Electricity: Our team had a generator, which was carried by a mule. Each night, one jug of gasoline would be used for the generator so we could charge cameras, phones, headlamps, power banks, and even drone batteries for a few hours each night. This seems to be standard practice among tour operators but you will need to check if it is available. I also took a small solar panel, which worked well to charge my phone and power bank each day.
K2 BASECAMP TREK ITINERARY
- Day 1: Islamabad Arrival
- Day 2: Fly to Skardu
- Day 3: Market Day in Skardu
- Day 4: Drive from Skardu to Askole
- Day 5: Askole to Jhula Camp (3150m)
- Day 6: Jhula to Paju (3,383m)
- Day 7: Paju – Khoburtse (3,566m)
- Day 8: Khoburtse – Urdukas (4,130m)
- Day 9: Urdukas – Goro 2 (4,250m)
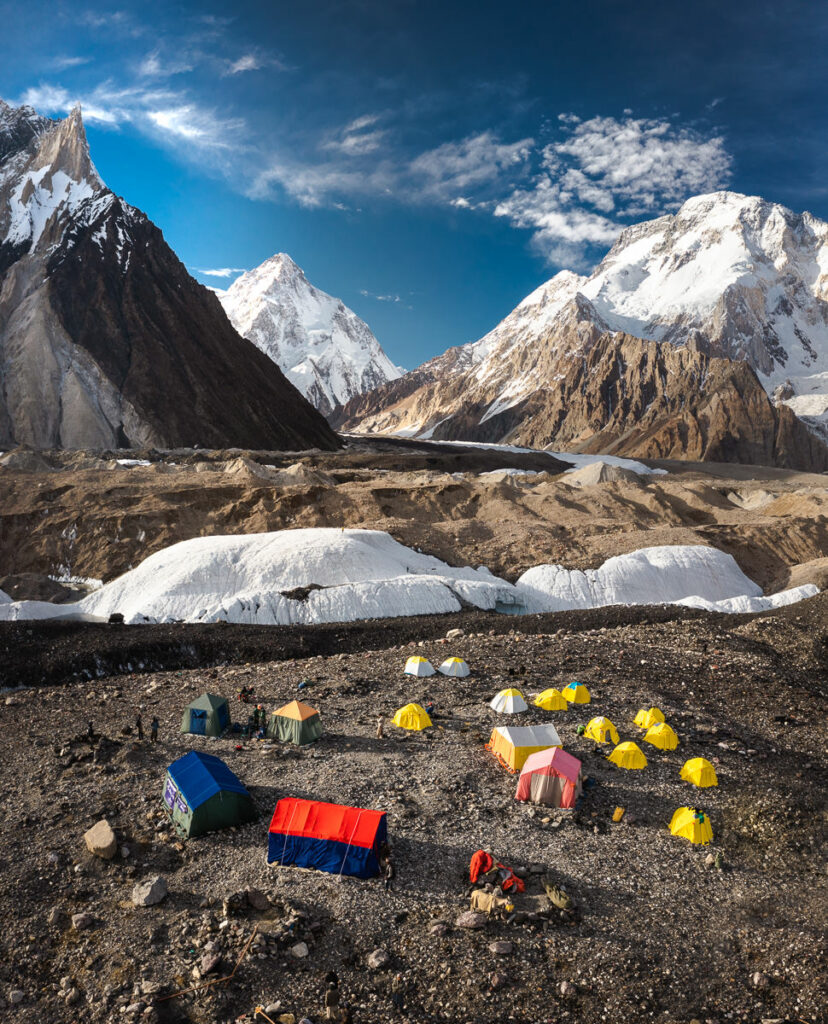
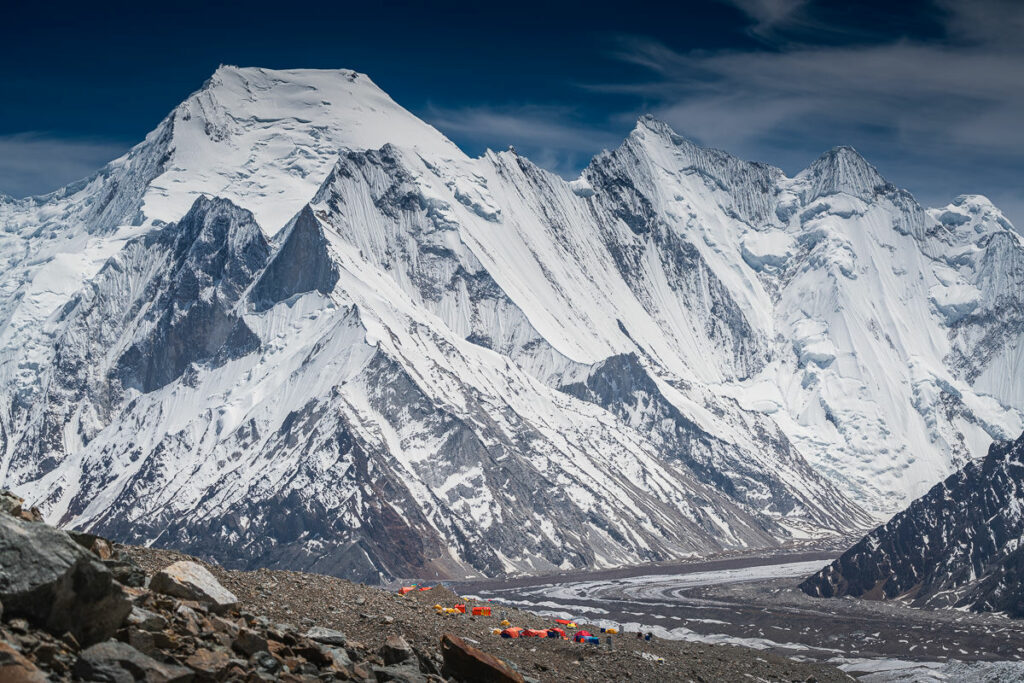
- Day 10: Goro 2 – Concordia (4,600m)
- Day 11: Concordia – K2 Base Camp (5000m) – Concordia
- Day 12: Rest Day at Concordia
- Day 13: Concordia – Ali Camp (5000m)
- Day 14: Ali Camp – Gondogoro La Pass (5,600m) – Kuisbang (4,700m)
- Day 15: Kuisbang – Saicho (3435m)
- Day 16: Saicho – Hushe – Drive to Skardu
- Day 17: Rest Day in Skardu
- Day 18: Rest Day in Skardu
- Day 19: Fly to Islamabad
- Day 20: Contingency Day in Islamabad
- Day 21: Client Departure Day

MY K2 BASECAMP TREK VIDEO
I filmed a short video showing some of the highlights of the trek so you can get an idea about the terrain and camping conditions.
MY EXPERIENCE ON THE K2 BASECAMP TREK
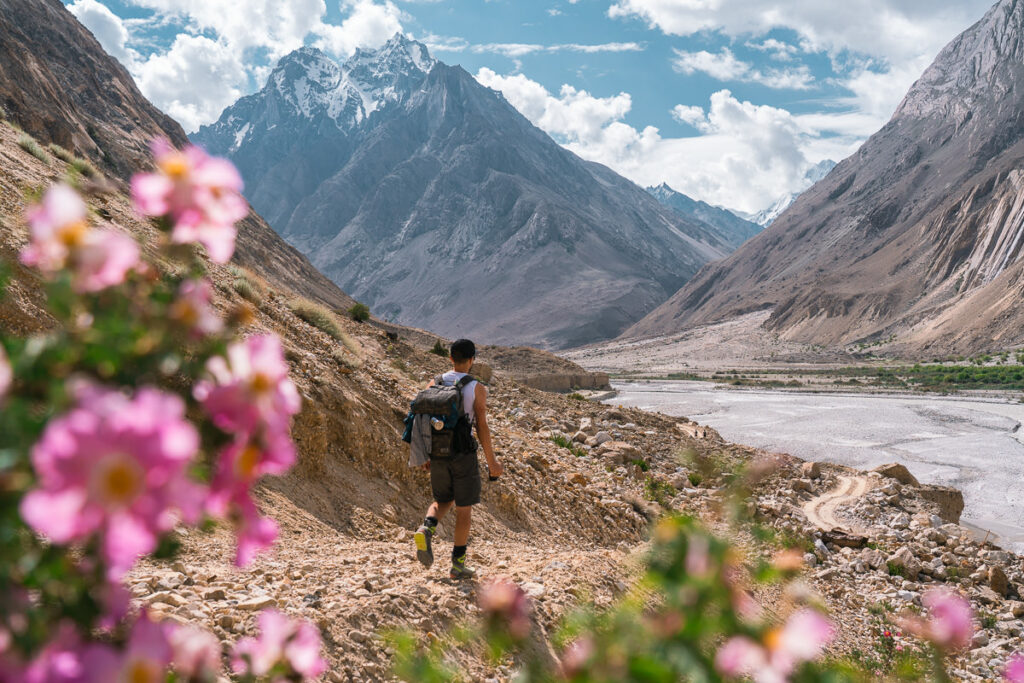
Our journey began by flying from Islamabad on a domestic flight to Skardu. A quick glimpse at Nanga Parbat out the plane window had us craving the mountains. We took a Jeep from the airport to Skardu town and checked into our hotel. We would stay here for the next couple of nights waiting for our comrades to catch up who had missed their international flights. This gave us time to explore Skardu. Walking the streets and meeting the friendly locals had us entertained for a couple of days before we made the long, bumpy drive to the start of the trek. There has recently been a road built past Jhula camp so we didn’t need to hike the first dusty day from Askole and could instead begin from Jhula Camp.
Day 1: Jhula to Paju (3,383m)
Trail report: Early start with 7-9 hours of trekking. Mostly flat with small gains and descents. The day is hot, exposed to much sun, and dusty. Sunscreen and lots of water will be your greatest friend today!
- Incredibly hot and dusty with little shade to hide from the sun throughout the 21km
- Followed the river all day with constant undulation on rocky and sandy trails.
- The views became better around every corner with 7000m and 8000m peaks coming into view, which was unexpected this early into the trek.
- Paju camp, our resting place for the night, had amazing views of the mountain range but also long-awaited shade from the trees.

Day 2: Paju – Khoburtse (3,566m)
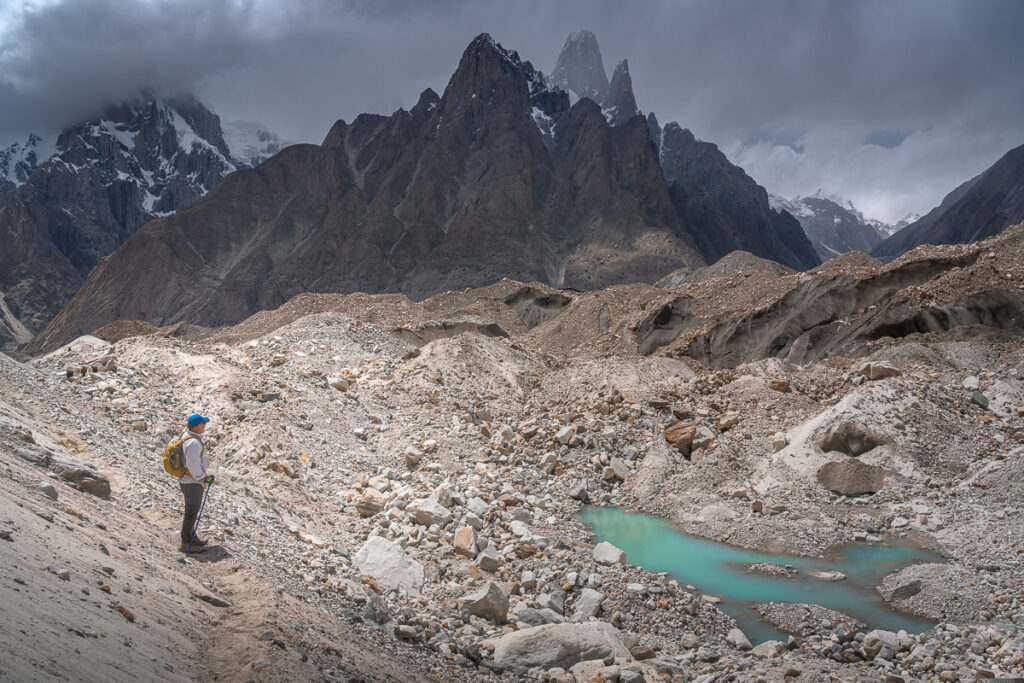
Trail report: 6-8 hours of hiking. After about an hour of walking, the trail enters the Baltoro Glacier. The trail follows the mighty Baltoro until we reach Concordia in several days’ time. The terrain is hilly, rocky, and uneven, with a few scattered bits of a proper trail. Khoburtse camp can feel a bit cramped, but there is a beautiful waterfall nearby as well as great opportunities for sunrise viewpoints.
- A tough 8km climb with 800m of incline through the rocky glacier for the morning session
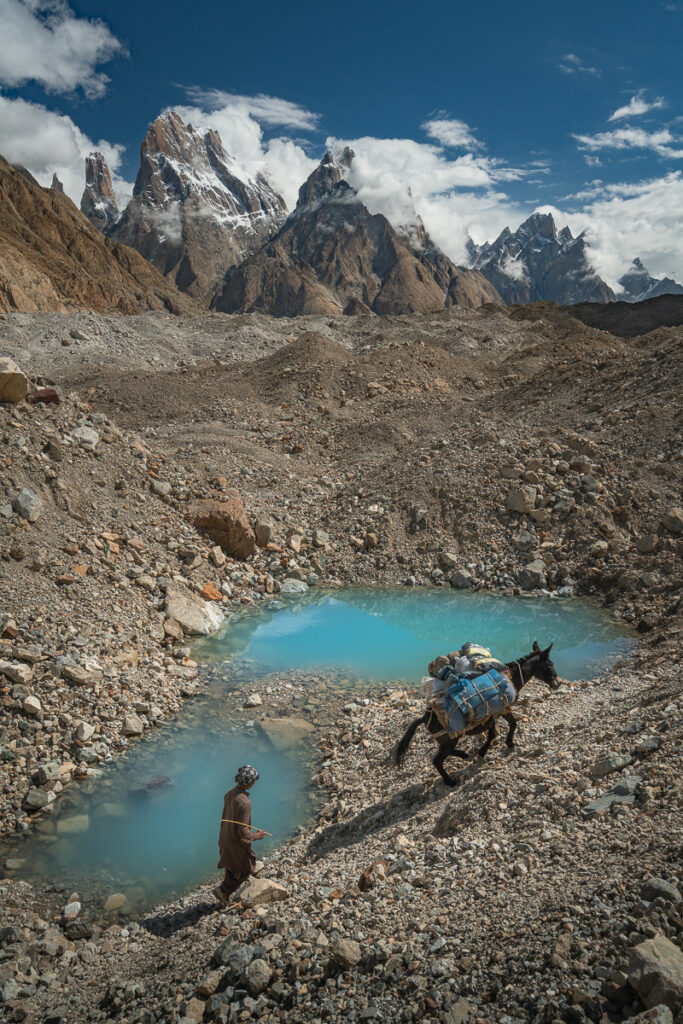
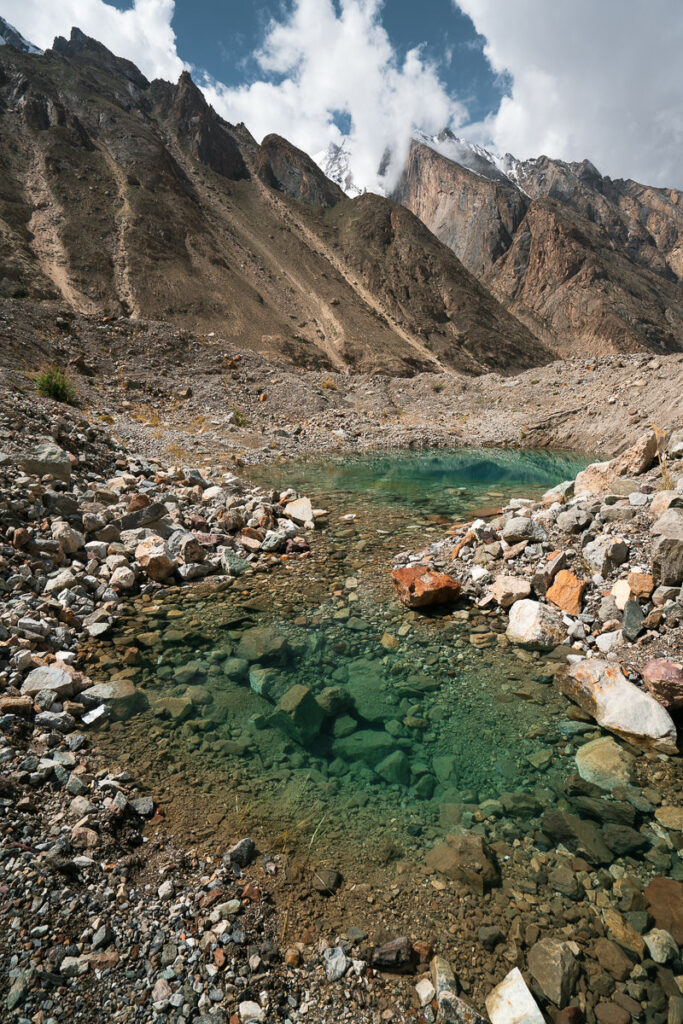
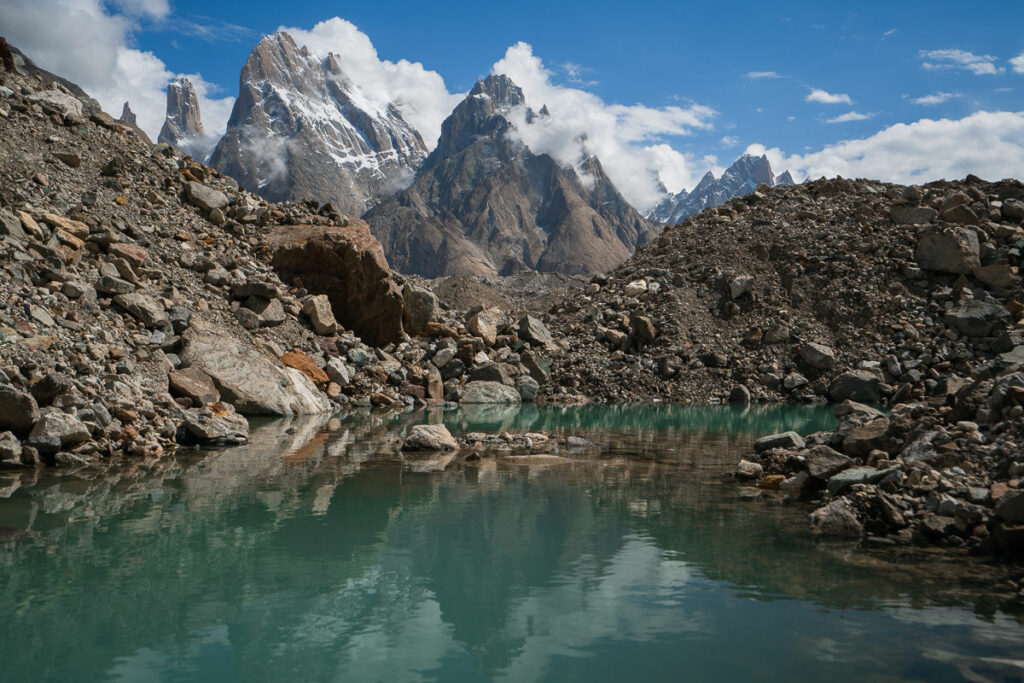
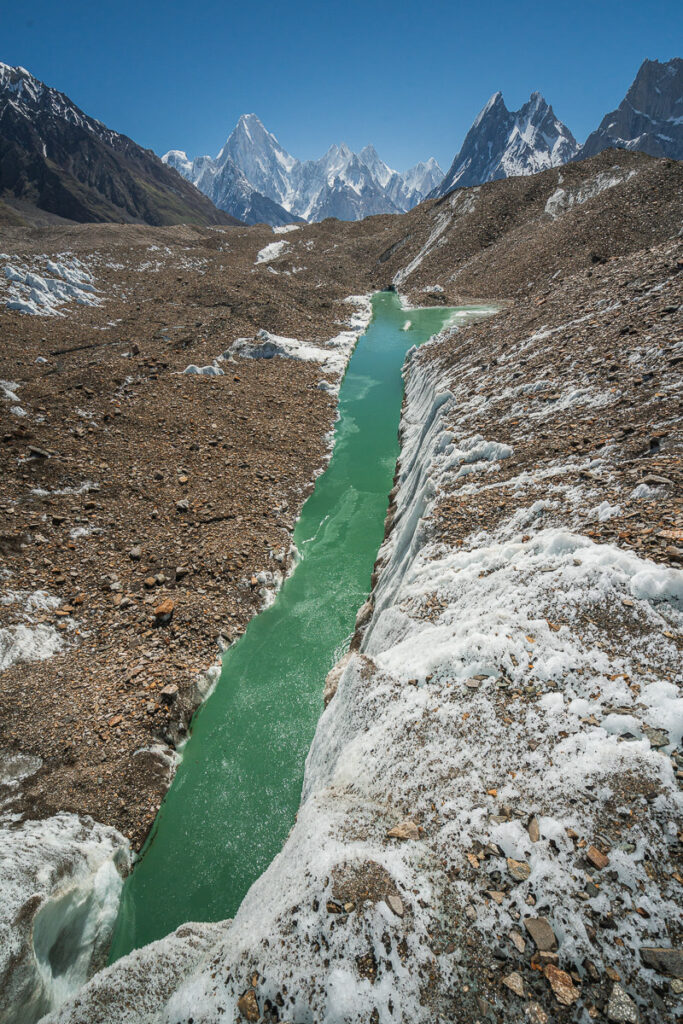
- First experience on the glacier and interesting to come across turquoise pools and ice caves
- A vast, lifeless area of undulating rocky terrain was the scene for most of the day.
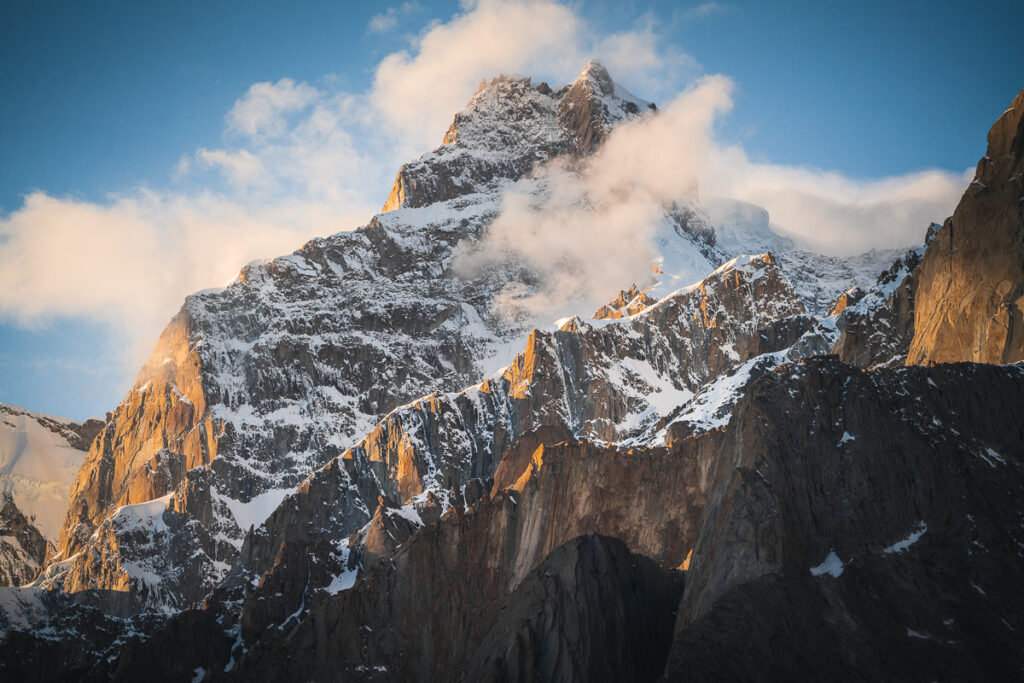
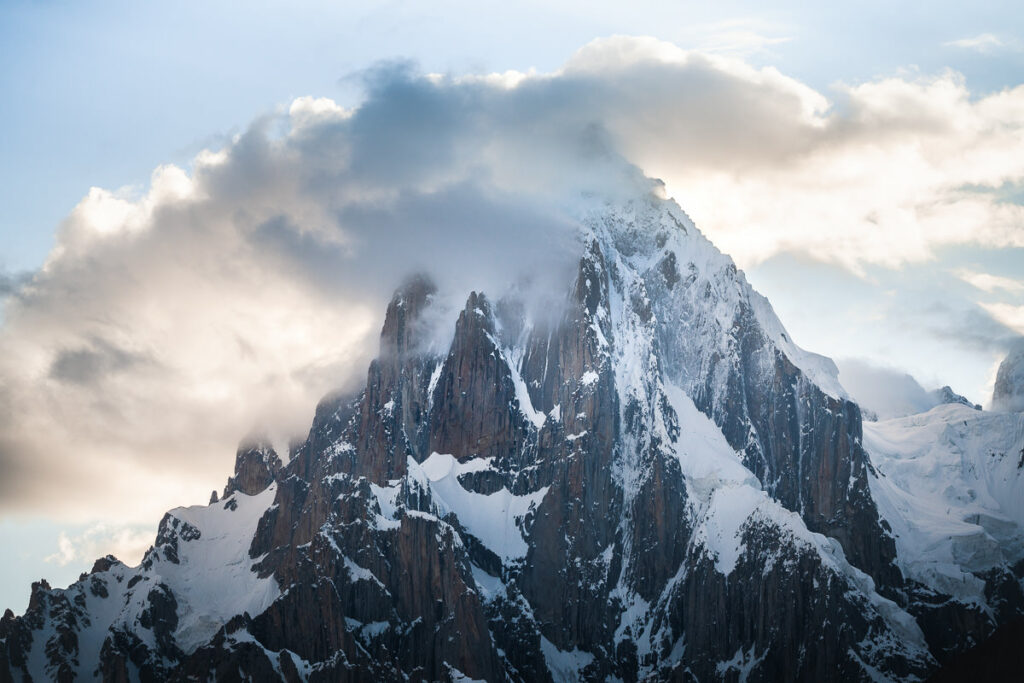
- We are surrounded by peaks in all directions and it’s hard to believe the views we have on day two of this long trek into the thick of the Karokoram Range.
BEST INSURANCE FOR TRAVELERS
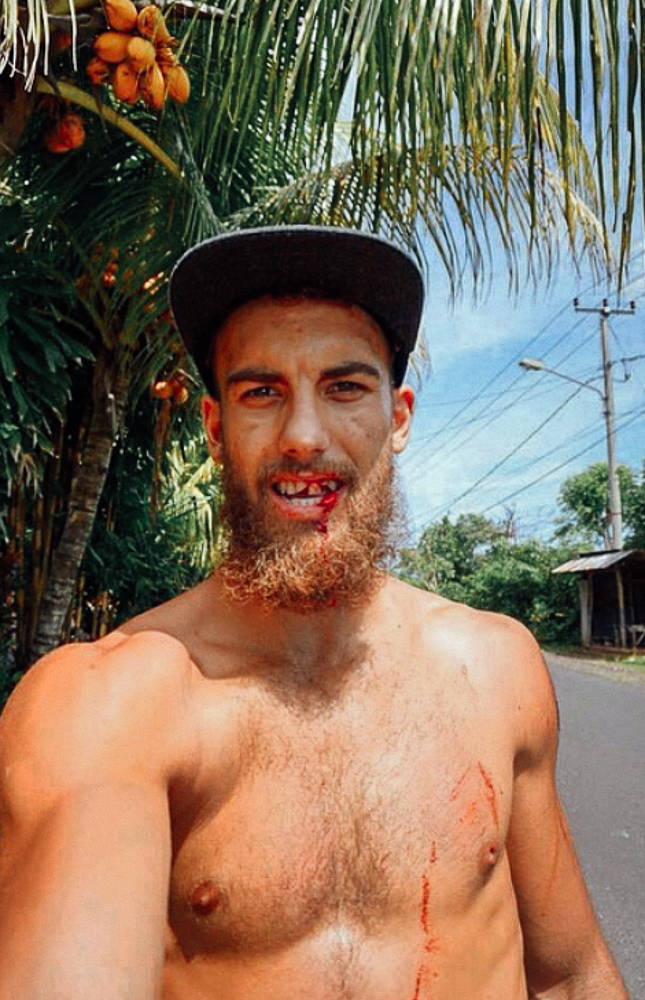
Don’t wait for an accident to happen… get insured! My travel insurance is HeyMondo which offers low-cost travel & medical insurance. That’s me on the left with three teeth knocked out after a motorbike crash in Bali!
You can click to read my Full Review of the Best Travel Insurance.
I’ve made several successful claims with HeyMondo and find their customer service very quick and helpful. Click the button below to get a 5% DISCOUNT
Day 3: Khoburtse – Urdukas (4,130m)
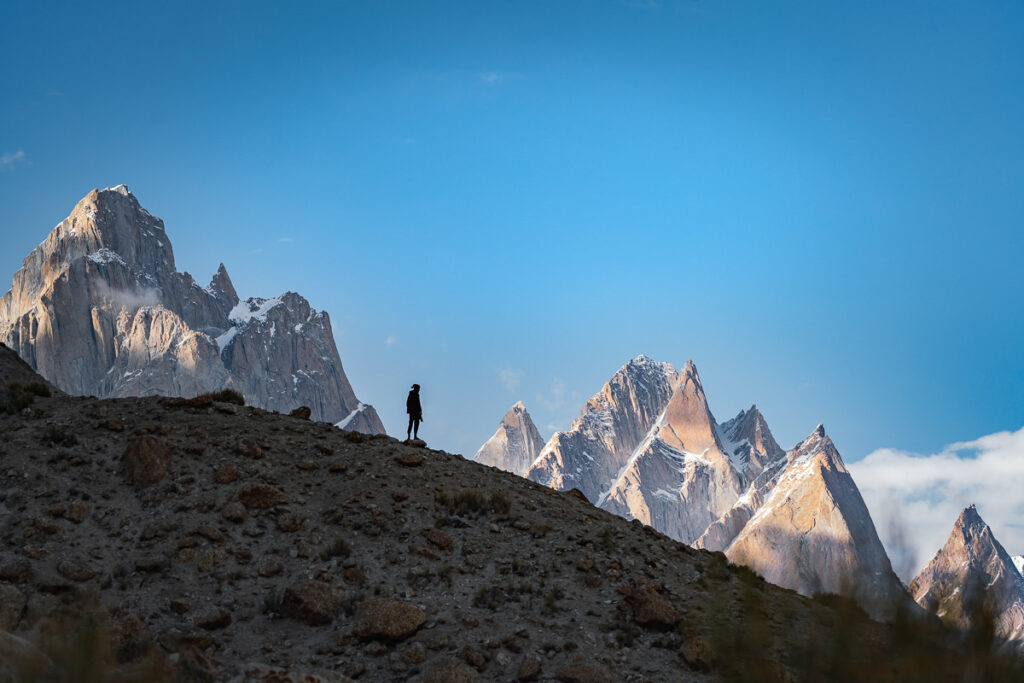
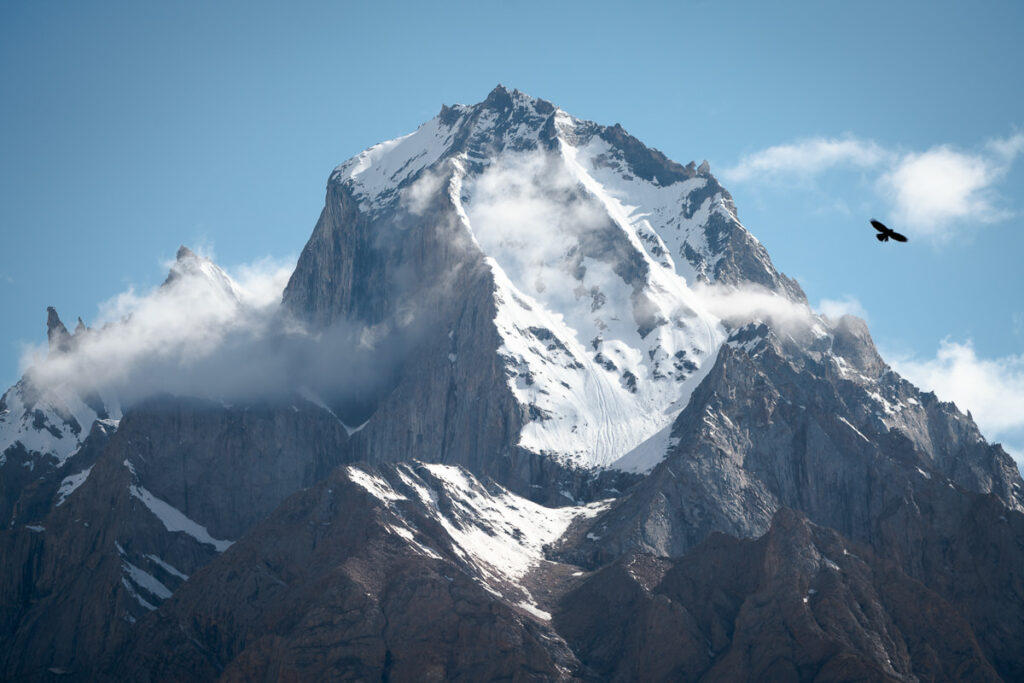
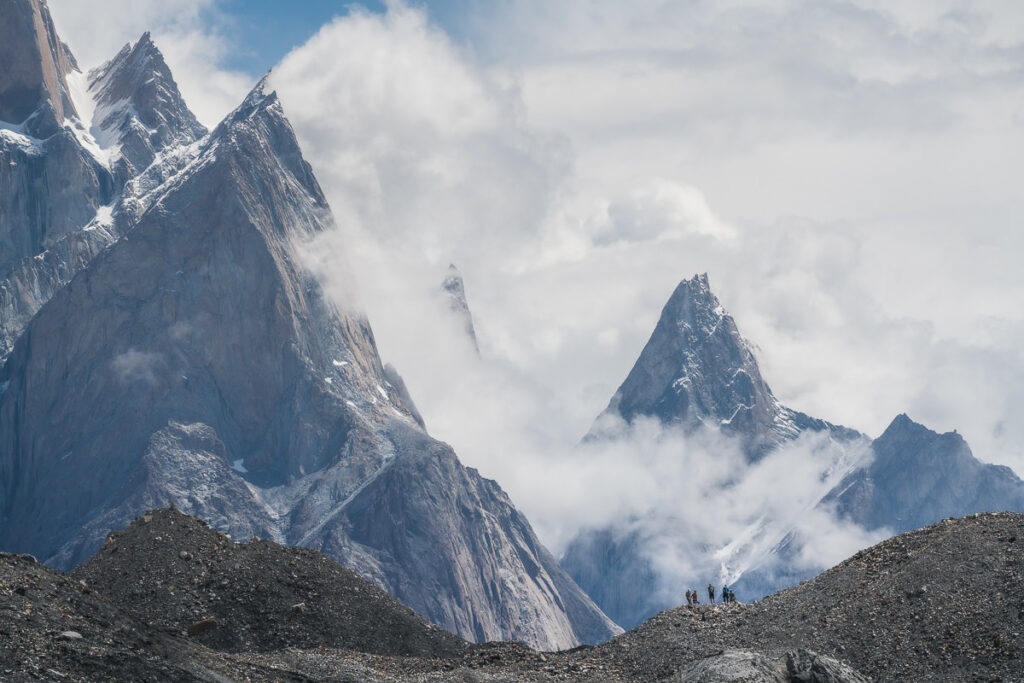
Trail report: Easy day, finishing after about 5 kilometers (2-4 hours). The trail gains in altitude, be mindful not to push yourself too hard or sleep too high too fast. Urdukas is a truly spectacular campsite, and one of the favorites along the whole trek. Excellent views of Trango Towers, Muztagh Tower, and Lobsang can be seen directly from the camp.
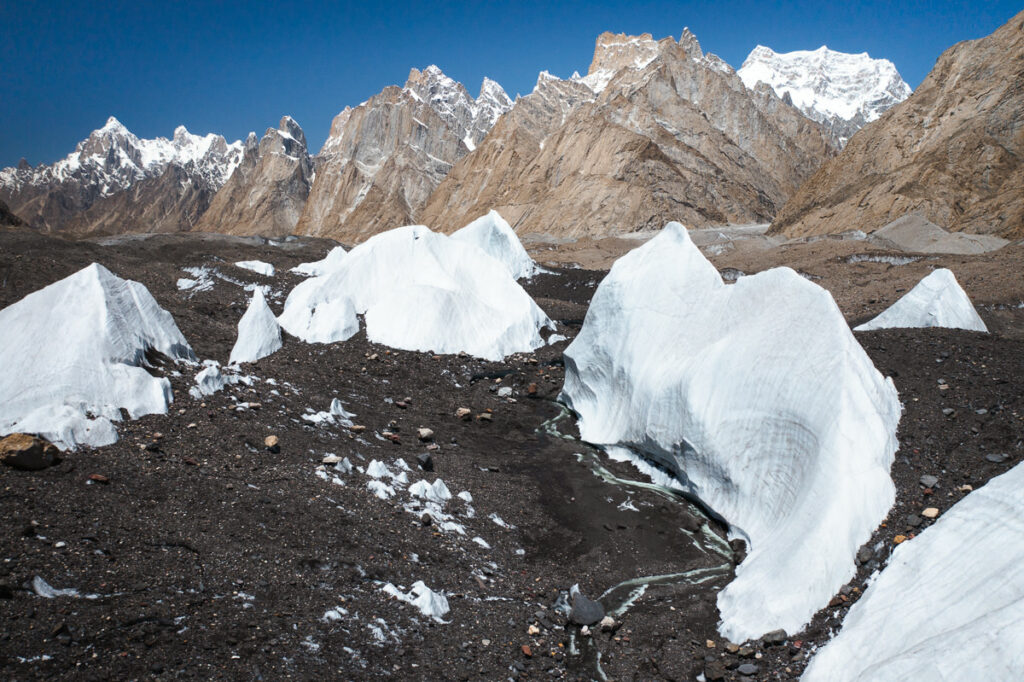
- Traversed a glacier for the first time in the trek while following the porters, which was incredible.
- A short 6km hike had us at camp by mid-morning and a full day to relax.
- The shower with a view of Trango and Cathedral was probably the best shower view of my life and very refreshing in the midday sun.
- Sitting around camp without a shirt in the sun while at 4,100m was Heaven.
- Sunset atop the rocks above camp was beautiful with the sun dipping below Lobsang Spire to finish the day.

Day 4: Urdukas – Goro 2 (4,250m)
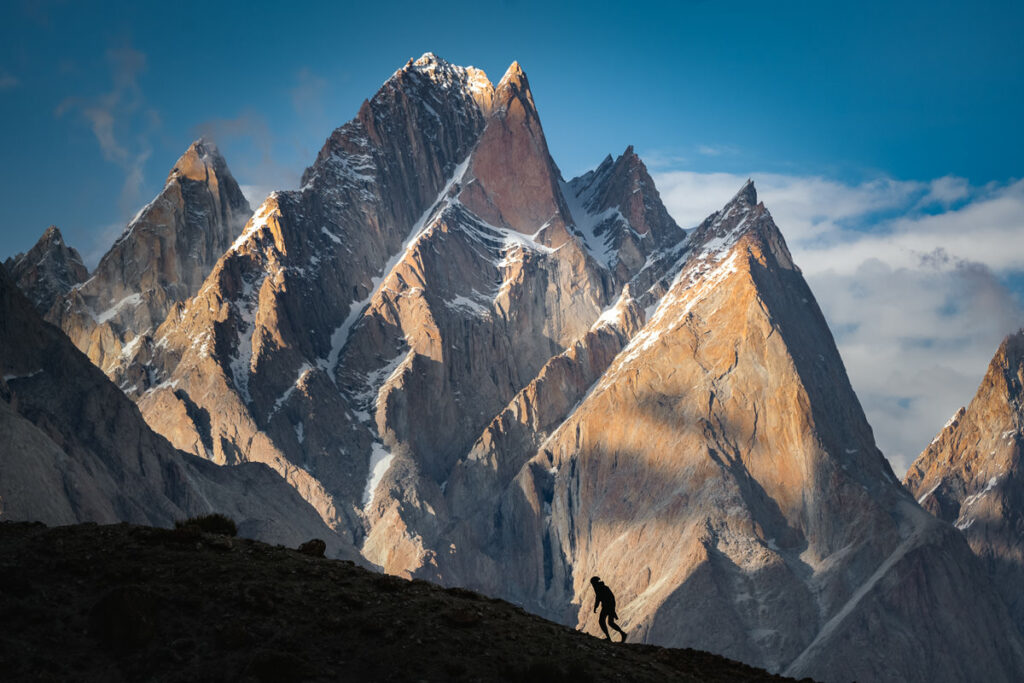
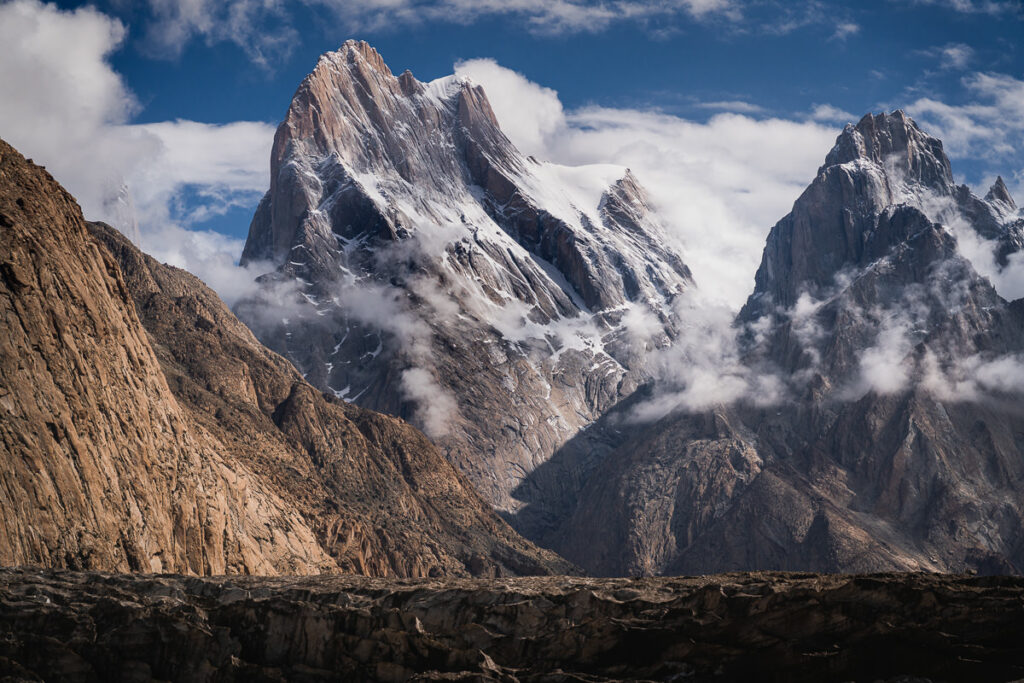
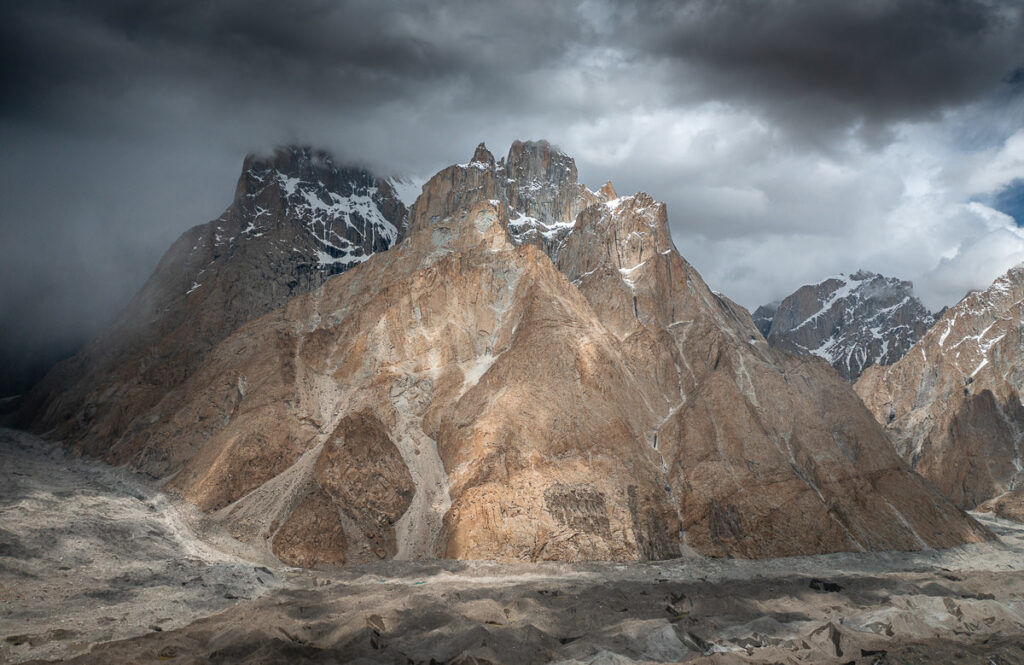
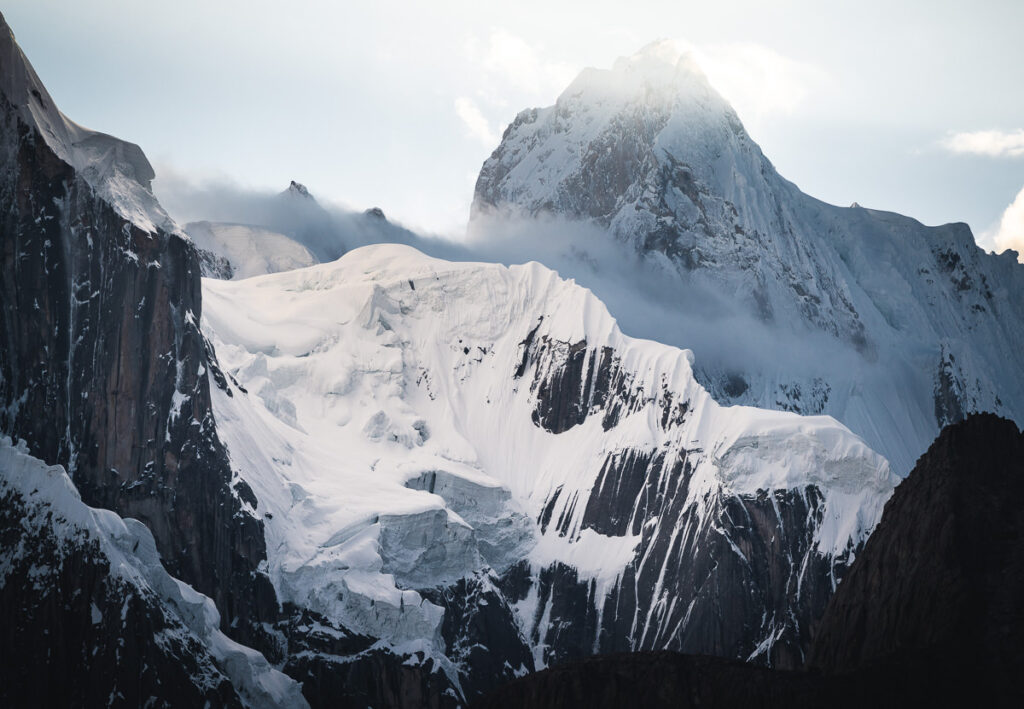
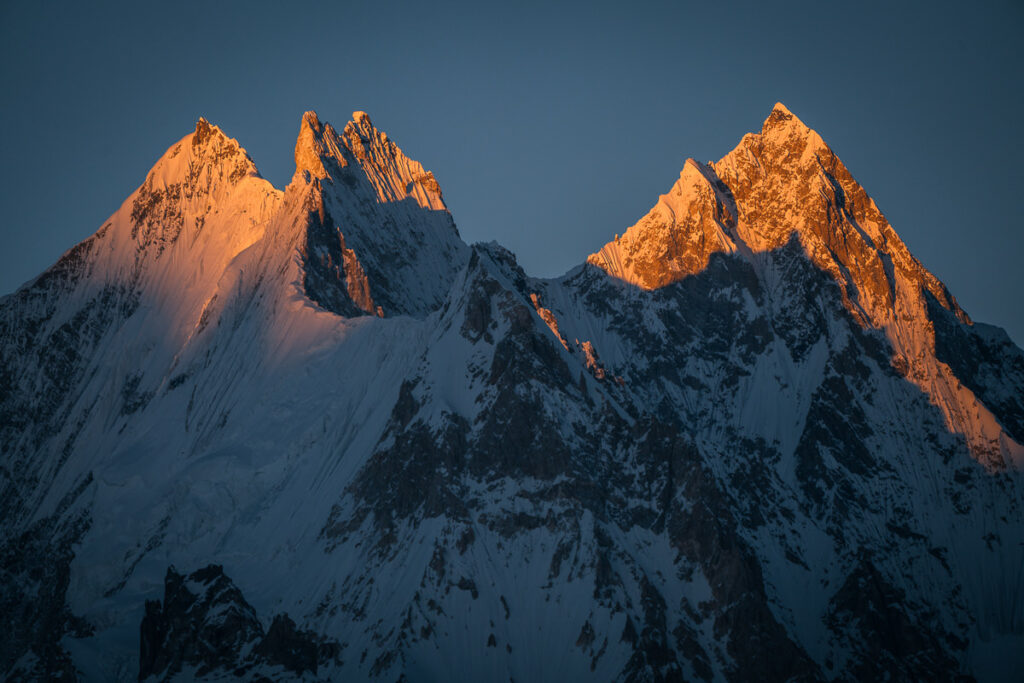
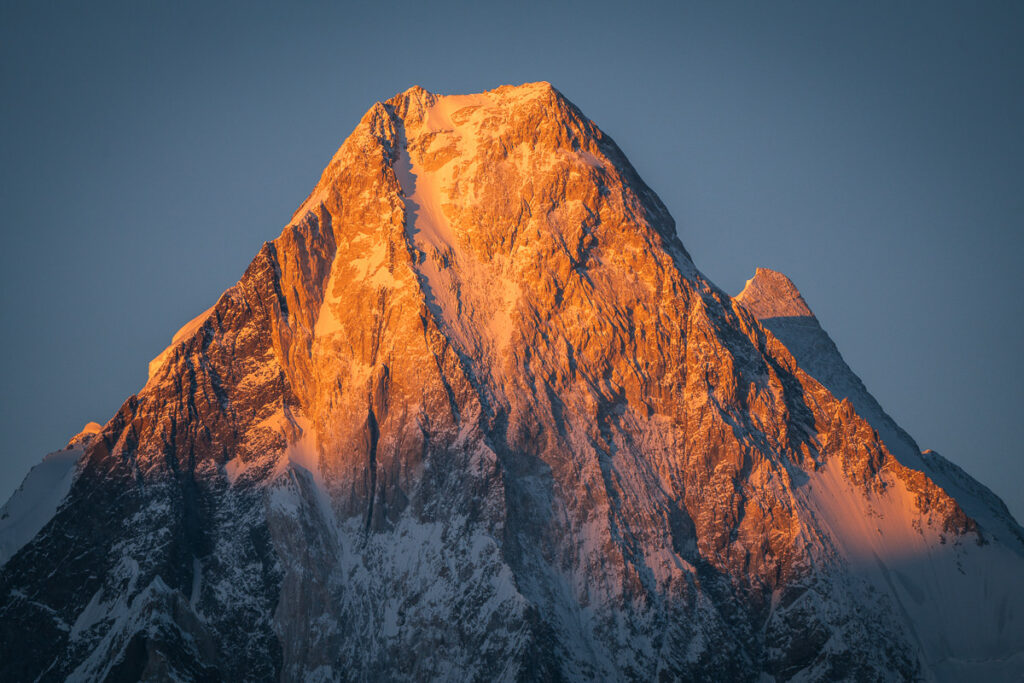
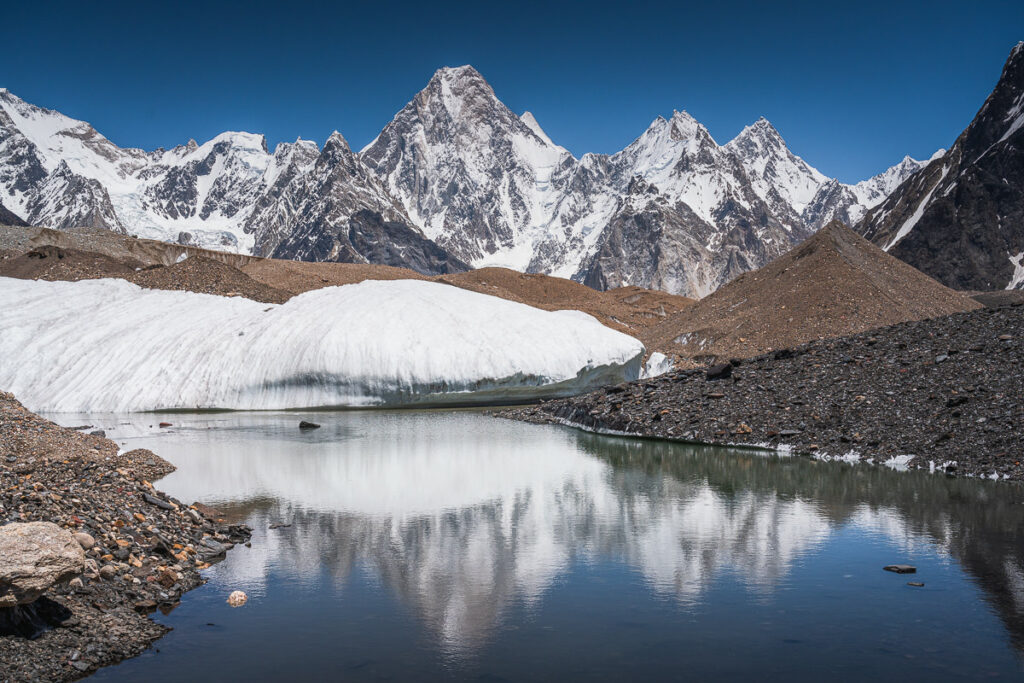
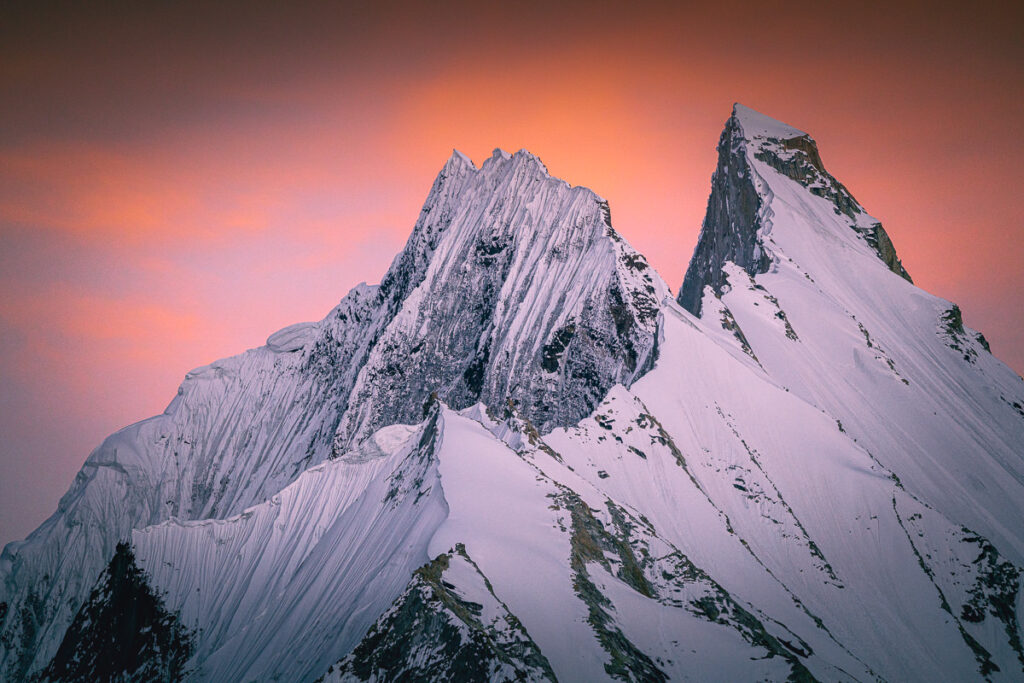
Trail report: 5 – 8 hours of moderate difficulty up and down glacier terrain. Today you will be starting to feel the altitude. Lunch stop at Goro 1. Temperatures can drop below zero at night at Goro 2. Spectacular views along the trail of Masherbrum, Gasherbrum IV, and the summit of Broad Peak can be seen from just outside your tent.
- Surrounded by 8000m peaks as we weaved through the rock-laden glacier.
- Views of Broad Peak, Masherbrum, Gasherbrum IIII highlighted the trek.
- Showered on ice with water so cold it was only a few degrees from ice itself.
- Sunset with Alpenglow on the 8000m peaks around us was incredibly special.
- Fell into a glacier river and soaked myself up to my neck. Luckily camera gear survived.
What are my favorite pieces of trekking gear?
There are six pieces of gear that I simply never forget when I go trekking. These are five items that I using right now and this list gets updated every year! Here are my trekking essentials.
- Arcteryx BETA AR Rain Jacket: This is my go-to rain jacket. It’s super light, folds down into a tiny ball, and protects brilliantly in a storm. This one never leaves my backpack.
- Salomon X Ultra 3 Mid GTX Hiking Boots: For the best ankle support, waterproofing, and durable exterior I’m a fan of tough but light hiking boots like these Salomons for my adventures.
- Black Diamond Head Torch: I can’t tell you how many times, I’ve arrived back from a hike unexpectedly late. I always keep this lightweight but strong headtorch in my bag for the unexpected.
- Darn Tough Socks: These are the most comfortable hiking socks I’ve ever worn and last for years. They also have a lifetime warranty and you just send them in with a hole and they replace it no questions asked.
- Osprey Atmos AG 65L Backpack: I’ve never had a more comfortable 65L pack than this one. I got it in the Navy Blue and have trekked with it through many a mountain.
- Black Diamond Trekking Poles: They might feel weird at first, but on a long trek with incline and decline you’ll begin to love these.
- Grayl GeoPress Water Filter Bottle: I’ve used this for three years. It filters your water with one press and you can drink directly from it. Never buy a plastic water bottle again!

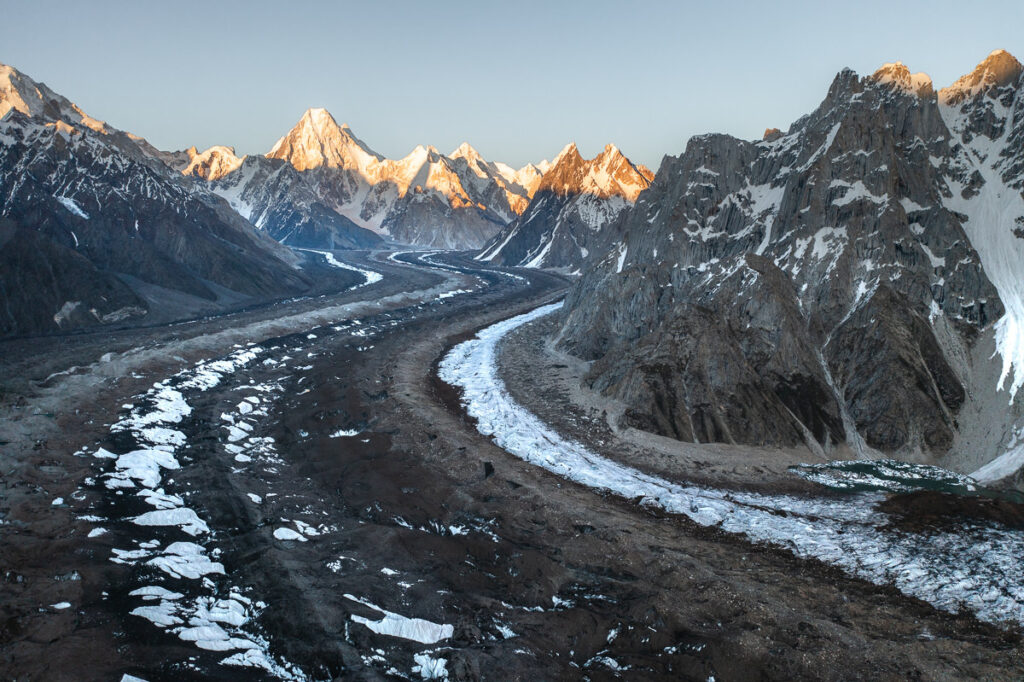
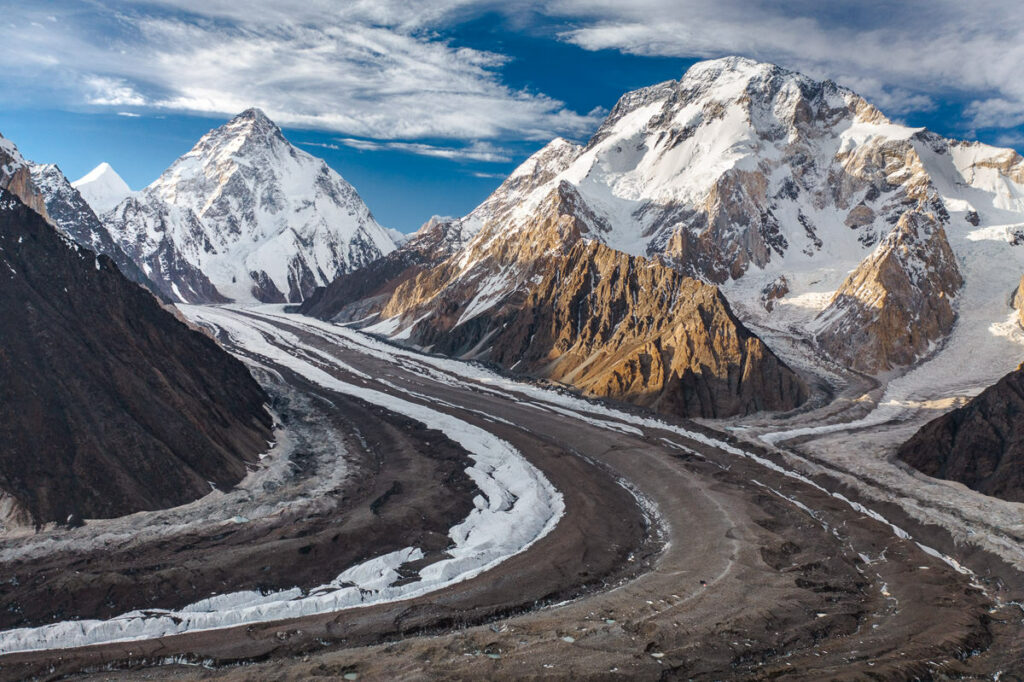
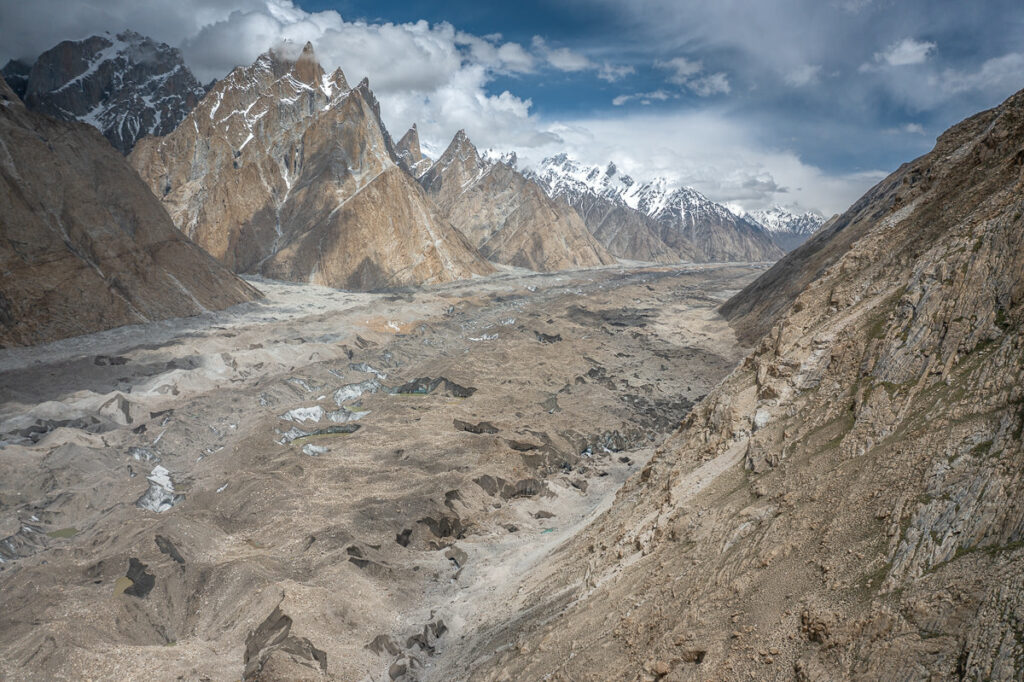
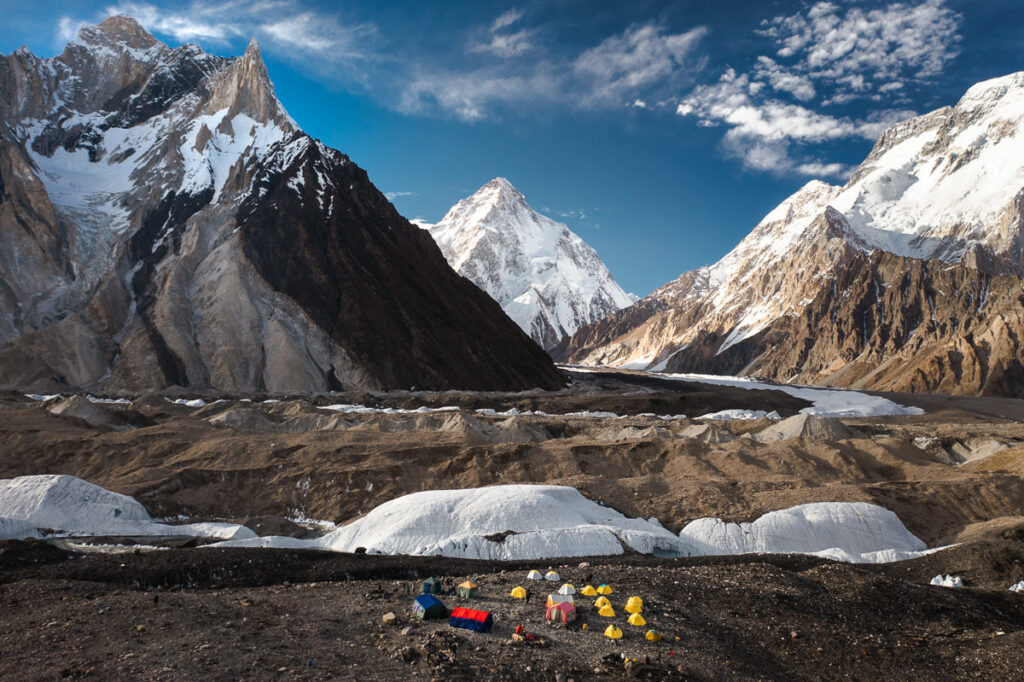
Day 5: Goro 2 – Concordia (4,600m)
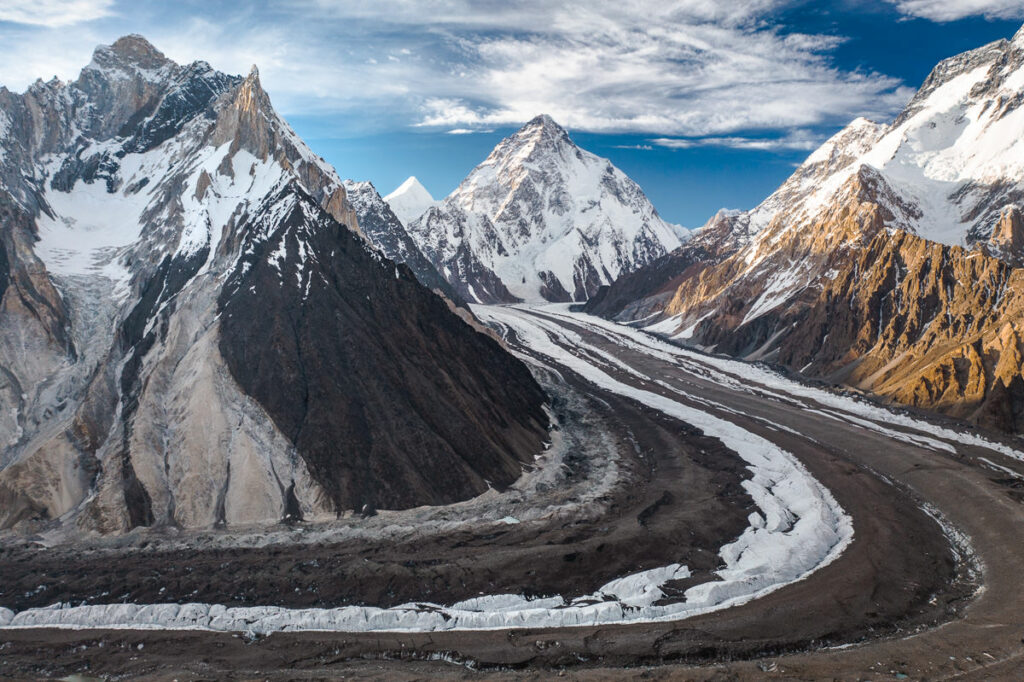
Trail report: Today we reach the “Throne Room of the Gods”, aka Concordia. 5-7 hours of pleasant trekking over the glacier, with more ice present than previous days. Amazing views of Gasherbrum IV, Mitre Peak, Broad Peak, Marble Peak, and of course, K2 can be seen from camp! Temperatures at Concordia drop well below freezing at night and snow/snowfall is possible here any time of the year. After a great dinner and solid rest, tomorrow we head to K2 Base Camp!
- Began the morning walking through the field of giants with massive glaciers surrounding my path.
- A rocky, undulating journey to Concordia in a piercing sun with no shade all day made this day pretty tough.
- Massive peaks surrounded us and seemed to be getting closer.
- Concordia is an intersection of glaciers with views of K2, Broad Peak, Mitre Peak, Gasherbrum IIII and many more. An incredible sunset lit up the clouds behind all of the peaks for a once in a lifetime view.
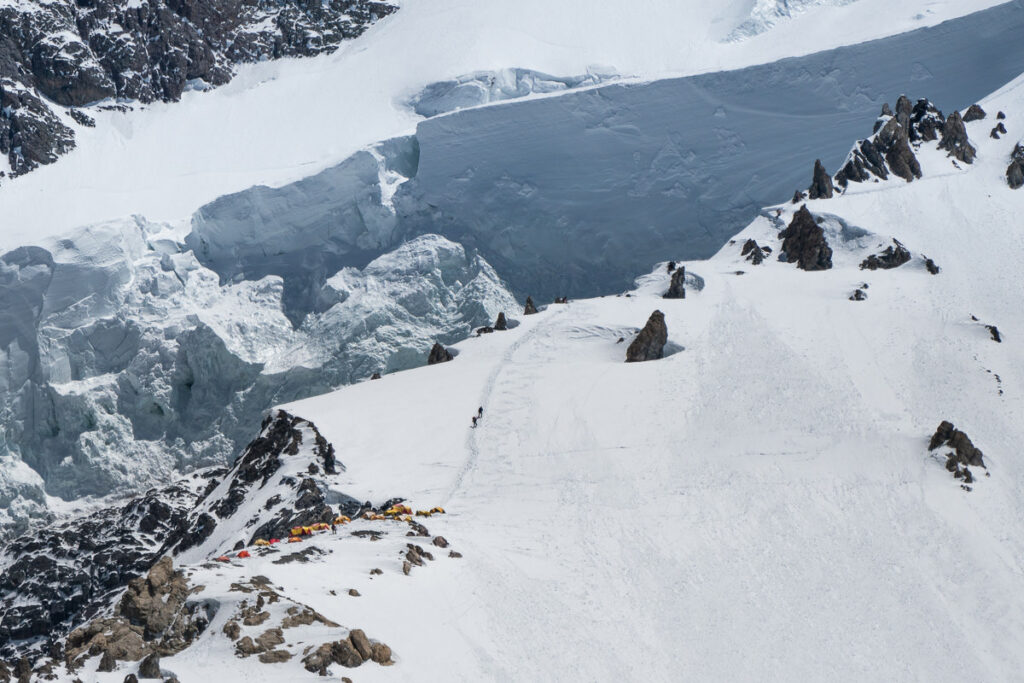
- With binoculars we could spot 14 tents at camp four on K2, which put the worlds second highest mountain into perspective.
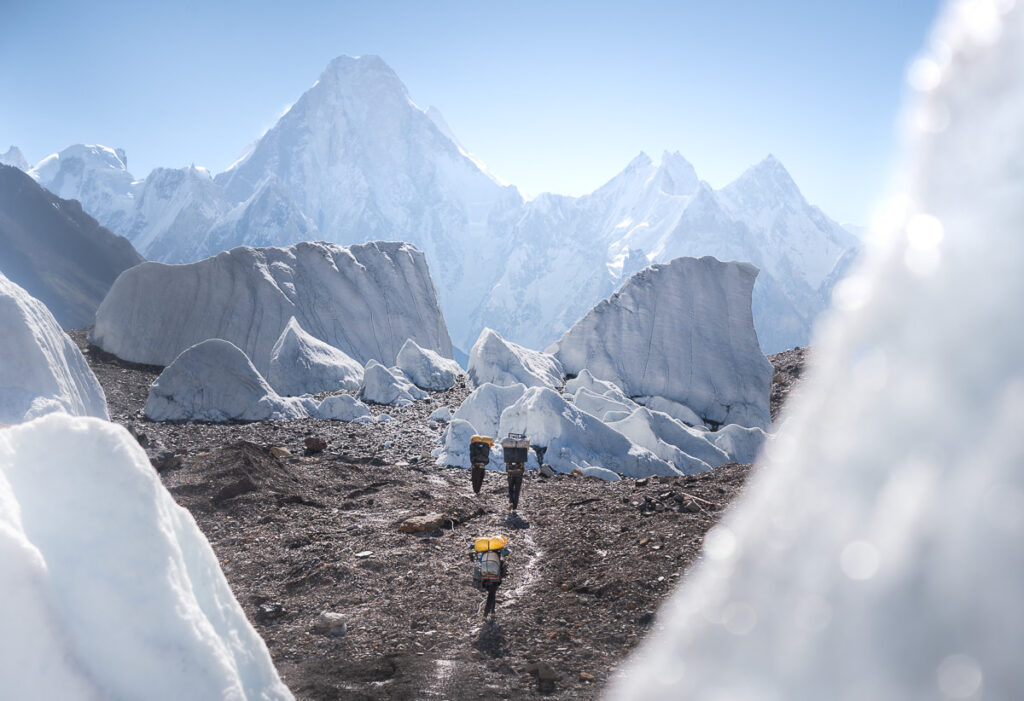


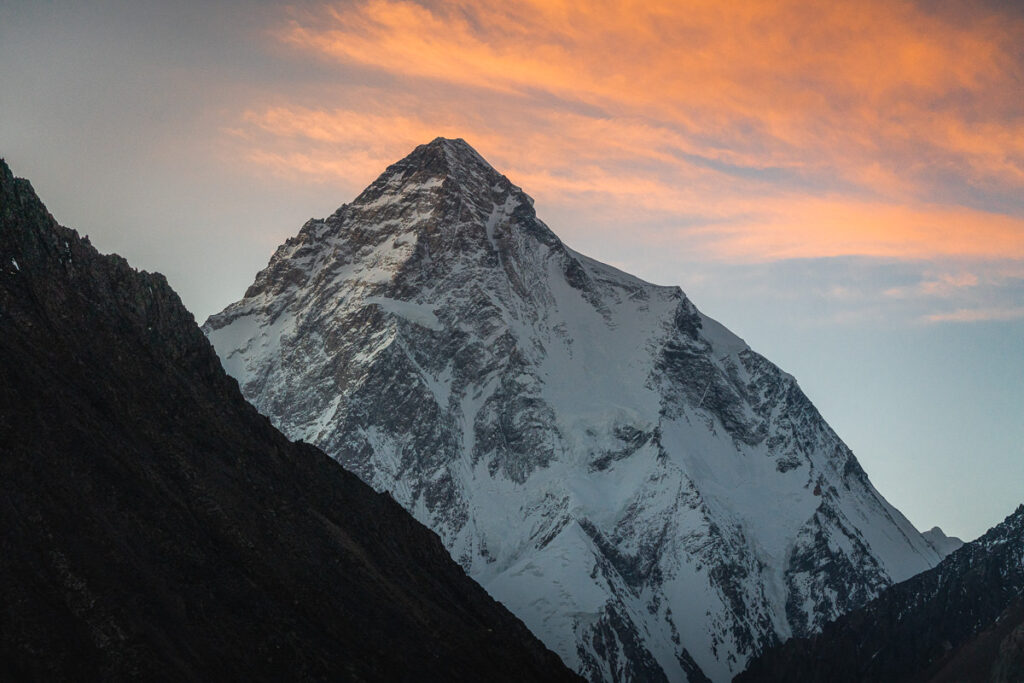

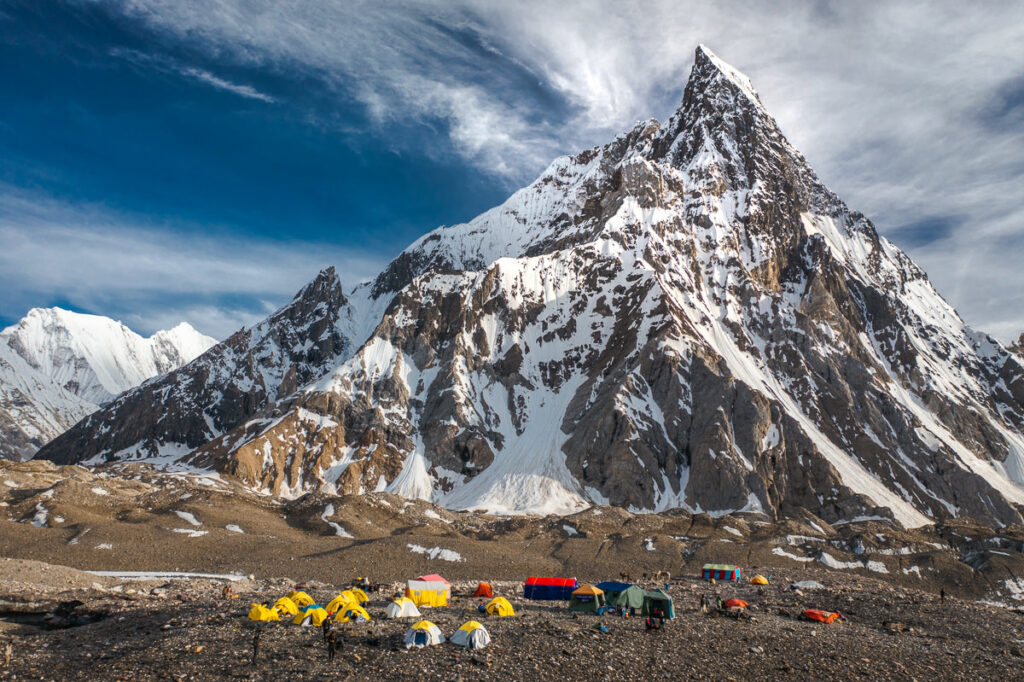
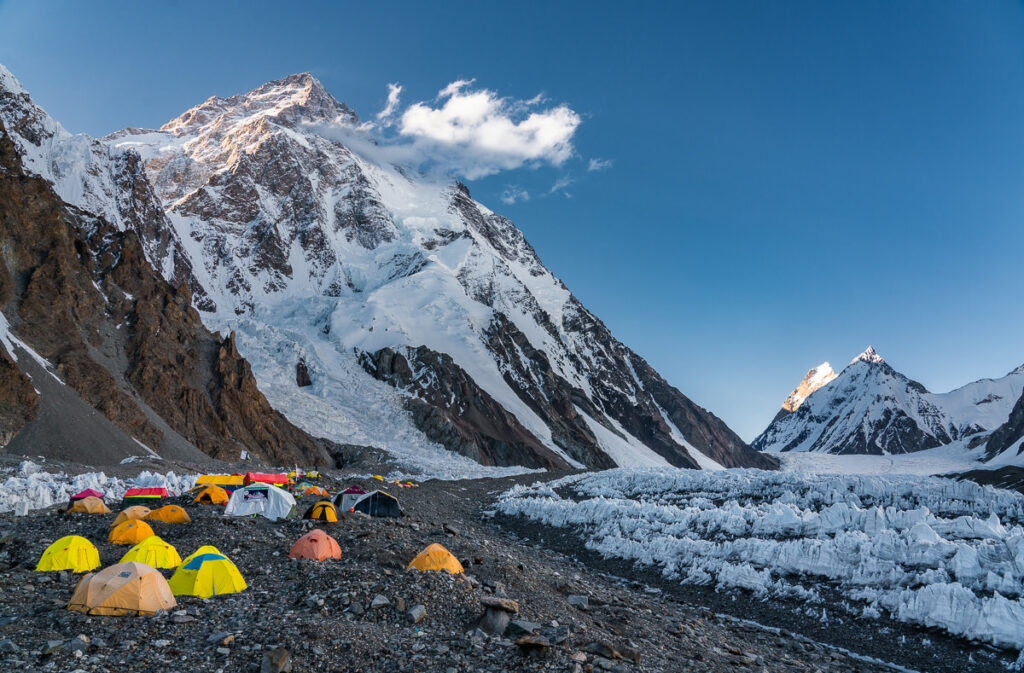
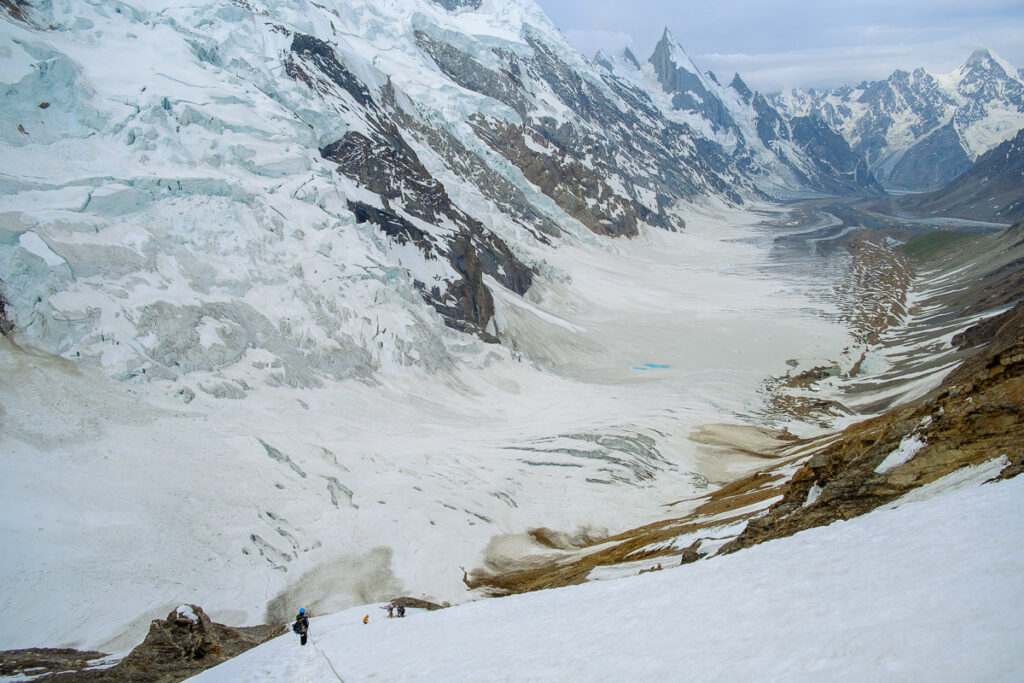
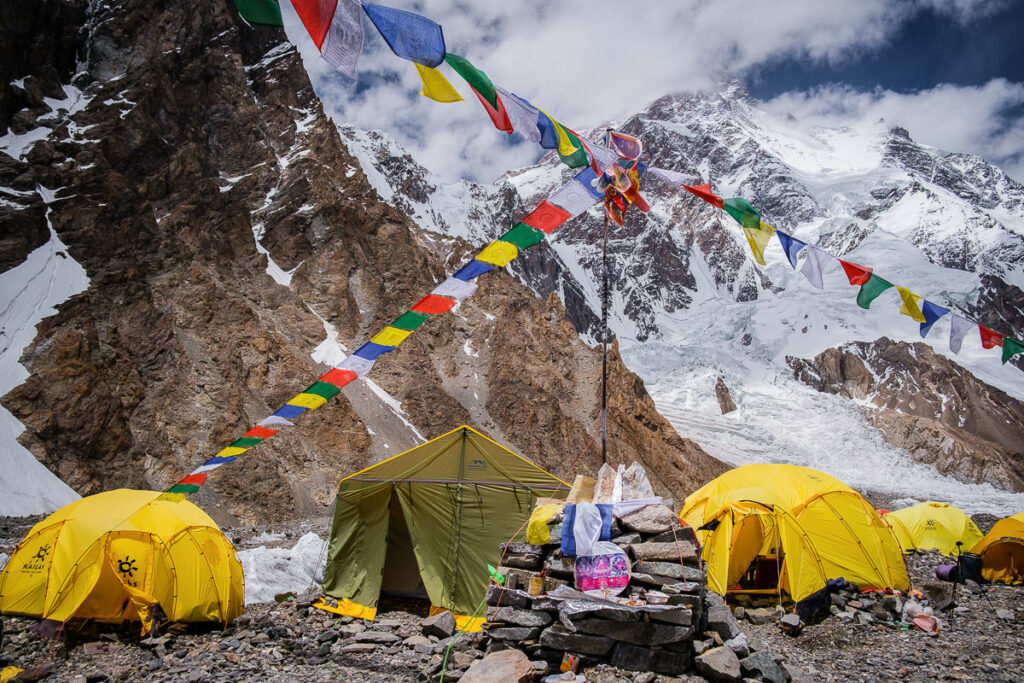
Day 6: Concordia – K2 Base Camp (5000m)
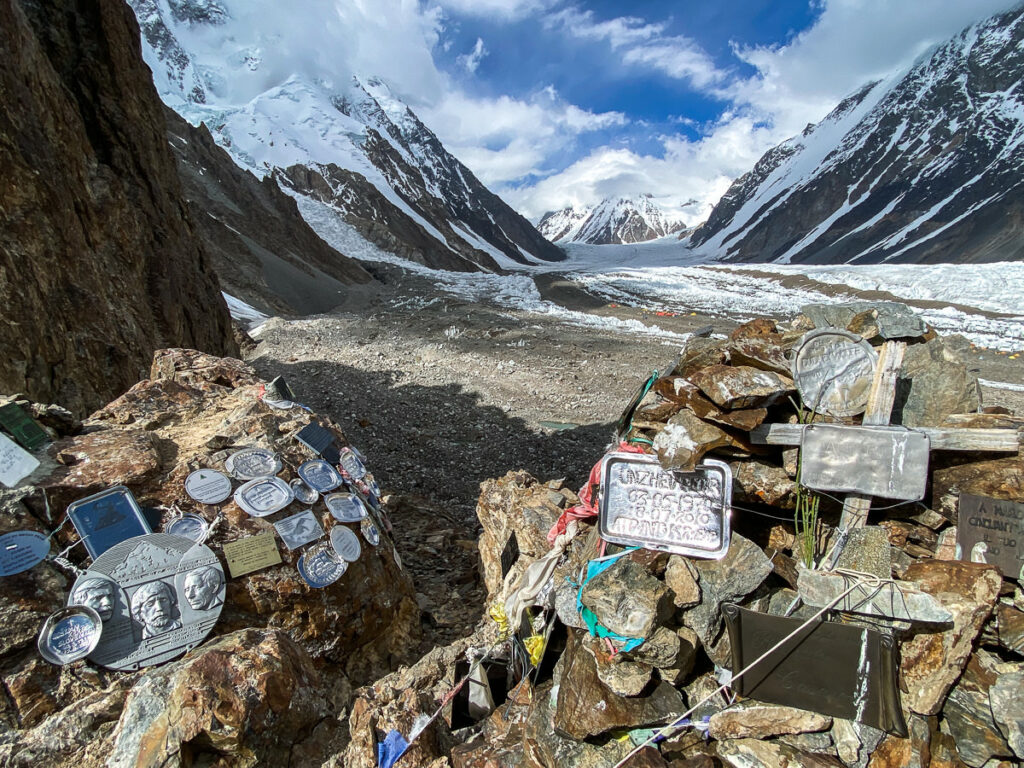
Early start to K2 Basecamp. The total trekking distance to Concordia is roughly 14 km. We will visit the Art Gilkey Memorial and then head to K2 Base Camp for tea and to chit-chat with expedition teams hoping for a successful summit bid. The terrain is relatively easy. Most of the route follows the Austen-Godwin glacier directly to the base of mighty K2.
- A 13km hike down the gauntlet with relentless sun beating down on us. Reaching 5000m at K2 Basecamp was a great achievement at the midway point of the trek. The rocky path didn’t allow a moments rest for the feet or mind with absolute focus required.
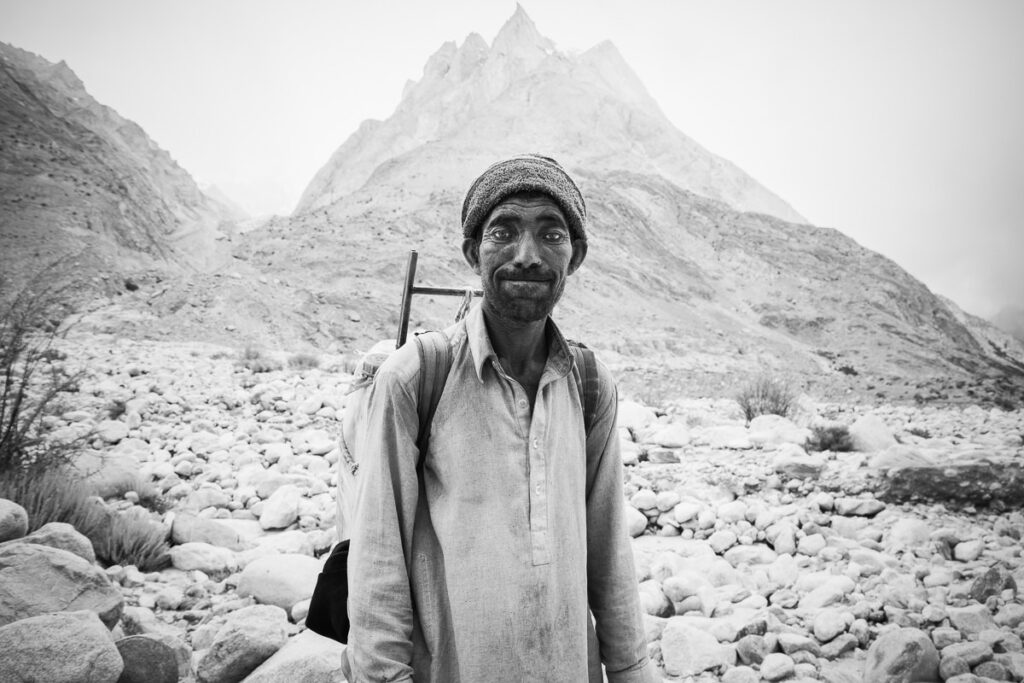
- Seeing the porters carry 35kg each without the mules and then start cooking and setting up camp as soon as we arrived was beyond humbling. These guys are on another level and tough as nails.
- The basecamp of K2 has an incredible vibe due to the precarious and deadly nature of the climb. It’s a quiet atmosphere where little needs to be said about the task at hand for the climbers on the mountain.
- Soup and a great meal sat inside the mess tent capped off a great day and marked the middle of our journey.
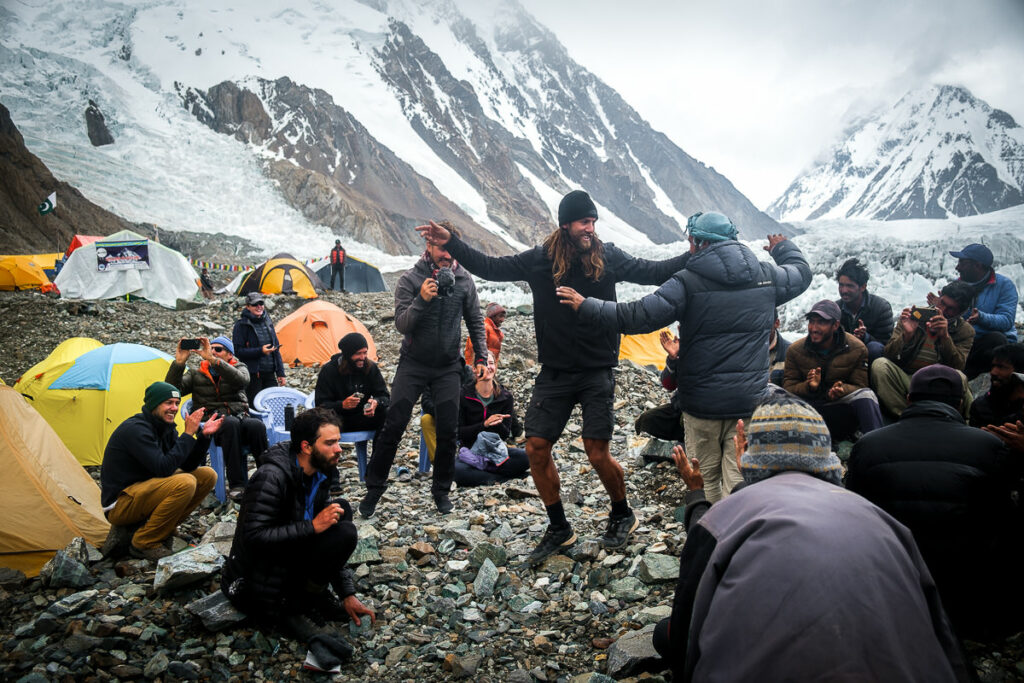
Day 7: Rest day at K2 Base Camp
- A rest day at K2 base camp. All of the climbers came down due to bad weather so was awesome to see them coming back into camp.
- Spent the morning singing songs and dancing with the porters from all of the different camps who seem to be drawn to our campsite.
- Visited the memorial, where many climbers from around the world are honored upon the rocky perch above base camp. It’s a powerful and moving memorial for climbers who haven’t made it out alive from the ‘Savage Mountain’.
- Cards and Balti lessons in the porter tents made the time pass by and the body enjoyed the rest day immensely.
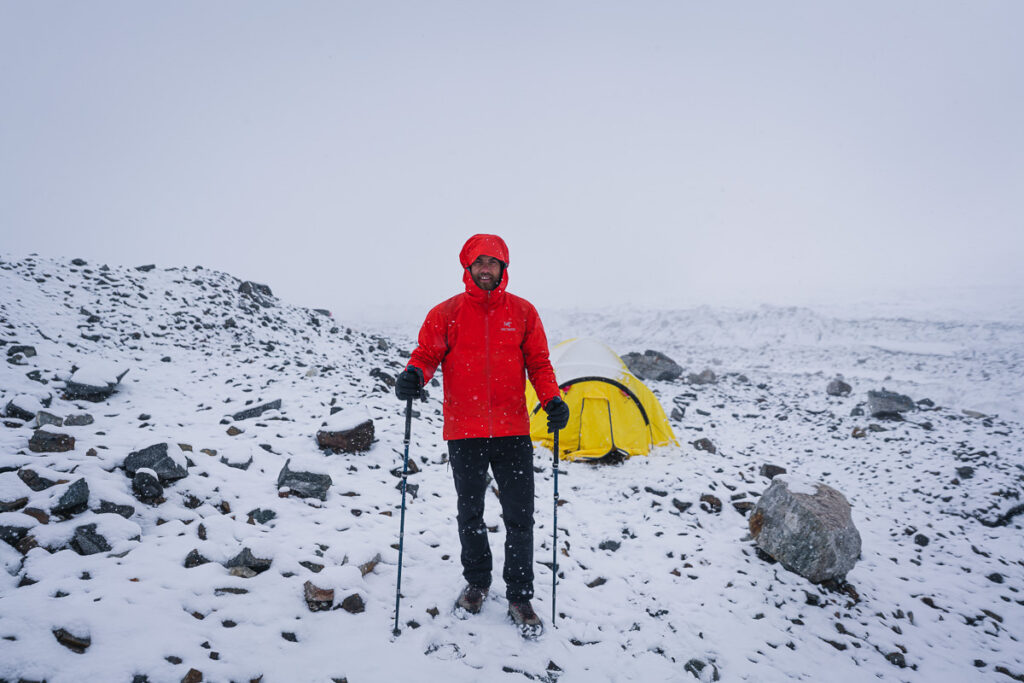
Day 8: K2 Basecamp to Concordia
- Woke up to snow covering my tent and the entire K2 basecamp, which looked like a winter wonderland despite being the middle of summer.
- Harsh trek back to Concordia in snow, rain and hail amidst white-out conditions.
- Dried out our clothes all day in the main tent heated by a gas oven cooker.

Day 9: Rest day at Concordia
Due to heavy snowfall, we decided to head back down the Baltoro Glacier rather than the challenging Gondogoro Pass due to avalanche risk. This was disappointing but it’s the nature of trekking in what can be some very dangerous mountains.
- Rest day at Concordia watching clouds, rain, sun, snow, hail and wind come and go
- Decided not to trek the pass due to avalanche risk and will trek back to Jhula camp over the next three days.
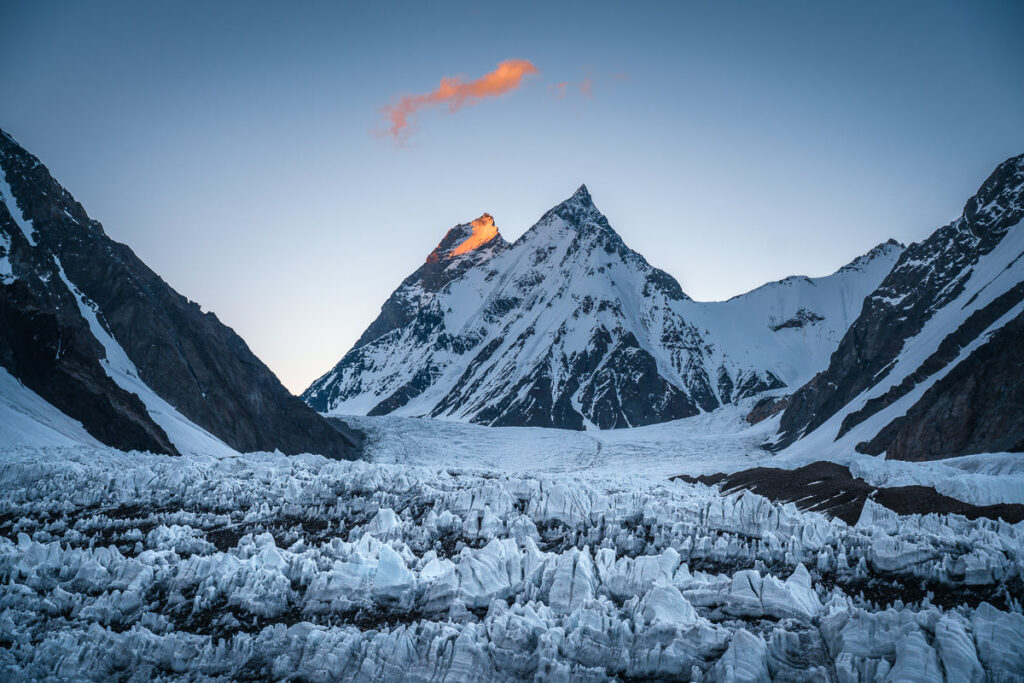
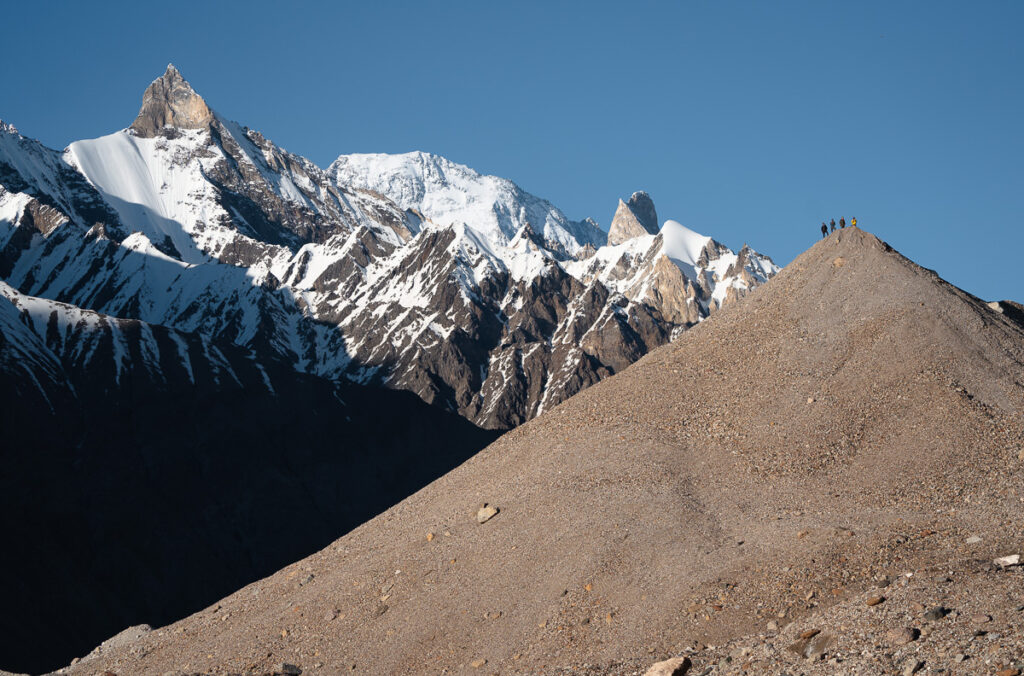
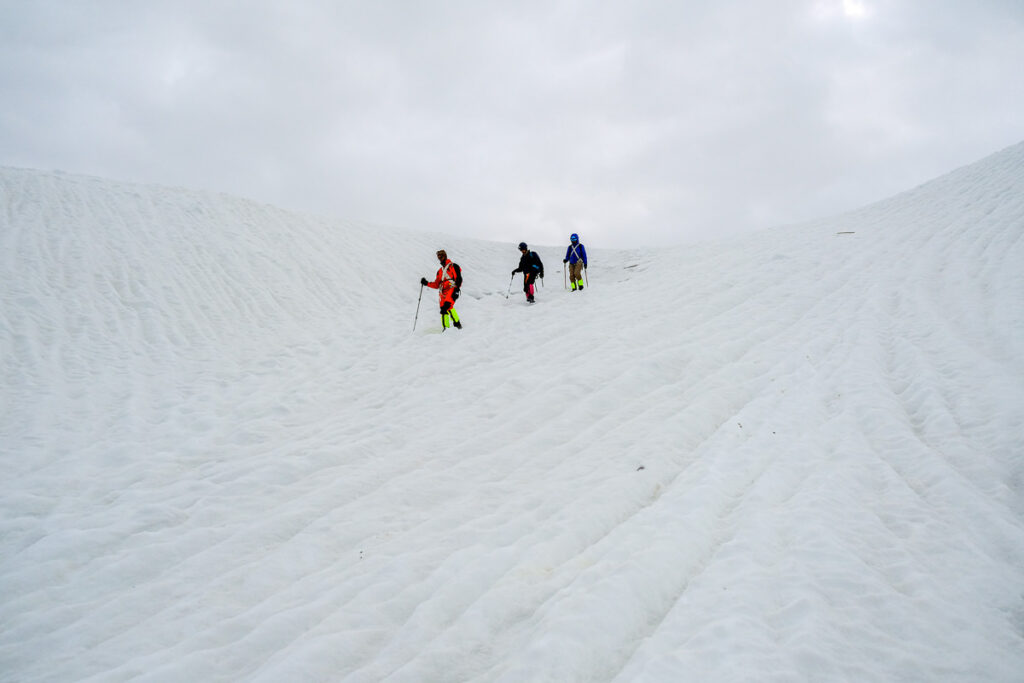
GONDOGORO PASS
As I mentioned, our group wasn’t able to adventure to the Gondogoro Pass due to the heavy snow, which caused an avalanche risk. However, I will detail what to expect on the pass as it is quite an amazing part of the trek and is usually possible. I’ve included some photos taken by our guide Chris Lininger from his previous trip so you have an idea of what to expect.
Gondogoro Pass Day: Ali Camp – Gondogoro La Pass (5,600m) – Kuisbang (4,700m)
Trail notes 10-12 hours of trekking. The group will set off in the dark by headlamp around midnight. From Ali Camp, it is 4-5 hours of steady climbing to gain the top of the Gondogoro La pass.
Once atop the La, the group can enjoy stunning sunrise views of every major peak in the area. The descent from Gondogoro La into the valley below is done with the assistance of a series of fixed ropes. Extreme care needs to be taken on the descent (helmets will be worn) and all guests will be clipped into the rope from their climbing harness. Microspikes should be carried for the descent, but are rarely needed as the slope is a mix of rock and deep snow (not so much ice).
Trekking from the top of the pass to Kuisbang Camp takes about five hours. If the weather is clear, the group will be treated to incredible views from our camp of Laila Peak, located just down the valley before taking a well-earned rest at Kuisbang Camp.
K2 BASECAMP PACKING LIST
I pack pretty light and managed to wash most of my clothes each afternoon/night for the first half of the trip. In the latter stages of the trip, it was pretty cold so we weren’t sweating as much and we wore our warm gear basically nonstop. During the day it was incredibly hot and then very cold at night so you need a good spread of warm weather gear and cold weather gear. Our porter allowance was 12kg and the rest we needed to carry during the day such as personal items, cameras, and rainjackets.
Clothes
- 1 pair of pants that maybe convert to shorts
- 1 pair of shorts
- 1 Warm or thicker pair of hiking pants
- 1 Long sleeve quick-dry shirt
- 1 Long-sleeve thermal shirt
- 2 Short-sleeve t-shirts
- 1 Thermal long underwear
- 4 pairs of quick-dry underwear
- 1 Lightweight down jacket
- 1 Heavy-duty summit down jacket
- 1 Beanie
- 1 Cap
- Sunglasses
- 1 Neck Buff
- Gloves
- Hiking boots
- Microspikes
- Headtorch
- Helmet
- Harness
- Gaiters
- 1 pair of warm summit socks
- 3 pairs of regular socks
- Sunscreen
- Trekking poles
- Water filter
- Powerbank
- Camera
My camera gear included a DJI Mavic Pro 2 drone, 100-400mm, Mirrorless body, 16-35mm lens, 24-105mm lens, GoPro Max, Sony RX100, and a tripod. I used a 40L camera bag and my porter had my 12kg duffel. For a full list of the gear, I use you can check out my article about the ‘What’s in my Camera Backpack‘ article.
I hope this was a helpful article for you while planning our K2 Basecamp Trek. It’s truly an unbelievable hike and I hope you have an amazing time exploring the Karakoram Range.
Ewout
Thursday 21st of December 2023
Excellent Blog! No problem with drone at airport / Pakistan?
Indri
Friday 8th of September 2023
Amazing write-up. Thank you so much Jackson. Going there in Summer 2024.
neat
Wednesday 6th of September 2023
Great Review of Gondogoro La. I have written about it too https://how2havefun.com/travel/trip-k-2-base-camp
I can't find a single picture of the climb to Gondogoro La. I guess everyone is so exhausted and it is too early in the morning to get a clear shot
Ivona
Thursday 6th of July 2023
Thank you so much for your article. Im setting out there in 2 days and was feeling quite uneasy watching films on YouTube etc. Your report made me enjoy the adventure again, so balanced and really encouraging. I believe I can do it now!
Iqbal Askole
Friday 9th of June 2023
thanks for your write very useful.
Jackson
Sunday 18th of June 2023
Thankyou